-
Get started with TestFlight
Discover how you can use TestFlight to improve your app experience and ready it for release on the App Store. We'll take you through an overview of TestFlightincluding how to invite testers and provide information to them about testing. We'll also provide best practices for receiving feedback and explore how you can get the most out of the testing process.
Resources
Related Videos
WWDC23
WWDC21
-
Search this video…
Welcome to Get started with TestFlight. I'm Aneesha and I work on the App Store Product Management Team. I'm joined by my colleague Jerome on the Developer Tools Product Management Team. We're excited to share more about TestFlight in this presentation. For today's agendawe will start with a brief overview of the importance of testing and an introduction to TestFlight. And then we'll share how to use TestFlight including how to distribute buildsadd testersand view feedback. So let's dive in.
Testing is essential to creating high quality app experiences. It's the process that allows your team to iterate on code and incorporate feedback so you can deliver great apps and experiences to your customers on the App Store.
The App Store is available in over 170 regions on more than 1.5 billion devices and in over 40 languages.
That's a huge opportunity for people to discover your app and that's also a ton of different people with different deviceslanguagesand accessibility needs.
By testing your appyou can make sure you're providing a great experience for App Store users around the world.
And to support your testing effortsApple offers an expansive set of tools to help you test your apps for. For exampleyou can use Xcode to write unit and UI tests with XCTest and then use Xcode Cloud to automate testing after each code change. You can manually test your code on different devices and OSs with Simulator and use Instruments to performance test your app.
Today we're gonna do a deep dive on TestFlight.
TestFlight is Apple's tool to help you gather feedback from real people in a privacy friendly way so you can create world class apps and games that people on the App Store will love. With TestFlightyou can get feedback even before your app is live on the App Store and use this information to update your app accordingly.
TestFlight is included as part of your Apple Developer Program membership and is one of the most popular developer tools that we offer. TestFlight allows you to distribute your app across all Apple platforms and has been purpose built to optimize the testing experience.
At a high levelTestFlight allows you to upload your app's buildadd testersand get feedback on an ongoing basis. This helps you quickly and easily get tester feedback to inform your decisions and develop world class apps and games to publish on the App Store. Nextlet's walk through an example of how to use TestFlight in more detail. Jerome is gonna get us started.
Let's talk about using TestFlight. And to illustrate thislet's imagine we're preparing our new Food Truck app for release on the App Store for the first time.
To get startedwe'll first need to upload our build and get it ready for testing.
There are three main steps around uploading a build that we are going to cover; uploading to App Store Connectadding test details and adding test information.
We'll first upload to App Store Connect using Xcode. So let's open Xcode and create an archive of our app in order to prepare it for distribution. To do thatwe'll first select the architecture we want to build our app for. Hereany iOS device arm64 and select Archive from the product top menu.
We'll then select the app and the build version we want to send to TestFlight and click the distribute app button on the right.
For TestFlight buildwe'll select App Store Connect as a distribution method so we can share the build with both internal and external testers.
We'll share more information about the types of testers later so for nowlet's click Next. We'll select Upload to automatically send our build to App Store Connect.
Before it can be uploadedclick Next to Xcode create an app record for us.
We are almost done submitting our buildjust a few more clicks. We recommend including symbol files when uploading your app so that App Store can add symbol names to crash reports before delivering them to the Crashes Organizer in Xcode.
We'll also select Manage Version and Build Number so the distribution assistant in Xcode can detect whether our app has a valid build number.
If our app has an invalid numberlike one we previously usedthe assistant will give us the options to automatically increment it to a valid number.
By defaultAutomatically Manage Signing will be selected. Xcode can manage our profiles and certificates for us which is great.
And after we finish thisXcode uploads our build to App Store Connect.
Once our app is uploadedit's now ready to be tested using TestFlight.
When using Xcode to upload your buildhere's a few best practices to keep in mind.
Be sure to set your distribution method to App Store Connect in order to use TestFlight.
Be mindful of version and build number. When you upload a new buildyou always have to specify a build string with a number greater than the previous build.
Be sure your certificates and profiles are up to date. This is a common reason for upload issues. One easy way to ensure the information is correct is to let Xcode manage signing for you. We have two more things we need to do to get our build ready for testing. Aneesha will share how we add test information and how we get started testing.
To add test detailswe'll first go to App Store Connect to view our build.
To access TestFlightwe'll open our App Store Connect app page and click on the TestFlight section at the top.
You can also access TestFlight through the App Store Connect mobile app in the TestFlight section of your app page.
Now we see our uploaded build in the TestFlight section of the Food Truck app. All builds uploaded to TestFlight are active for 90 days before they expire.
If you wanna keep testing beyond 90 dayssimply upload an additional build.
Here you'll see the details of our newly uploaded build including its status and when it expires. We are going to click on the build to add our test details.
Adding test details helps our testers know what to pay attention to when they test our app which helps us get more valuable feedback.
Let's go ahead and add some in for this build.
This is our first time releasing this app so let's mention that.
And we also just started allowing users to change the design of the Food Truck so let's mention that in our test details too.
Filling out test details specific to your build is important because it is the first thing testers see when they go to test your app. Looks goodnow we hit Save.
Here are some best practices to keep in mind as you add test details.
Update your test details on a per build basis. Since test details are associated with a buildthis is your opportunity to tell testers how they can provide you with meaningful feedback.
When coming up with test detailswe recommend keeping it simple. You might try using short sentences or bullets to make it readable and draw in potential testers. You should also call out any particular features to test or any known issues to be aware of. This helps testers understand what they should explore and allows them to focus their efforts.
One last thingbefore we share our build with testerswe need to add test information for our app.
To do thatwe'll click on the Test Information section under General Information.
We will need to add our beta app description and an email address. The beta app description will be visible to a tester from the TestFlight app and any tester feedback sent via email will go to the feedback email address we enter here.
And while not required nowwe will need to fill out the beta app review information section before we can distribute our app to external testers. We only have to update the test information page one time per app and again if the information changes.
And with thatour build is ready to start testing.
With our build uploaded and configured for testingnow we can add testers.
You can add two types of testers to TestFlightinternal and external. Since our app is still fairly newlet's start by getting feedback from a few people within our team.
We'll add them to our app as internal testers.
Let's learn a little bit more about internal testers. Internal testers are part of your App Store Connect team and you can designate up to 100 team members as internal testers for your app.
Each internal tester can install builds and test them on up to 30 devices and since these testers are part of your teamyou can choose to automatically distribute all new builds to them.
To add internal testerswe'll first need to create an internal group. To do thatwe'll go to the TestFlight section in App Store Connect and click the plus button next to Internal Testing to create a new internal testing group.
Groups are a powerful tool because they allow us to create repeatable testing processes. We'll add a group name and keep the Enable Automatic Distribution button checked and then click Create.
Now we have an internal group. Since we selected Enable Automatic Distributionour build has already been added to this group. Moving forwardthis internal group will automatically get access to all builds we upload without having to add them one by one. With our group creatednow we have to add testers so let's click on the blue plus button next to Testers to see who we can add.
All of our App Store Connect team members with the roles of adminapp managerdeveloper or marketing will appear here as testers we can add. We can add up to 100 total internal testers per app. Let's select JeromeMelissa and myself and add us to this group.
Now we are testers for our internal group. In the status columnyou'll see that we've been invited.
After I add testersthey'll receive an email invite to test our Food Truck app. The email includes a link to view our app in TestFlight.
When a tester opens the TestFlight app to accept the invitation and install the Food Truck appthe first thing they see is the What to Test section.
This section includes the test details we have added when setting up our build. So even before our app is installedwe've had an opportunity to help testers understand how to provide valuable feedback. Testers can also view more details about the app. For examplethe beta app description that we added in the test information section of TestFlight.
Once Jerome and Melissa get our invite and install the Food Truck appwe have our first testers.
With our app in the hands of some testersnow is a good time to see how feedback works in TestFlight.
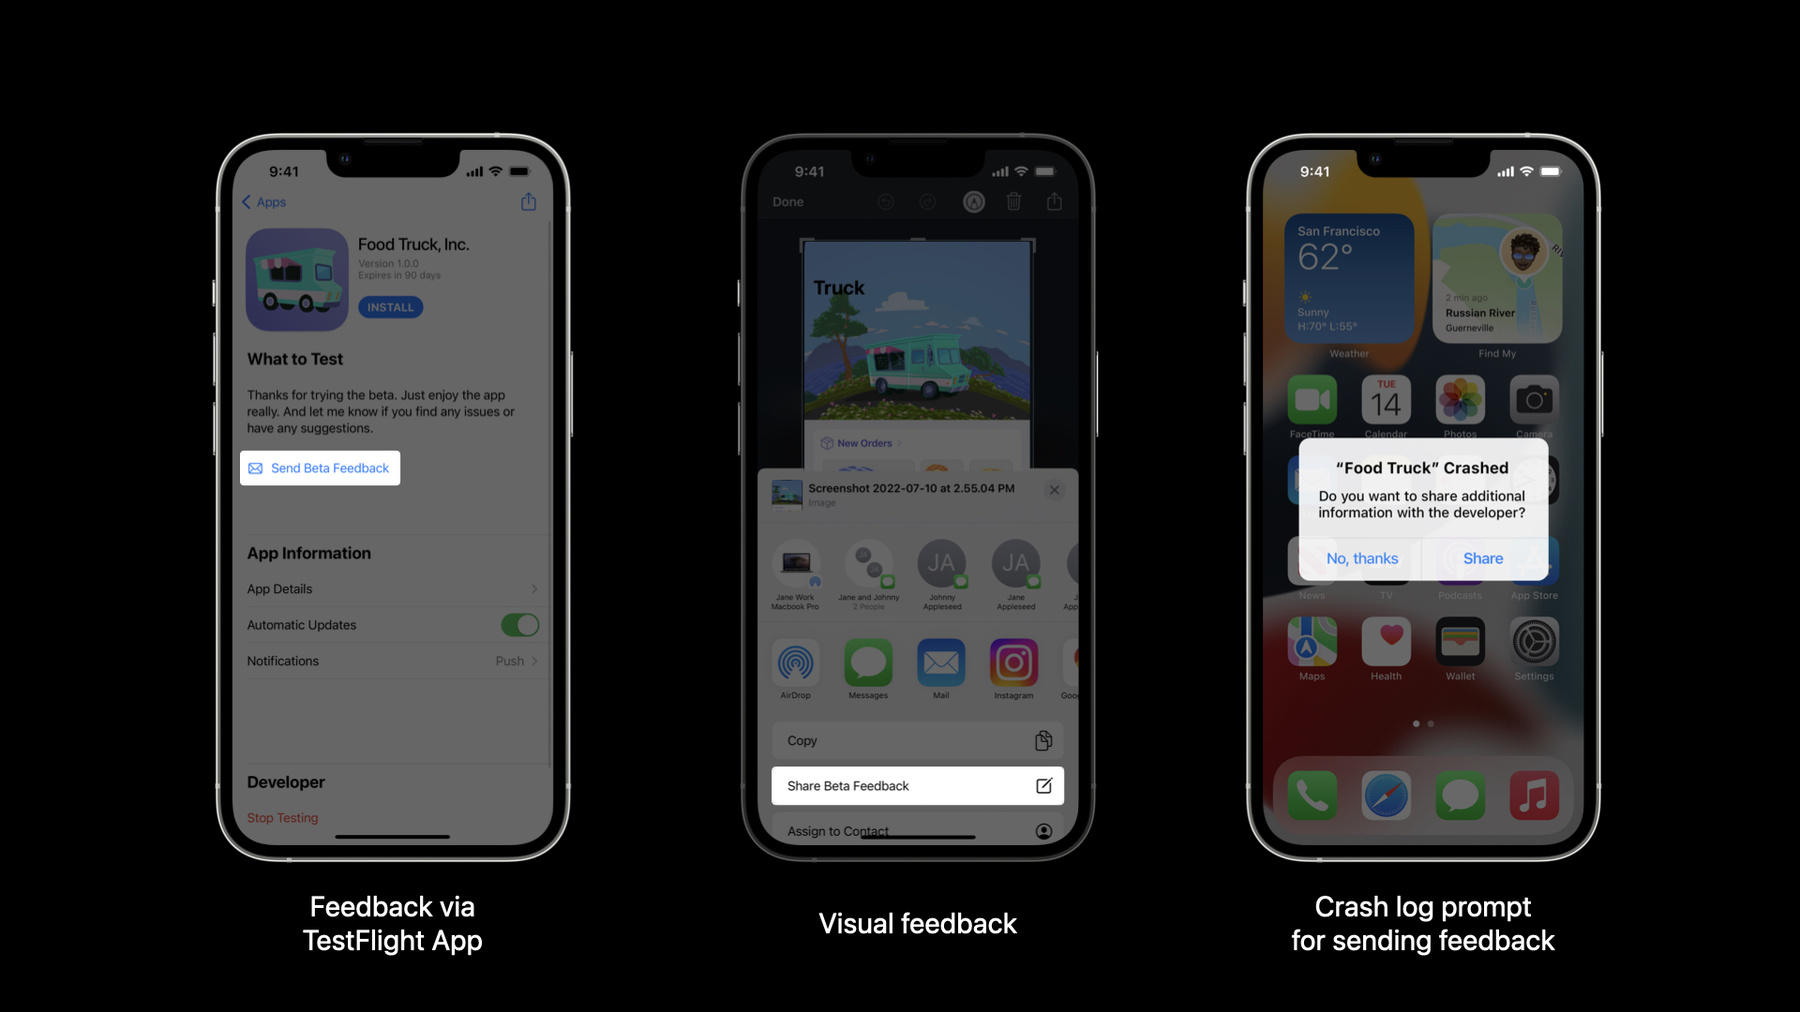
Testers can submit feedback in multiple ways. Firstvia the TestFlight app with the Submit Feedback button. Feedback submitted in this way will be sent to the email we specified in the test information section of the app.
Testers can also take a screenshot while testing your app. In the screenshot previewertesters can edit and add markups to provide more information.
With this methodtesters have the option to share the screenshot and any comments directly to TestFlight. If our Food Truck app crashestesters can submit a crash report. They can agree to send a report and add feedback about the context of the crash.
The group's page is a great place to get a summary of tester engagement and feedback for our app.
By looking at the status columnwe can see that both Jerome and Melissa have installed our build and they have been testing it.
We can see the counts of sessionscrashes and feedback by tester and the number of sessions and crashes attributed per build.
It looks like we have a few crashes and feedbacks to investigateso let's go do that.
Let's first go to the crashes page under the feedback section on the left side.
Here we can see all crashes our testers have submitted and quickly see the crash details summarized in a table. We can then use the filters at the top to view crashes by platformbuild or device. I can select this crash to see the details of the crash report submitted by Jerome including things like time zonebattery percentage and connection type.
These details can really come in handy as we try to understand why this app crashed.
Similarlywe can go to the screenshots page to view screenshot feedback provided by our testers. Like with crash feedbackwe can filter by fields like devicebuild and OS version to view a subset of feedback. This can help inform changes we might make to our next build.
We can also select a screenshot to inspect it more closely.
From the screenshot details viewwe can download the image to our device with the download button on the top right corner and even open in Xcode Organizer using the Open in Xcode button.
In Xcode Organizerwe can see the selected screenshot and the other visual feedback and crashes for the Food Truck app. Here I can write notes to my development team and mark feedback is resolved as we make our way through addressing them.
Look at thatwe've gotten through our first round of testing with TestFlight. Our internal testers gave us some really great feedback to incorporate.
RememberTestFlight is also designed to scale and support your testing needs.
So let's expand our testing audience and share our app with testers outside of our team. To do thatwe're going to add external testers to our build.
An external tester is any tester outside of your team that you invite to beta test your app. You can invite up to 10,000 external testers per app. And with external testersthere are two methods to invite; invitation or public link and we'll touch on both of those differences shortly.
Before testing with external testers can beginyou submit your build to App Review. This keeps TestFlight a safe and trusted place for testers to participate in testing.
One last thing to keep in mindin TestFlighttesters can test your in-app purchase experiences without incurring charges. This can really help you improve these experiences before they go live on the store.
Once our build has gone through App Reviewwe can create an external group and start adding testers.
Like we did with internal testingwe'll click on the blue plus button next to the External Testing section to create a new group.
Let's invite some chefs to test our app. We're gonna go ahead and call this group Chef Testers and then click Create.
For all external groupswe need to manually add the builds we'd like the group of testers to access.
Most of the sections for this group are similar to an internal group but we can see that there's a new section called Public Link. Public Link is another way to distribute your app to external testers in addition to email.
Unlike with email invitesyou don't need a tester's email to invite them using a public link. Insteadyou generate a specific link with an enrollment limit and anyone who clicks on the link can enroll and be a tester for the app. You can choose to share the link however you like such as your social channels or even email campaigns.
Once enrolledthese testers have the option to stay anonymous when providing you with feedback.
Let's create a public link for our chef testers. To do thatwe'll select the Enable Public Link button.
We'll click Enable again to confirm that we wanna create a public link for this group and then we set our tester limit.
This is the maximum number of people who will be able to enroll using this link. You can set this limit as low as one and up to 10,000. We're gonna start with 100. It's always good to start with a smaller group of testers and then expand. And don't worryyou can always edit the limit once you create the group and testing progresses.
Once we click Set Limitwe have the URL we can use to invite testers.
I'm gonna share the link on my social media to invite people to test our Food Truck app.
When someone clicks on the linkthey'll be directed to download TestFlight if they haven't already and then they can download our Food Truck app.
Feedback provided by external testers appears in the same place as internal tester feedback and crashes so we already know what to do and how to use it to improve our app. Once we use this information and diagnostics to improve our Food Truck app and maybe go through a few more rounds of testingwe are ready to publish it on the App Store.
Since we used TestFlight for testingour build is already uploaded to App Store Connect so it'll just take us a few steps to submit for publishing on the App Store.
We'll go to the App Store tab in App Store Connect and complete the details on the page. Againsince we've already uploaded our build to TestFlightwe won't need to upload it again. Insteadwe will select the build from the dropdown menu when prompted. Once we're donewe'll click Submit for Review and that's it.
Remembertesting is not a one and done experience. It's a best practice as part of your ongoing development cycle even after your app is published on the App Store. As you consider incorporating TestFlight into your testing and release processwe wanted to share an additional way to make your testing efforts even easier. For thatI'll pass it back to Jerome.
This year we also introduced an easier way to upload your app to TestFlight and App Store ConnectXcode Cloud. Xcode Cloud is a continuous integration and delivery service built into Xcode and design expressly for Apple developers.
It accelerates the development and delivery of high quality apps by bringing together cloud-based tools that helps you build appsran automated test in paralleland deliver apps to testers.
It's a perfect companion for TestFlight. Xcode Cloud works with workflowsa configuration that tells Xcode Cloud which action to perform and when to perform them.
Let's create a workflow for Food Truck.
This is a default workflow. Workflows are made up of a start conditiona build environmentthe sets of actions to be performed and post-actions such as deployments and notifications. By defaultthere is no post-action so let's edit our workflow and add a post-action for TestFlight deployment. Firstin the archive actionI'm going to change the deployment preparation for TestFlight build. I want this workflow to be used for internal deployment only so I'll choose the Internal Testing Only option.
If I want to prepare my build for external testing or for the App StoreI would choose the TestFlight and App Store option.
Then I can click on the Post-Action plus sign and select what I want to do after the archive step. In that caseTestFlight internal testing.
Then I select a specific group of testers for this workflowhere our QA team we created earlier and click Add.
Once my workflow is triggered by my start conditionXcode Cloud will build my app and automatically upload it to App Store Connect and my QA team will be notified of a new build in TestFlight.
I just click Save and that's it.
Xcode Cloud can be accessed directly from Xcode and also an App Store Connect right next to the TestFlight app.
For more information on Xcode Cloud and workflowsyou can check out those WWDC videos.
As you incorporate TestFlight into your ongoing development cyclehere are a few things to keep in mind.
Start smallthen expand. If you're making a large change to your app or introducing new featuresconsider adding testers over time so you can test these changes before distributing to all 10,000 testers.
Rememberexternal testers are also your potential users so you want to be mindful of their experience.
Know what you want to accomplish with each build and testthis will help you create a smoother testing process.
Use groups to create repeatable testing processesgroups are a great way to manage your testers and quickly distribute builds. Once you set up a group and add testers to ityou can start the testing cycle and share new builds with testers more quickly.
And finallytry Xcode Cloud in your development process. This will help you automate your TestFlight workflows and could reduce the time between your releasesimproving the overall quality of your apps.
We hope this presentation has helped you better understand how you can use TestFlight to engage testers and get valuable feedback on your beta apps. For more information on TestFlightlinks to documentation and morecheck out the Apple developer website.
-