Modified on 11.10.2025
One of the most useful tools included in Windows is the Snipping Tool. This app allows you to capture any part of your screensave the screenshots as imagesor copy them to the clipboard. You can also annotate your screenshots with penshighlightersand erasers. The Snipping Tool is available in all versions of Windowsand there are many ways to start itincluding with the keyboard. In this articleI show you how to open or activate the Snipping Tool in both Windows 10 and Windows 11. I share various methodsincluding ways of opening the Snipping Tool without using the Start Menu. Let’s get started:

 The toolbar you see in Windows 11 when pressing Windows + Shift + S
Here’s what each of these buttons doesfrom left to right:
The toolbar you see in Windows 11 when pressing Windows + Shift + S
Here’s what each of these buttons doesfrom left to right:

 The buttons you see in Windows 10 when pressing Windows + Shift + S
Here’s what each of these icons doesfrom left to right:
The buttons you see in Windows 10 when pressing Windows + Shift + S
Here’s what each of these icons doesfrom left to right:

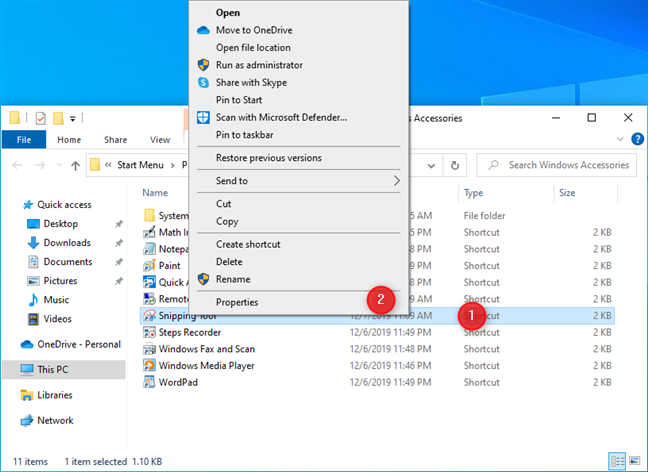
 Where the Snipping Tool shortcut is stored in Windows 10
Right-click or press-and-hold on the Snipping Tool shortcutand then choose Properties in the menu that opens.
Where the Snipping Tool shortcut is stored in Windows 10
Right-click or press-and-hold on the Snipping Tool shortcutand then choose Properties in the menu that opens.
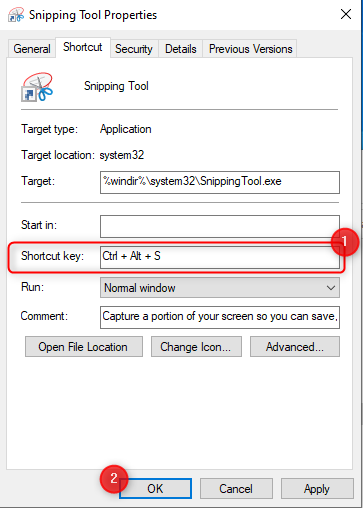
 Right-click on Snipping Tool and choose Properties
You see the properties of the Snipping Tool shortcut in Windows 10. Firstclick or tap inside the Shortcut key fieldthen press the keys you want to use as a keyboard shortcut for this app.
I chose Ctrl + Alt + Sbut you can use any combination of keys. Thenclick or tap OK to save your new keyboard shortcut.
Right-click on Snipping Tool and choose Properties
You see the properties of the Snipping Tool shortcut in Windows 10. Firstclick or tap inside the Shortcut key fieldthen press the keys you want to use as a keyboard shortcut for this app.
I chose Ctrl + Alt + Sbut you can use any combination of keys. Thenclick or tap OK to save your new keyboard shortcut.
 Set the Shortcut key you want for the Snipping Tool
The next time you press your chosen keysthe Snipping Tool app opens in Windows 10.
Set the Shortcut key you want for the Snipping Tool
The next time you press your chosen keysthe Snipping Tool app opens in Windows 10.
 The Snipping Tool from Windows 10
TIP: For more information on assigning any shortcut key to a Windows apphere’s how to run a Windows app or program with a keyboard shortcut.
The Snipping Tool from Windows 10
TIP: For more information on assigning any shortcut key to a Windows apphere’s how to run a Windows app or program with a keyboard shortcut.
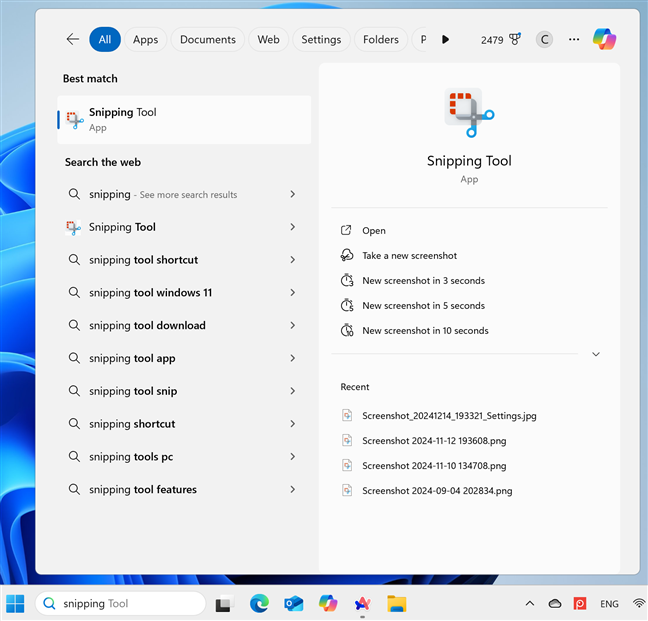
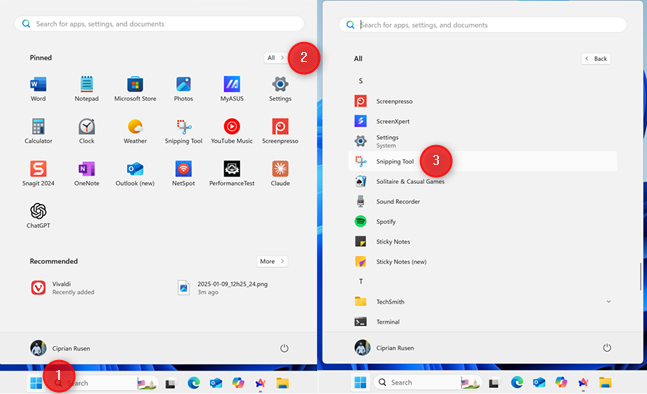
 Searching for Snipping Tool in Windows 11
Similarlyin Windows 10click or tap inside the search box on the taskbar and type snipping. You should see the appropriate search results almost immediately. Click or tap the Snipping Tool result or press Enter on your keyboard to start the app.
Searching for Snipping Tool in Windows 11
Similarlyin Windows 10click or tap inside the search box on the taskbar and type snipping. You should see the appropriate search results almost immediately. Click or tap the Snipping Tool result or press Enter on your keyboard to start the app.
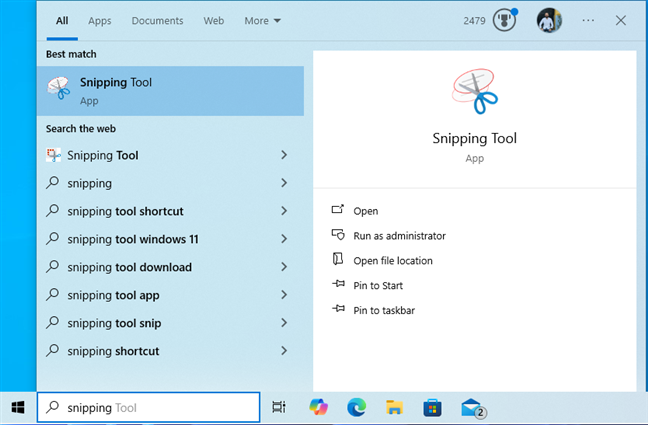
 Searching for the Snipping Tool in Windows 10
IMPORTANT: Notice how the Snipping Tool has different icons in Windows 11 and Windows 10. That’s because it is a separate app with other features. The Windows 10 version dates from 2002while the Windows 11 version dates from 2021 and has received updates and improvements since.
Searching for the Snipping Tool in Windows 10
IMPORTANT: Notice how the Snipping Tool has different icons in Windows 11 and Windows 10. That’s because it is a separate app with other features. The Windows 10 version dates from 2002while the Windows 11 version dates from 2021 and has received updates and improvements since.
 Accessing the Snipping Tool shortcut in the Windows 10 Start Menu
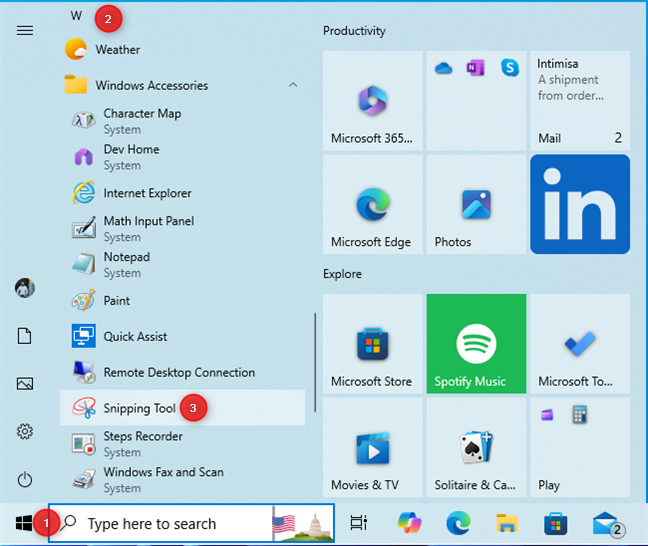
Windows 11’s procedure is lengthier: open the Start Menu and click or tap All. Scroll down the list of apps until you see those that start with the letter S. Thenclick or tap Snipping Tool.
Accessing the Snipping Tool shortcut in the Windows 10 Start Menu
Windows 11’s procedure is lengthier: open the Start Menu and click or tap All. Scroll down the list of apps until you see those that start with the letter S. Thenclick or tap Snipping Tool.
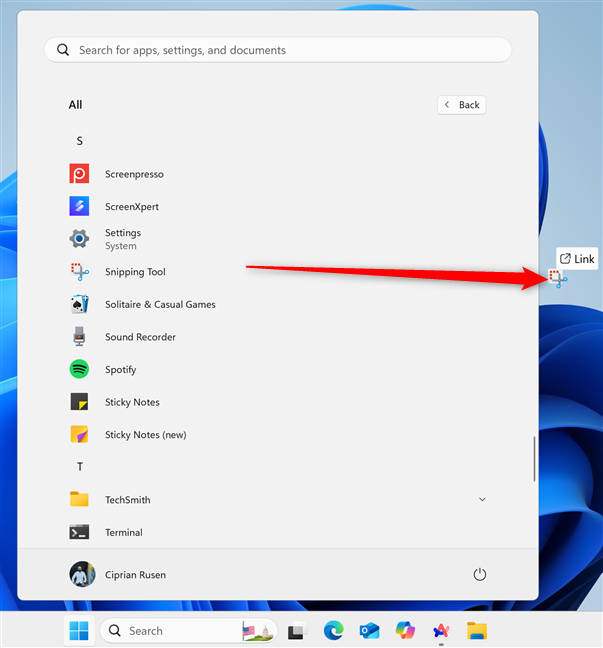
 Accessing the Snipping Tool shortcut in the Windows 11 Start Menu
TIP: Here’s a detailed guide on how to use the Windows 11 Start Menuincluding how to jump to shortcuts that start with different letters.
Accessing the Snipping Tool shortcut in the Windows 11 Start Menu
TIP: Here’s a detailed guide on how to use the Windows 11 Start Menuincluding how to jump to shortcuts that start with different letters.
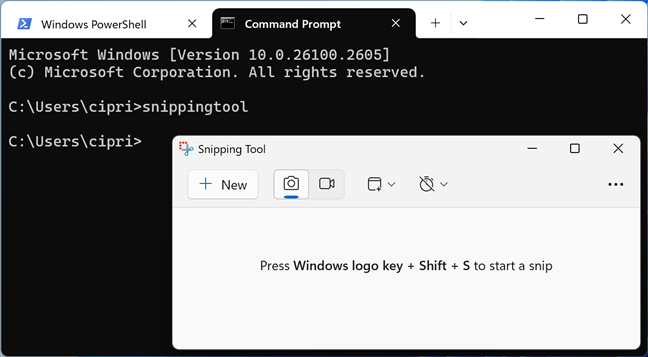
 Opening the Snipping Tool from CMD
This command opens the Snipping Tool from CMD in Windows 11 and Windows 10.
Opening the Snipping Tool from CMD
This command opens the Snipping Tool from CMD in Windows 11 and Windows 10.
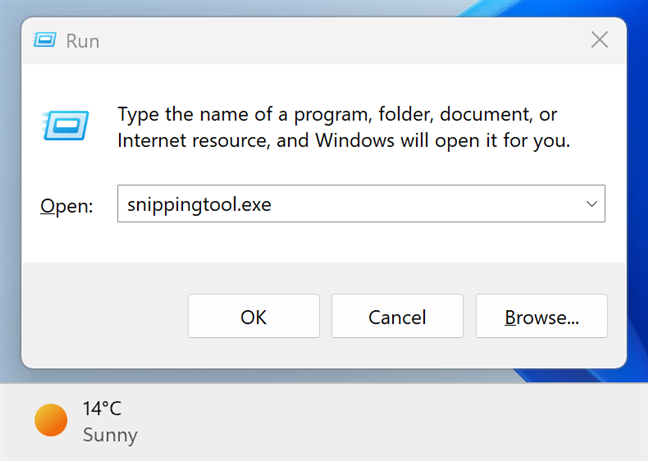
 Opening the Snipping Tool from Run
 The location of the Snipping Tool file in Windows 10
In Windows 11the Snipping Tool is a Windows app installed in a folder like:
The location of the Snipping Tool file in Windows 10
In Windows 11the Snipping Tool is a Windows app installed in a folder like:
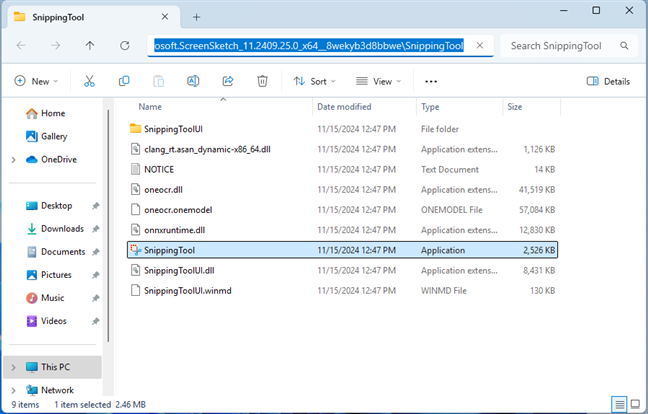
 The location of the Snipping Tool file in Windows 11
Another issue is that you can’t open the WindowsApps folder from File Explorer. Windows 11 will tell you that you don’t currently have permission to access this folder. You need to change the permissions for the WindowsApps foldera complicated process you shouldn’t undergo just to get to the folder where Snipping Tool is installed and run its executable file.
The location of the Snipping Tool file in Windows 11
Another issue is that you can’t open the WindowsApps folder from File Explorer. Windows 11 will tell you that you don’t currently have permission to access this folder. You need to change the permissions for the WindowsApps foldera complicated process you shouldn’t undergo just to get to the folder where Snipping Tool is installed and run its executable file.
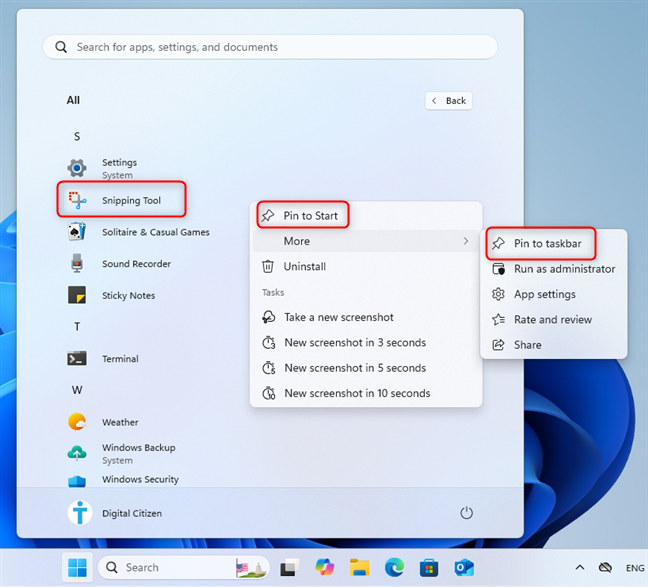
 Pinning the Snipping Tool shortcut to Start or the taskbar in Windows 11
The options available in Windows 10 are the same as in Windows 11. Simply open the Start Menugo to Windows Accessories, find the Snipping Tool shortcutright-click (or press and hold)and select the option you prefer.
Pinning the Snipping Tool shortcut to Start or the taskbar in Windows 11
The options available in Windows 10 are the same as in Windows 11. Simply open the Start Menugo to Windows Accessories, find the Snipping Tool shortcutright-click (or press and hold)and select the option you prefer.
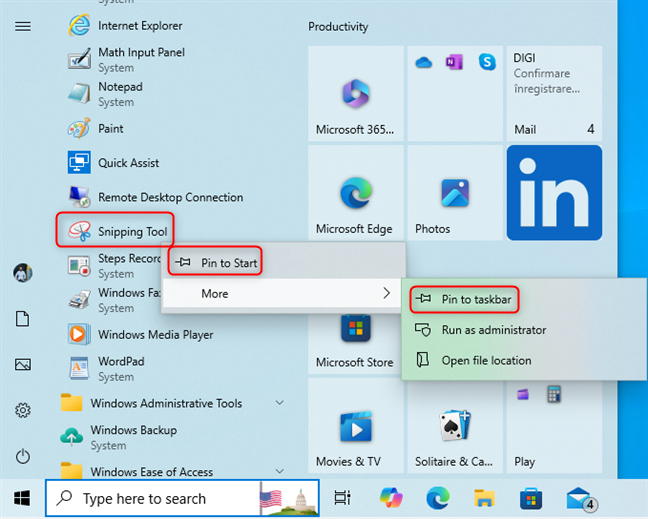
 Pinning the Snipping Tool shortcut to Start or the taskbar in Windows 10
 Drag the Snipping Tool shortcut to the desktop
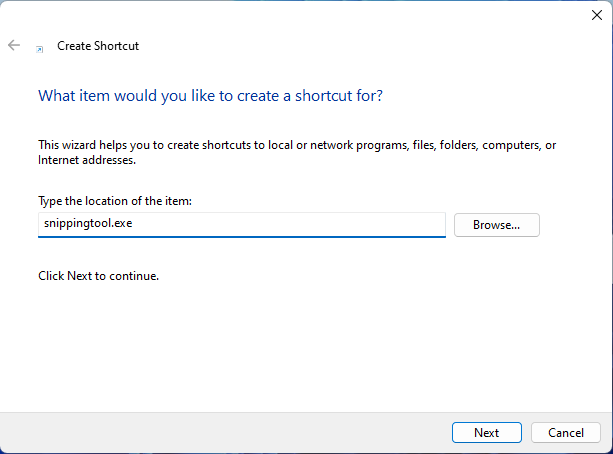
Another method is to manually create a Snipping Tool shortcut. Right-click or press-and-hold on an empty space on the desktopand then select New > Shortcut. Make sure to enter snippingtool.exe as the shortcut’s location and follow the instructions of the Create Shortcut wizard.
Drag the Snipping Tool shortcut to the desktop
Another method is to manually create a Snipping Tool shortcut. Right-click or press-and-hold on an empty space on the desktopand then select New > Shortcut. Make sure to enter snippingtool.exe as the shortcut’s location and follow the instructions of the Create Shortcut wizard.
 Creating a Snipping Tool shortcut
NOTE: If you need help creating shortcutsread How to create shortcuts for filesfoldersappsand web pages in Windows.
Creating a Snipping Tool shortcut
NOTE: If you need help creating shortcutsread How to create shortcuts for filesfoldersappsand web pages in Windows.
1. How to open Snipping Tool with a keyboard shortcut in Windows 11
The fastest way to begin using the Snipping Tool is with a keyboard shortcut:Windows + Shift + S
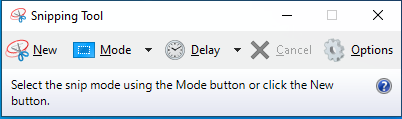
If you press these keys simultaneously in Windows 11the screen darkensand you see a small toolbar with four buttons at the top of the screen.
- Snip (camera icon) - captures a screenshot using the shape shown as the third icon. By defaulta rectangle is selectedbut clicking or tapping it shows a dropdown menu where you can select another shape. Pressing the Snip icon without changing this setting lets you take screenshots with a rectangular shape you draw on the screen with the mouse or touch.
- Snip (video recorder icon) - allows you to draw a rectangle shape on the screen and start a video recording of the selected area.
- Snipping mode - opens a menu where you can select the type of snip you want to make: Rectangle (the default option)Windows (which allows you to choose the app window you want to capture)Full Screen (which captures the entire screen)or Freeform (draw any shape you want on the screen and capture that area).
- Close - closes the Snipping Tool without taking a screenshot.
2. How to open the Snipping tool with a keyboard shortcut in Windows 10
In Windows 10you activate the default screenshot-taking app using the same shortcut:Windows + Shift + S
Howeverpressing these keys displays a different menu at the top side of the screenwith options different from the ones in Windows 11. You’re also encouraged to “Draw a shape to create a screen snip.” Snip is Microsoft’s term for screenshot. 🙂
- Rectangular Snip - the default optioncaptures screenshots using a rectangular shape you draw on the screen with the mouse or touch.
- Freeform Snip - draw any shape you want using the mouse or touchand then save it as a screenshot.
- Window Snip - captures the entire window of a specific app you select with the mouse or touch.
- Fullscreen Snip - saves the whole screen in a screenshot.
- Close Snipping - closes the snipping menu.
2.1. How to create a keyboard shortcut for opening the Snipping Tool in Windows 10
If you’re a Windows 10 userand you want to use a keyboard shortcut for opening the Snipping Toolnot the (newer) Snip & Sketch appdo this: Open File Explorer and navigate to this path:C:\ProgramData\Microsoft\Windows\Start Menu\Programs\Accessories
You can also use environment variables to navigate to this pathleading to the same folder:
%PROGRAMDATA%\Microsoft\Windows\Start Menu\Programs\Accessories
Hereyou find shortcuts to several Windows appsincluding the old Snipping Tool.
3. How to use Search for opening the Snipping Tool
A fast way to open the Snipping Tool in Windows 11 is to click or tap inside the search box on the taskbar or press the Windows key. Thentype the word snippingand when you see the Snipping Tool search resultpress Enter on your keyboard or click or tap the result. Notice that on the right side of the search resultyou also have options for taking screenshots right away.4. How to open Snipping Tool using the Start Menu
If you’re using Windows 10click or tap the Windows icon on the taskbarscroll down the list of apps to the letter Wand open the Windows Accessories folder. Thereyou’ll find the Snipping Tool shortcut. Click or tap itand the app is launched.5. What is the Snipping Tool command? How to open the Snipping Tool from CMDTerminalor PowerShell
If you like working with Windows Terminal, Command Promptor PowerShellopen the app you preferand then type this command:snippingtool
Or this one:
snippingtool.exe
Don’t forget to press Enter on your keyboard to run the command.
6. How to open the Snipping Tool from Run
Another method of accessing the Snipping Tool is to use the Run window. Launch Run (Win + R) and type snippingtool or snippingtool.exe in its Open field. Thenclick or tap OK or press the Enter key on your keyboard to open the app.7. How to open the Snipping Tool in Windows by running snippingtool.exe
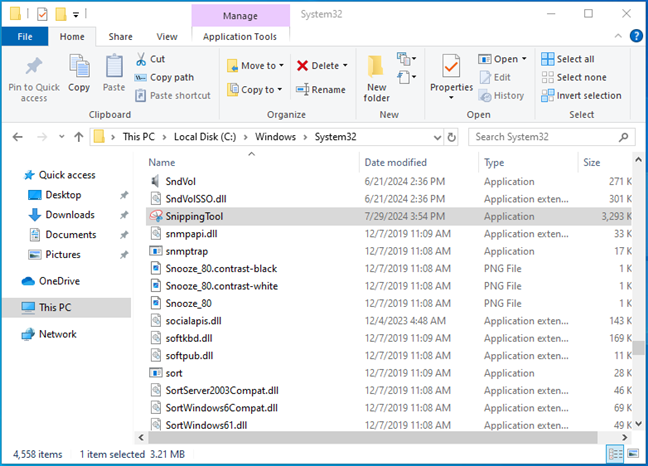
In Windows 10the Snipping Tool app has an executable file that is easy to run. Simply open File Explorerand then access or copy and paste this path into the address bar:%WINDIR%\System32\SnippingTool.exe
On my computerit’s found at:
C:\Windows\System32\SnippingTool.exe
C:\Program Files\WindowsApps\Microsoft.ScreenSketch_ a number and some random characters\SnippingTool\SnippingTool.exe
For exampleon my computerthis is the path to Snipping Tool:
C:\Program Files\WindowsApps\Microsoft.ScreenSketch_11.2409.25.0_x64__8wekyb3d8bbwe\SnippingTool
On your computerthe Microsoft.ScreenSketch_ part of the folder path may have a different number or character string at the end.
8. How to start the Snipping Tool quickly by pinning it to your taskbar or Start Menu
If you regularly use the Snipping Toolpin its shortcut to the taskbar or your Start Menu for quicker access. To do soopen the Start Menugo to Alland locate the Snipping Tool shortcut. Nextright-click or press and hold on itand in the context menugo to More > Pin to taskbar or Pin to Start, depending on where you want to pin the Snipping Tool.9. How to create a Snipping Tool shortcut to open it from anywhere
You can always make a shortcut that opens the Snipping Tool. An easy way to do this is by dragging and dropping the Snipping Tool shortcut from the Start Menu onto the desktop or in any other folder you prefer. When you see the word Link displayed on the screenrelease the shortcutand it’s immediately placed in that spot.