How to use Google Docs to createeditand collaborate on documents online — with or without help from GeminiGoogle's AI assistant.

Google Docs is a powerful word processor that you use through your web browser. It’s integrated with Google Drive to store your documents in the cloud. In addition to the Docs web appthere are mobile apps for Android and iOS.
Anyone with a Google account can use Google Docs for free. It’s also available with Google Workspace — Google’s subscription-based online collection of office apps that also includes GmailGoogle SlidesGoogle Sheetsand more — with more advanced features.
This guide will get you started with the Google Docs web app and show you how to share and collaborate on your documents with other people.
[ See more Google Workspace tips and tutorials ]
We’ll also cover a few Gemini (Google’s generative AI assistant) features that are now integrated with Google Docs. Gemini tools are available in Google Docs with a Google Workspace Business Standard or greater plana Google AI Pro or greater planor if you sign up for Google Workspace Labs with your Google account.
In this article:
- Create or open a document
- Work in a document
- Share your document
- Collaborate on your document
- Recover older versions of a document
- Download and export your document to Word or PDF
- Use the Google Docs mobile app
- Use keyboard shortcuts
Create or open a document
To start a new document or open one you’ve already saved in Google Driveyou’ll need to sign in to your Google or Google Workspace account. If you haven’t signed in yetyou’ll be prompted to do so when you click either link below.
Create a new document
From the Google Docs home screen: To start a new documentclick the Blank thumbnail or select a template to the right. To see more templates that you can insert into your document and customize to your needsclick the Template gallery button in the upper-right corner of the screen; click any thumbnail to start a new document in that template.
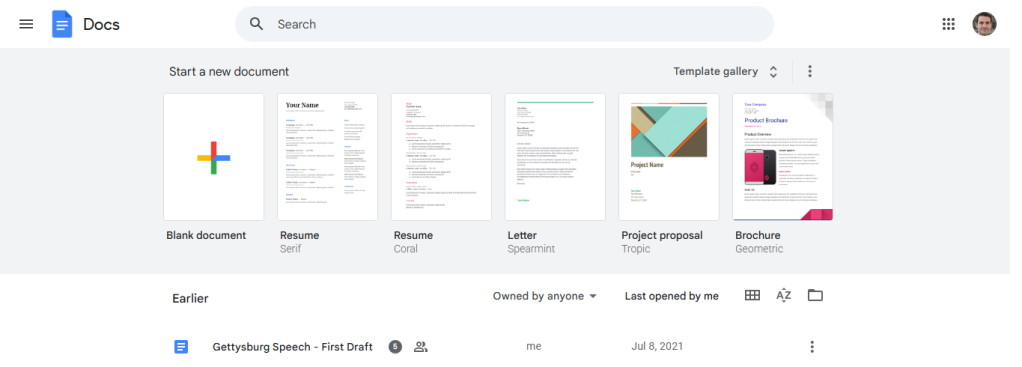
The top of the Google Docs home screenwith templates across the top and stored documents listed below.
Howard Wen / Foundry
From the Google Drive home screen: To start a new blank documentclick the New button at the upper-left of the screen and then click Google Docs. If you want to select a template to start a new documentclick the New buttonthen move the cursor over the > to the right of “Google Docs” and select From a template. The Google Docs home screen will openshowing its full template gallery.
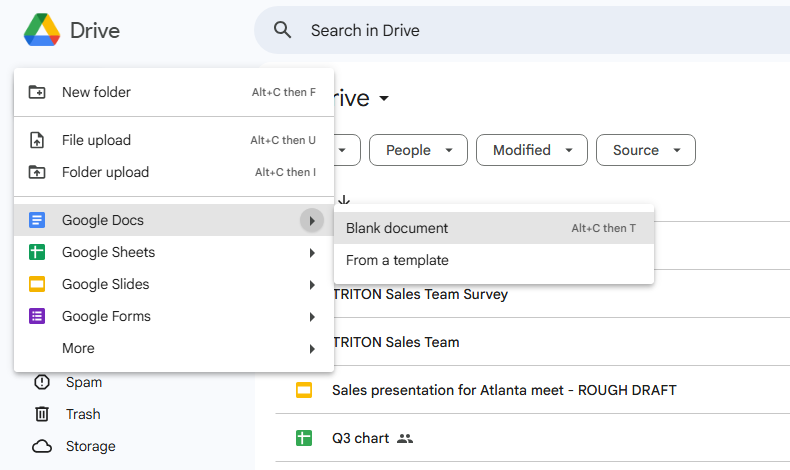
Creating a new Docs document from Google Drive.
Howard Wen / Foundry
From your browser’s address bar: You can immediately launch Google Docs with a new blank document by simply typing docs.new in the address bar of your web browser. (This works if you’re already signed in to your Google or Google Workspace account on the browser.)
Open a document
Documents that are already in your Google Drive storage appear on the Google Docs and Google Drive home screens. Double-click a documentand it will open in Google Docs.
You can use the search box at the top of either home screen to search for your document’s file name or text that is in it. On the Google Docs home screenyou can also click the folder icon on the right above the documents list. This opens a simplified version of your Google Drive inside a panel.
To open a document that someone else has shared with you via Google Drive: On the Google Drive home screenclick Shared with me in the left columnand then double-click the document to open it in Google Docs.
Upload a document for editing in Google Docs
If you have a document on your PC that you want to edit in Google Docsyou have to first upload it. Google Docs supports common text formats such as Microsoft Word (.docx)OpenDocument Format (.odt)Plain Text (.txt)and Rich Text Format (.rtf).
To upload via the Google Docs home screen: Click the folder icon on the right above the documents listthen click the Upload tab on the panel that opens. You can drag-and-drop the document onto this panel or browse your PC’s storage drive to find and select the document. The file is saved to your Google Drive in Docs format and opens immediately in the Docs web app.
To upload via the Google Drive home screen: Click New > File upload and select the document from your PC’s drive. The document retains its original formatting.
Working with Microsoft Word documents in Docs
Google Docs supports the ability to edit Word .docx files in their native format. You can edit and collaborate on a Word file right in Docswith all changes made by you or your collaborators saved directly to the Word file.
To retain the Word formatthoughyou must upload the file through Google Drive. When you upload a Microsoft Word document through the Google Docs home screenit is automatically converted to the Docs file format.
When you upload a Word through the Google Drive home screenon the other handit is not automatically converted to Docs file format. So a Word document will retain its format and .docx file extension. In the documents listWord docs are designated with a W icon instead of the usual Docs icon.

The top document shown here is in Word format.
Howard Wen / Foundry
If you would rather have Word (and other document format) files automatically converted to Docs format when you upload them via Google Driveclick the gear icon in the upper-right corner of the Google Drive home screen and select Settings from the drop-down menu. On the Settings pagescroll down to “Uploads” and check the checkbox marked Convert uploads to Google Docs editor format.
Converting PDF and image files to Docs format
Through Google Driveyou can upload a PDF or image file of a scanned documentthen convert it so that you can edit it in Google Docs. The accuracy of this conversion depends on how readable the text is in the PDF or source image.
From the Google Drive home screenclick New > File upload and select the PDF or image file on your PC.
After the file is uploadedright-click its filename on the Google Drive home screen and select Open with > Google Docs.
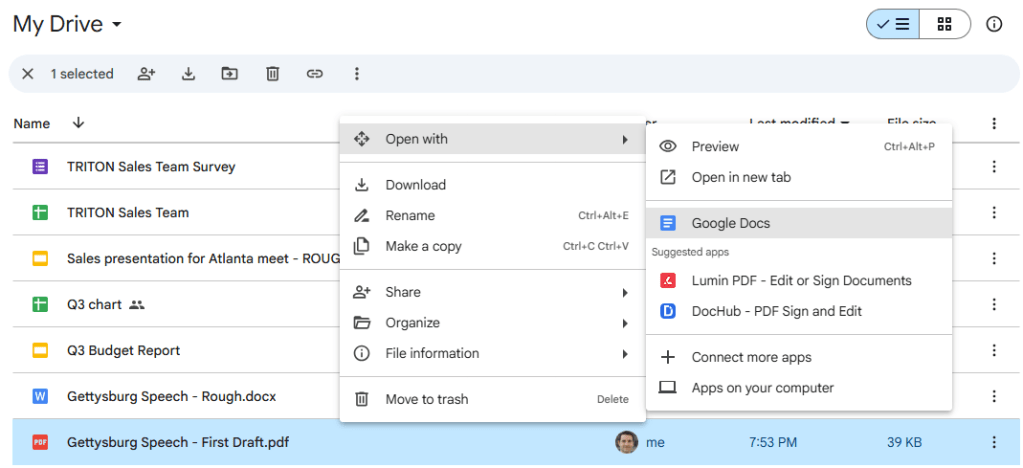
Converting a PDF to Google Docs format for editing.
Howard Wen / Foundry
Drive converts the PDF or extracts the text from the image file and opens the result in Google Docs for you to view and edit. This converted version appears listed on your Google Docs and Google Drive home screen as a new Docs document. Note that only the text from the source file is converted; if your PDF has imagesthose will not appear in the new document.
Work in a document
When you open a new or existing documentthe document’s title appears at the top left. To change the titleplace the cursor in the title and start typing.
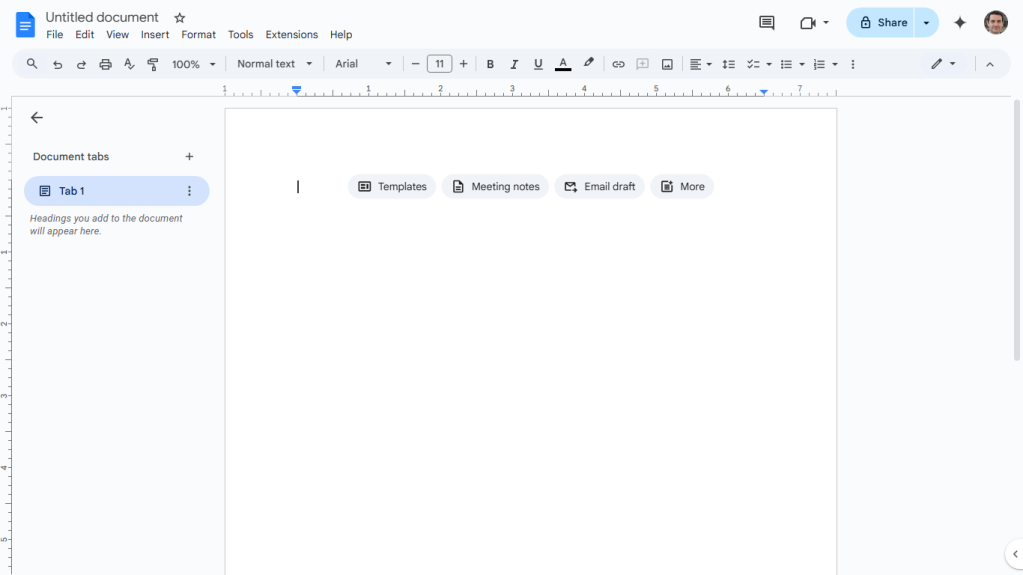
The Google Docs compose/edit screen with a newblank document.
Howard Wen / Foundry
The menu bar below the document’s title includes the following drop-down menus:
- File: commands for taking action on the whole documentsuch as Make a copyShareRenamePage setupand Print
- Edit: copypasteundoredofind and replaceand similar
- View: lets you change your view of the document and how you interact with it (more on that in a moment)
- Insert: insert items into your documentsuch as an imagetablespecial characterheader or footeror watermark
- Format: format textparagraphsand some other elements in your document such as tables
- Tools: extras such as getting a word count and translating your document into another language
- Extensions: find third-party apps that integrate with Docs and other Workspace apps
- Help: search for commands or get help for specific tasks
The toolbar below the menu bar has buttons for the most common word processing functionssuch as formatting text and paragraphsinserting links and picturesrunning spell checkand printing.
Note that there is no Save command; Docs automatically saves any changes as soon as you make them.
Tools to help you start writing
When you start a newblank documentbuttons appear along the top of the document areaas shown in the previous screenshot; they’re shortcuts to tools to help you write. (They don’t appear when you load a document that already has content on it.) You can ignore these shortcuts if you want; just start typing and they’ll disappear.
If you’re using Google Docs under a free Google account or Business Starter Workspace planyou’ll see these shortcuts at the top of a blank document:
Templates: This button opens a pane listing a subset of popular templates from the template gallery you can call up when creating a new documentas covered earlier in the story. To access this pane elsewhere in Google Docs: On the top menu barclick File > New > From a template.
Meeting notesEmail draftand More: These buttons all lead to “building blocks,” which are table templates that you can insert into your document. Some also have interactive elementscalled “smart chips,” in them. See “How to use smart chips in Google Docs and Sheets” for in-depth information about smart chips and building blocks.
Clicking Meeting notes lets you extract information from an event scheduled on your Google calendar and set it in your document as a table.
The Email draft building block appears as a basic email composition window in your document. Inside each capsule to the right of “To,” “Cc,” and “Bcc,” you enter or select the email address or name of someone in your Google Contacts to insert as a People chip.
Clicking the More button opens the “Building blocks” panel along the right that lists several other building blocks you can insert into your document. There are building blocks for meetingsproject managementcontact managementand more.
To access building blocks elsewhere in Google Docs: On the top menu barclick Insert > Building blocks and from the menu that opensselect the building block that you want to insert into your document. Or select View more on this menu to open the “Building blocks” side panel.
If you’re using Google Docs with a paid Workspace plan that includes Geminisuch as Business Standardthen you’ll see these buttons at the top of a blank document:
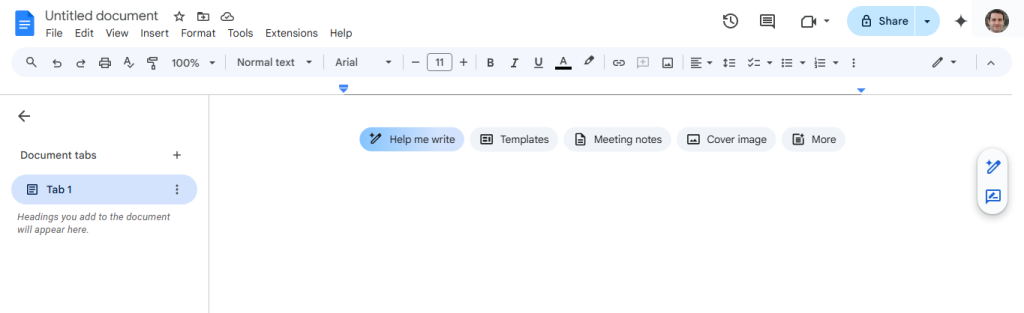
With a paid Workspace planthe quick-start buttons for a blank document include the AI-powered “Help me write.”
Howard Wen / Foundry
Help me write: Clicking this opens a pane over your document. You type inside it to prompt Gemini to generate text that you can insert into your document. For details about using Help Me Writesee “How to use Gemini AI to write (and rewrite) in Google Docs and Gmail.”
To access Help Me Write elsewhere in Google Docs: Look for the vertical mini-toolbar along the right of your document. Clicking the Help me write icon at the top of this toolbar will open the “Help me write” pane over your document.
Templates and Meeting notes: These buttons work the same as described above under a free or Business Starter plan.
Cover image: You can embed an imagesuch as your business logothat runs along the top of your document as a banner. Clicking this button opens a menu that lets you insert an image file stored on your PCGoogle Driveor Google Photos accountor you can search a stock image repository or enter a link to an image file online. You can also use Gemini to create an image: Select Generate an image and describe what you want it to create.
To access this tool elsewhere in Google Docs: On the top menu barclick Insert > Cover image.
More: This button works the same as described above under a free or Business Starter planopening the “Building blocks” side panel.
The Gemini sidebar
There’s another way to interact with Gemini in Docs: Click the nova star icon at the upper-right corner (next to your Google account profile headshot) to open a Gemini side panel along the right. (If you’re using a free or Business Starter planthis side panel will show an ad for Gemini and a button you can click to start a trial.)

The Gemini side panel in Google Docs.
Howard Wen / Foundry
You can use the Gemini sidebar for a variety of tasksincluding brainstorming ideasgenerating textsummarizing documentscreating listsand more. See “Google Workspace: 7 great ways to use the Gemini AI sidebar” for detailed instructions and use cases for the Gemini side panel.
EditingSuggestingand Viewing modes
When you create or open a documentit is presented in Editing modein which you compose or edit your document normally. You can switch to two other modes:
Suggesting mode: Changes to your document appear as colored “suggestions” that can be accepted or rejected. This mode mostly comes into play when you’re collaborating with others; more on that later in this guide.
Viewing mode: You can’t edit the documentonly scroll through and read it. Viewing mode can help you focus on reading through a document without being tempted to stop and edit it. You can also share a document with others in a way that limits them to Viewing mode; we’ll cover that in the sharing section of this guide.
To switch among these modes: Click the Editing mode pencil icon at the far right of the toolbar and make your selection. Alternativelyyou can select View > Mode from the top menu bar.

Switching to Suggesting mode.
Howard Wen / Foundry
Document tabs
Along the left is the “Document tabs” side panel. (If you don’t see itclick the Show tabs & outlines button at the top left.) It’s a unique feature that lets you build interactive documents in two ways.
Heading links
Your document (whether it’s blank or already has content) is listed in this side panel as “Tab 1.” Click Tab 1 and it will expand down to list any headings that are in your document. When you click a heading in this side panelyour view in the main window will jump to that heading in your document.
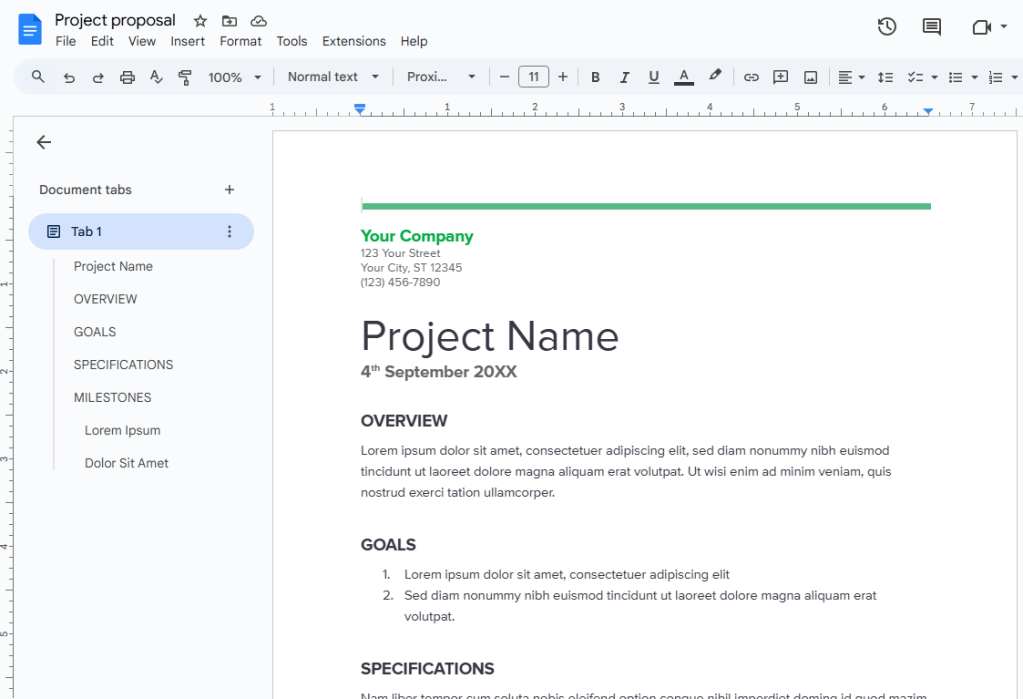
You’ll find shortcuts to each heading in your document in the “Document tabs” side panel.
Howard Wen / Foundry
To add a heading to your document: On the toolbar above your documentclick Normal text and from the drop-down menuselect a heading level (Heading 1Heading 2etc.) and type in your heading.
In the “Document tabs” side panelyou can rename “Tab 1” by clicking the three-dot icon to its right.
Multiple tab links
You can also add more tabswhere each tab represents a separate section of the document that has its own content and formattingand switch among them.
For instanceyou could have a project management document where one tab shows the project overview and goalsa second tab lists team members and their responsibilities for the projecta third tab is a timeline tableand so on. You could create a separate document for each of those itemsbut the tabbed setup keeps them more tightly tied together while allowing each section to retain its own unique purpose and formatting.
A document starts with just one tabcalled “Tab 1” by default. To add a new tab (“Tab 2”)click the + next to “Document tabs” in the side panel. Your view in the main window switches to a new blank document area that you can put content on.
When you create a new tabit feels like you’re starting a whole new documentbut it’s still part of the same larger document. When you look at the top of the screenyou’ll see that the document title remains the same.
You can click back and forth between these two tabbed sections of the document using the tab links in the “Document tabs” navigation. You can add and navigate to additional tabs the same way.

You can switch between tabs in your document using the left navigation panel.
Howard Wen / Foundry
You can also add a subtab underneath another tab. In the “Document tabs” side panelhover your cursor over the tab you want to attach a subtab toclick the three-dot icon that appears to its rightand from the menu that opensselect Add subtab.
You’ll quickly realize as you add tabs and subtabs that using the default names (Tab 1Tab 2etc.) isn’t very helpful. To rename any tab to something more meaningfulclick its three-dot iconselect Renameand type in a new name.
Links to headings across tabs
You can insert a link in one tab that goes to a heading that’s in another tab in your document. For examplea link in Tab 1 takes you to a specific heading in Tab 3.
To create this type of link: Select a tab in the “Document tabs” side panel. In the main window showing the documentright-click on a heading. From the menu that opensselect Copy heading link.
Now select another tab in the “Document tabs” side panel. In the main windowpaste the link somewhere in the document. A long URL appears with a bar next to it that contains the title of your document. Click this bar or press the Tab key on your keyboard to insert the link in your document; it will appear as a capsule with your document’s title in it.
When you (or anyone you’ve shared your document with) click the capsule you inserteda small bar opens showing the heading. Click itand the view in the main window will jump to this heading in this other tabbed document.

Click the MILESTONES link in the main document window to go to that heading on Tab 1.
Howard Wen / Foundry
Share your document
Through Google Docs or Google Driveyou can share a document for others to view or edit.
From the Google Docs screen where you’re editing your document: Click the Share button at the upper right. Orfrom the Google Drive home screen: Right-click the filename of your document and select Share > Share from the menu that opens. Either waythe Share pane opens.

Sharing a document in Google Docs.
Howard Wen / Foundry
Google lets you share your document privately by inviting specific people to access itor publiclywhich means anyone with the link to it can open it. In most casesbusiness users will want to share their documents privately with specific colleagues. But there may be a few times when you need to share it publiclysuch as when you’re seeking public comments on a document.
Note: In managed business environmentsyour administrators may limit your sharing options. For exampleyou might not be allowed to share a document link publicly — or even share it privately with people outside your organization.
Share your document privately (only certain people can access it)
On the Share panetype in the names or email addresses of the people you want to collaborate with on the document. The Share pane changes to a new view where you can add more people and change their access permissions for the doc. You can also type in a brief message to them.

Setting permissions for a file being shared privately.
Howard Wen / Foundry
By defaultevery person you add is given Editor access to your document. You can change this by clicking Editor at the right of the invitees’ names and selecting another option from the dropdown that opens.
- Editor means they can change your documentadd comments to itand reshare it with other people.
- Commenter means they can view your document and add comments to itbut they cannot change it.
- Viewer means they can view your documentbut they cannot change it or add comments to it.
Keep in mind that this setting applies to everyone you’re currently inviting to the document.
When you’re doneclick Send. Everyone you’ve added will receive an email with a link they can click to access the document.
Changelimitor revoke permissions
You can change anyone’s permissions for a document at any time by reopening the Share pane for the document. It will list everyone who has access to the document. Click the dropdown next to their name to change their permission level or remove their access entirelythen click Save.
You can also limit the overall permissions for a document somewhat by clicking the gear icon in the upper right of the Share pane:
- Unchecking the first box prevents others at the Editor level from resharing the document or changing other collaborators’ permission level.
- Unchecking the second box prevents anyone with Viewer or Commenter status from downloadingprintingor copying the document.
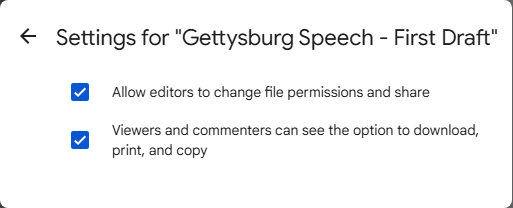
Unchecking these boxes curbs some of the default permissions for editorsviewersand commenters.
Howard Wen / Foundry
Set an expiration date
Under a Google Workspace planyou can also deny access to a person you’ve shared your document with on a specified date.
Click the down arrow to the right of a collaborator’s name and select Add expiration. Thento the right of “Access expires…,” click the pencil icon and select an expiration date (and time if you want) on the pop-up calendar. It can be within one year of the current date.
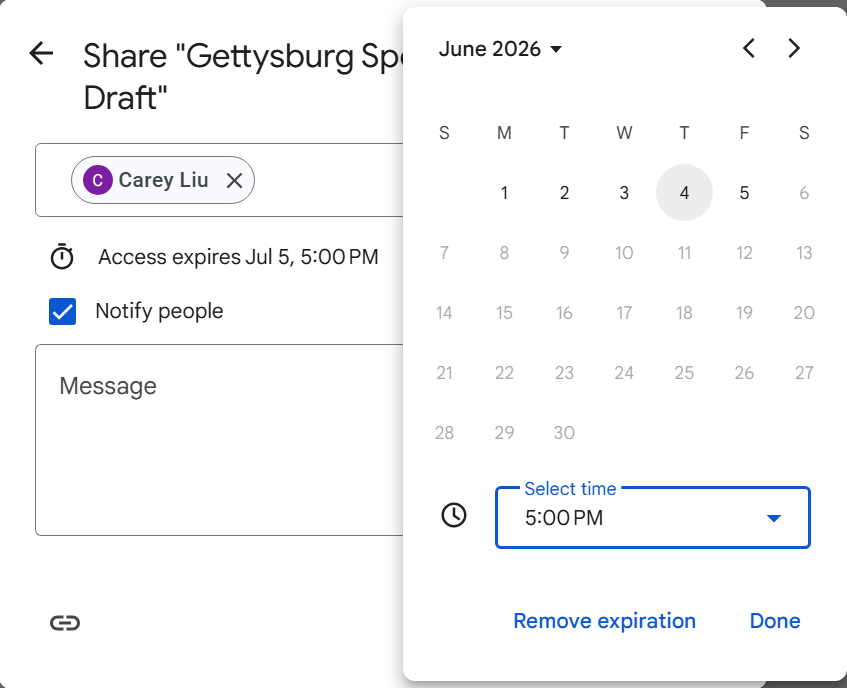
Setting an expiration date for a person’s access to a document.
Howard Wen / Foundry
Share your document publicly (anyone can access it)
At the bottom of the Share pane is a Copy link button that you can click to copy the link to your document. By defaultthis link is restricted to those you invite to the document.
To change it to a public link: Click Restricted and select Anyone with the link from the dropdown menu.

Changing permissions for a public link to a document.
Howard Wen / Foundry
By defaultthis link has Viewer access assigned to it. To allow anyone with the link to comment on or edit your document: Click the Viewer dropdown to the right and then select Commenter or Editor.
After you’ve made your above selectionsclick the Copy link button. You can now paste this link to your document into an emaildirect messageor documentor post it on a public forum or social media. Remember that anyone who sees and clicks this link will be able to access your document.
To turn off the public link to your documentreopen the Share pane and click Anyone with the link. From the dropdown that opensselect Restricted. Then click the Done button.
Status of your shared documents
On your Google Drive or Google Docs home screenyour documents that are being shared either privately with others or as public links are marked by an icon of two silhouetted heads. (If you have the home screen of Google Drive set to “Grid layout,” this icon won’t appear with the thumbnail or filename of a shared document.)
The double silhouette icon to the right indicates that this is a shared document.
Howard Wen / Foundry
Collaborate on your document
The people you’ve shared your document with can collaborate with you on it if they’ve been designated as an Editor or Commenter. See “How to collaborate on a document” in our Google Drive collaboration guide for step-by-step instructions on how to add and review commentsedit a documentand collaborate on a document in real time.
One thing that can’t be stressed enough is how helpful it is if you and your collaborators use Suggesting mode. (Commenters will automatically be in Suggesting mode when they open the documentbut Editors need to turn it on by clicking the pencil icon at the upper right and selecting Suggesting.)
If multiple people make changes to your document in Editing modeit can become difficult to keep track of who did what. Under Suggesting modethougheach collaborator’s text additions appear in a different color. So if they add an imagethe border of that image will be the same color as their text color. Anything they delete will have a strikethrough in their assigned color.
Suggesting mode makes it easy to see who made each change to a shared document.
Howard Wen / Foundry
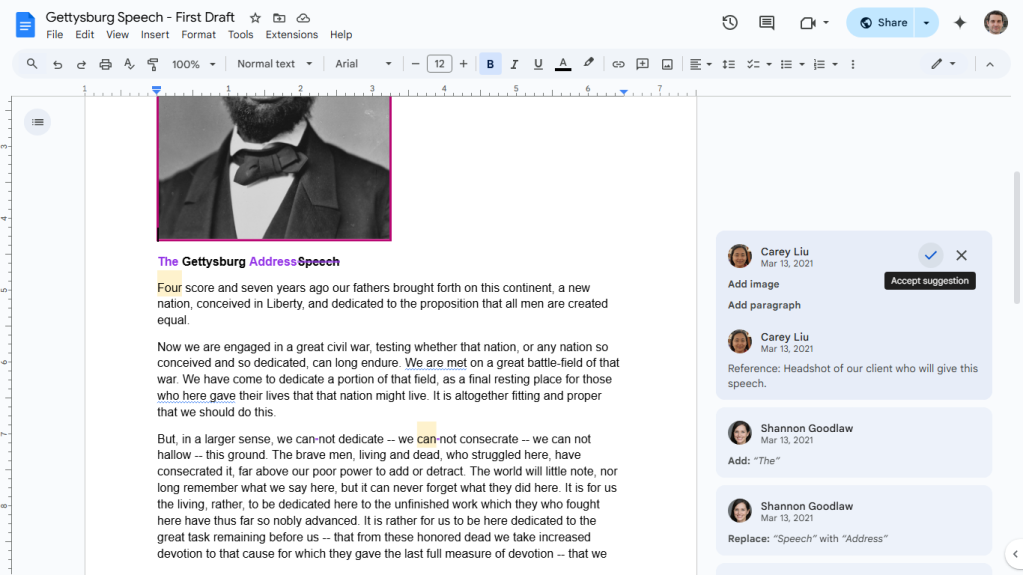
Note cards will appear to the right of your document; each shows a suggested change made to your document (and by whom and when the change happened). To accept the suggestion on a cardclick the checkmark; to reject itclick the X.
To view your document with or without all the edits suggested by your collaborators: Click Tools > Review suggested edits from the top menu bar. A box will open at the upper-right corner. To view your document with the suggested edits merged inclick the Show suggested edits dropdown and select Preview “Accept all.” To view without the suggested editsselect Preview “Reject all.”
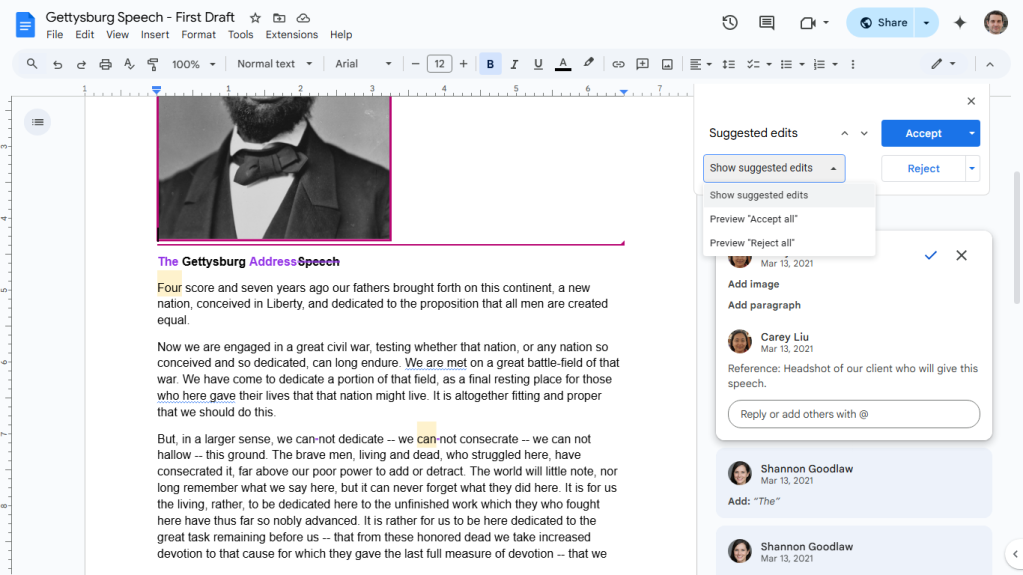
Reviewing suggested changes.
Howard Wen / Foundry
If you want to accept or reject all suggestions at once without going through them one by oneyou can click the Accept All or Reject All buttons on this pane.
Whenever your document gets a suggested edit by a collaboratoran updated tally appears next to its filenameor on the upper-right of its thumbnailon your Google Docs or Google Drive home screen.
Recover older versions of a document
Mistakes happenand you may want to undo changes you or others have made to a document. To look up older versions of an open documentclick File > Version history > See version history.
A panel opens on the right that shows a list of older versions of your documentorganized by date and time. To see what an earlier version of the doc looks likeclick its date or version name in the list. That version will appear in the main window.
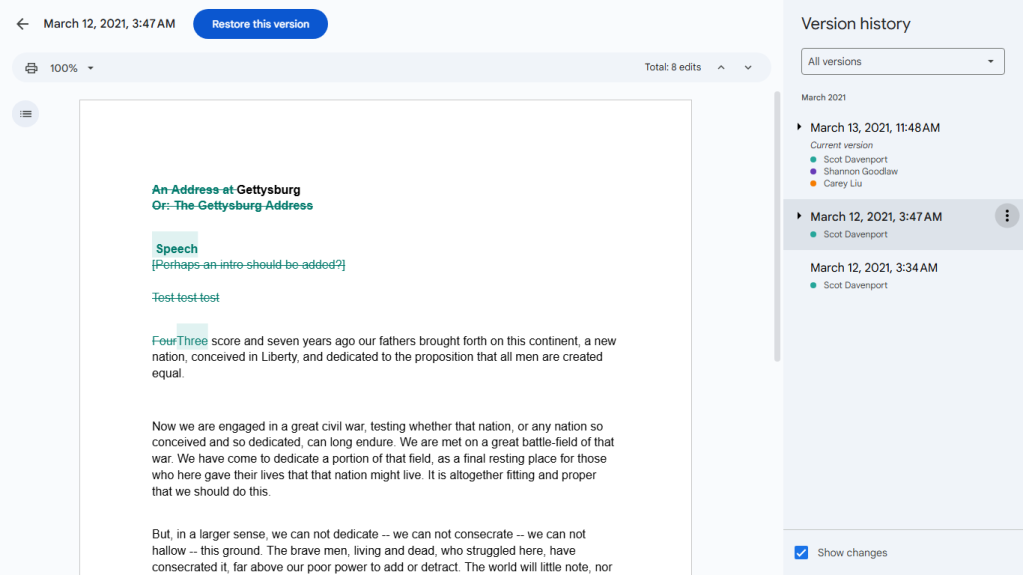
Viewing an earlier version of a document.
Howard Wen / Foundry
If you want to use this older version to replace the current version of your documentclick the blue Restore this version button at the upper-left of the screen. This restored version will then appear at the top of the version history list.
If you want to give an older version a unique nameclick its date. You’ll be prompted to type in words to replace the date. The version’s date and time will then appear in smaller type underneath its new name.
Download and export your document to Word or PDF
You can download a document and convert it to PDF.docx (if it’s not already a Word document)or another text format such as OpenDocument Format (.odt)Plain Text (.txt) or Rich Text Format (.rtf).
With the document openselect File > Download from the top menu bar and choose a file format. The document will be saved to your PC’s storage drive in that format.

Downloading and converting a document to Word format.
Howard Wen / Foundry
Alternativelyyou can select File > Email and then pick either Email this file or Email collaborators. This action will open a panel that lets you email your document as an attachment. PDF is the defaultbut you can click the PDF dropdown and choose Word or another format.
A third option under File > Email is Email draft. This inserts the Email draft building block discussed earlier in the story.
Use the Google Docs mobile app
The Docs mobile apps for AndroidiPhoneand iPad have a simplified interface to accommodate small touchscreens. Except for version historythe same features described in this guide are in the mobile apps.
For examplethrough the Docs mobile appsyou can share documents (see “How to use Google Drive for collaboration” for instructions) and work on them with other people. This includes doing so under Suggesting mode.
Toolbars along the top and bottom of the app let you take actions such as formatting text and inserting images or tables. Clicking the three-dot icon at the far right of the top toolbar opens more options including turning on Suggesting moderunning spell checkand sharing your document.
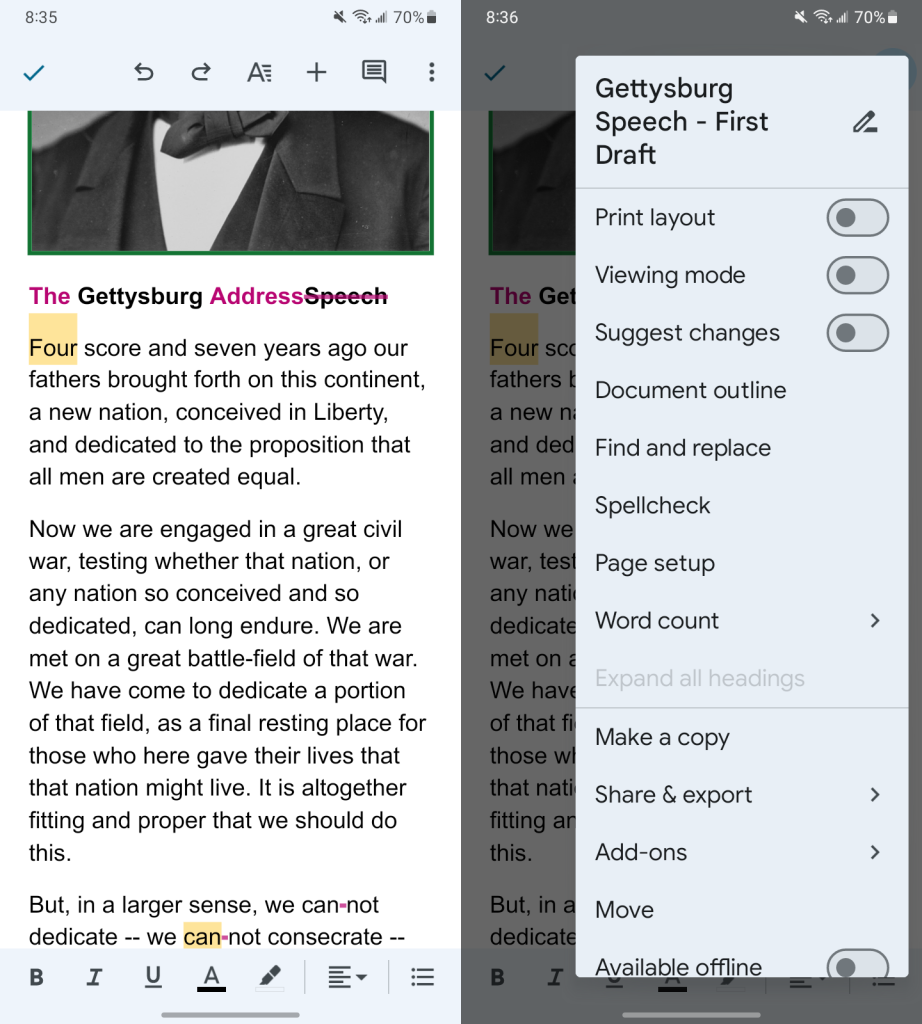
Using the Google Docs Android app.
Howard Wen / Foundry
It can be tedious to work on a document on a small phone screenbut the Docs mobile app is handy for making quick edits or keeping up to date on changes to your document made by other people. Any changes you make to a document through the mobile app are automatically saved to your Google Drive. They will show up the next time you open the document from the Google Docs or Google Drive home screen in your PC’s web browser.
Use keyboard shortcuts
Save time in Google Docs by using keyboard shortcuts to execute tasks. Below are some of the most useful shortcuts. For moreselect Help > Keyboard shortcuts from the top menu bar in Google Docsor see Google’s extensive list of Google Docs keyboard shortcuts.
Handy Google Docs keyboard shortcuts
| BASICS | ||
| Action | Chrome OS / Windows shortcut | macOS shortcut |
| Copy | Ctrl-C | ⌘-C |
| Cut | Ctrl-X | ⌘-X |
| Paste | Ctrl-V | ⌘-V |
| Undo | Ctrl-Z | ⌘-Z |
| Redo | Ctrl-Y | ⌘-Y |
| Insert or edit link | Ctrl-K | ⌘-K |
| Open link | Alt-Enter | Option-Enter |
| Find | Ctrl-F | ⌘-F |
| Find and replace | Ctrl-H | ⌘-Shift-H |
| Select all | Ctrl-A | ⌘-A |
| Insert comment | Ctrl-Alt-M | ⌘-Option-M |
| Check spelling and grammar | Ctrl-Alt-X | ⌘-Option-X |
| Open dictionary | Ctrl-Shift-Y | ⌘-Shift-Y |
| Ctrl-P | ⌘-P | |
| TEXT AND PARAGRAPH FORMATTING | ||
| Action | Chrome OS / Windows shortcut | macOS shortcut |
| Bold | Ctrl-B | ⌘-B |
| Italicize | Ctrl-I | ⌘-I |
| Underline | Ctrl-U | ⌘-U |
| Numbered list | Ctrl-Shift-7 | ⌘-Shift-7 |
| Bulleted list | Ctrl-Shift-8 | ⌘-Shift-8 |
| Align text left | Ctrl-Shift-L | ⌘-Shift-L |
| Align text right | Ctrl-Shift-R | ⌘-Shift-R |
| Copy text formatting | Ctrl-Alt-C | ⌘-Option-C |
| Paste text formatting | Ctrl-Alt-V | ⌘-Option-V |
This article was originally published in May 2019 and most recently updated in June 2025.
More Google Docs tips:
- Make your own business templates in Google Docs
- Google Docs: How to add chartscitationsand more
- 3 clever new tricks to turn Google Docs into a collaboration superhub
- How to use smart chips in Google Docs and Sheets
- 4 advanced ‘smart chip’ tips for Google Docs and Sheets
- How to use Gemini AI to write (and rewrite) in Google Docs and Gmail
- 6 fast fixes for common Google Docs problems
- 9 handy hidden features in Google Docs on Android
- Google Workspace: 7 great ways to use the Gemini AI sidebar
- More Google Workspace tips and tutorials


