Complete Guide on Managing Audio Input Devices [Latest In 2026]
![Complete Guide on Managing Audio Input Devices [Latest In 2026]](https://www.techcommuters.com/wp-content/uploads/2025/12/Complete-Guide-on-Managing-Audio-Input-Devices.webp)
People use microphones for meetingsgamesclassesrecordingsand voice chatsso any problem with the device can interrupt their work. Even a small system error can make the voice weak or stop it fully. This is why knowing the basics of managing audio input devices is helpful for new and experienced users.
Windows includes tools that let you adjust the microphoneimprove clarityreduce noiseand choose the right device.
When you understand these optionsyou avoid confusion and save time while fixing sound issues. This guide aims to explain each part in clear and simple terms.
Before You StartKnow The Answers To These Questions:
1. Why is my microphone not showing in Windows?
Your microphone may not appear when the connection is faulty or when the drivers are outdated. Windows sometimes disables devices it cannot detect. If the port has dust or the cable is damagedthe system might skip the device completely. There are also times when privacy settings block access. Many users forget to enable the permission for apps. Once you check the cableportprivacy paneland driversthe microphone usually shows up again without extra tools.
2. Why does the microphone volume stay too low?
A low microphone level usually happens when the input gain is set too low. Some apps also reduce it to protect your ears. Background noise filters can make the sound appear soft as well. If you use external sound cards or mixersthey might override the level chosen inside Windows. When you increase the input volumecheck the advanced settingsturn off noise suppression for a momentand restart the app. These steps often bring the volume back to a normal range.
3. Why do I hear an echo during calls?
Echo occurs when the microphone picks up the sound from your speakers. If the speaker volume is highthe mic catches the output and sends it back into the meeting. This creates a loop. Some apps have built-in echo cancellationbut it is not always perfect. Headphones help stop the feedback completely. You can also lower the speaker volumemove the mic away from the speakersand disable unnecessary sound enhancements that amplify incoming audio.
4. Why is the sound breaking or cutting?
The sound breaks when the connection is unstable or when the system struggles to process the input. A faulty cabledamaged USB portor weak Bluetooth link can interrupt the audio. Background processes on your PC may also slow down the audio engine. When you close heavy programsswitch portsor reconnect the devicethe sound often becomes steady again. If it continuesupdate the drivers and remove unused audio devices that might conflict with the main one.
Precautions Before You Start: Important Things To Keep In Mind
Precautions help you avoid common microphone problems before they even begin. A few simple checks make your device more stable and prevent sudden failures during important calls or recordings. These points guide you toward a smoother experience with your audio setup.
- Check your microphone cable
Make sure the cable is fixed properly. A loose cable often causes sudden drops or cracks in the sound. - Confirm that the device is supported
Some microphones need special drivers. If your device is very new or very oldyou may need to install extra software. - Test the microphone before long calls
A short test helps you avoid problems during meetings. It also helps you adjust the volume to a safe level. - Avoid placing the mic near loud fans
Background air noise can disturb your voice. Try to keep the microphone away from fans or noisy equipment. - Check app permissions
Some apps need permission to use your microphone. If the permission is offthey cannot detect it. - Disable unused microphones
Too many active devices can confuse the system. Keep only the microphone you use enabled. - Restart the device after major changes
Some settings work only after a restart. This helps the system apply the new configuration. - Keep your system updated
Updates often fix sound errors. They also improve compatibility with new audio input devices.
How To Manage Audio Input Devices: Easy Methods
Windows gives you several tools to help in managing audio input devices. These tools allow you to choose the right devicecheck the volumefix basic problemsand improve clarity.
Below are four methods that work well for most users. Each method is simple and takes only a few minutes.
Method 1: Use the Settings Panel
Many users start with the Settings panel. This is where Windows groups all the main audio options. It is easy to find and simple to use. The panel lets you select the deviceadjust the input leveland test the microphone. It is the best place to check if your system detects your device.
The Settings panel shows all active audio input devices in one list. You can see the volume bar move when the system hears your voice. This helps you quickly confirm whether the mic is working. It is also useful for switching between built-in and external microphones.
Step 1. Open Settings and select Sound.
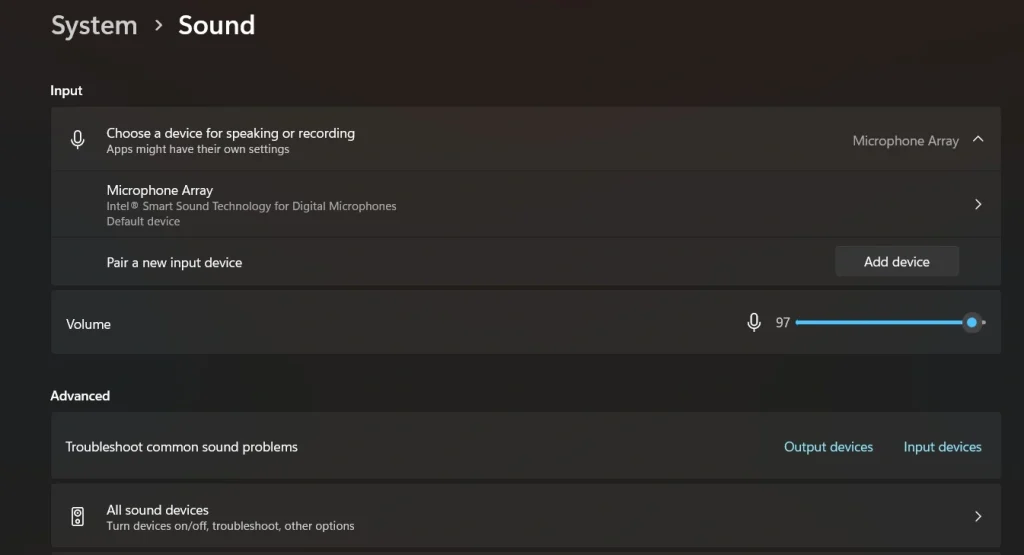
Step 2. Choose your input device and adjust the level.
Method 2: Use the Control Panel
The Control Panel has been part of Windows for many years. It offers deeper access to audio settings. Many users still prefer it because it provides classic options such as device propertiesadvanced settingsand enhancements.
This method helps when Settings cannot detect your device or when you need more detailed control. It also allows you to check hidden devices and disable extra microphones that cause conflicts. For older hardwarethe Control Panel often gives better results.
Step 1. Open the Control Panel and select Sound.
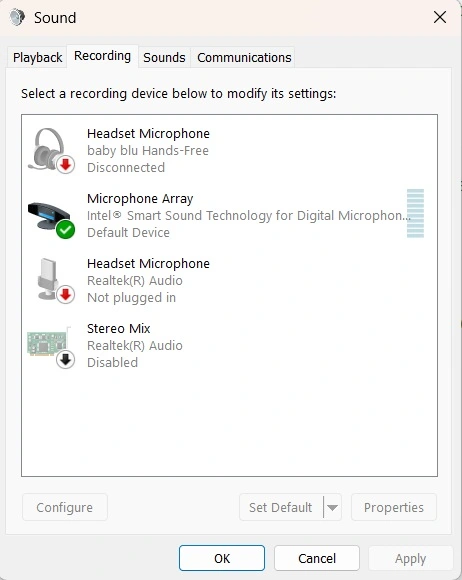
Step 2. Go to the Recording tab and manage your devices.
Method 3: Use the Troubleshooter
The built-in troubleshooter scans your audio input devices and finds common problems. It checks driversconfigurationspermissionsand basic hardware. Many issues are fixed quickly by this tool without extra effort.
The troubleshooter is helpful when you do not know the exact cause of the problem. It guides you through a series of checks and applies fixes automatically. It is a good choice when the microphone stops working suddenly.
Step 1. Open Settings and search for Troubleshoot.
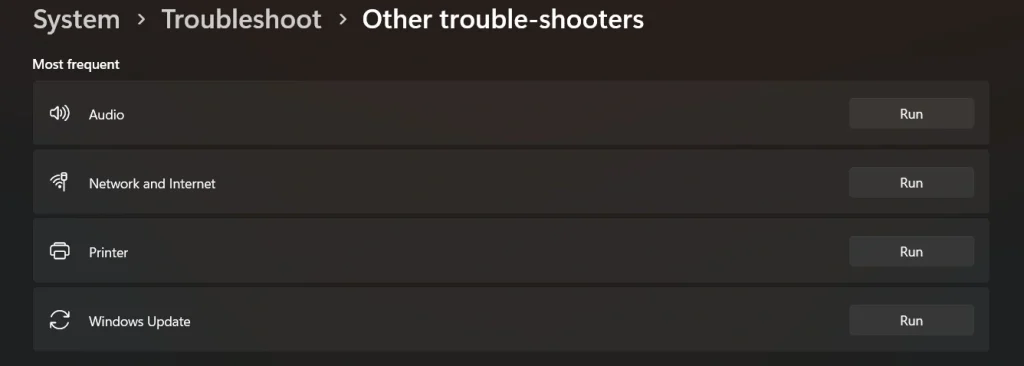
Step 2. Choose the Recording Audio troubleshooter and run it.
Method 4: Update or Reinstall Audio Drivers
Drivers allow Windows to communicate with your audio input devices. When they are outdated or damagedthe microphone stops working or behaves strangely. Updating or reinstalling the driver fixes many of these problems.
This method is useful when the microphone disconnects on its own or when the system shows errors. Once you install the correct driverthe device becomes stable and responds faster. It also improves compatibility with new apps.
Step 1. Open Device Manager and find Audio Inputs and Outputs.
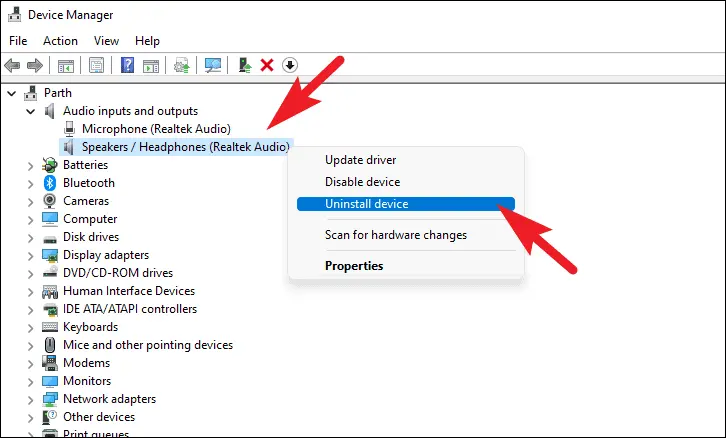
Step 2. Update or reinstall the driver for your microphone.
Author’s Tip
Most users forget to clean their microphone ports. Dust or moisture inside the port can make the connection unstable. A small brush or a dry cloth is enough. A simple cleaning improves the overall clarity and prevents sudden drops in voice.
Another helpful habit is to check levels inside the apps you use. Many meeting apps and recording tools have their own volume controls. If you change only the Windows levelthe app may still sound low. Adjusting both gives you a better and clearer result. This also makes it easier when managing audio input devices during important calls.
Advanced Tips: Extra Techniques for Better Control
Advanced tips help you refine the way your microphone works and keep your setup stable. These ideas are useful when basic adjustments are not enough. They give you more controlimprove clarityand reduce small problems that appear during long calls or recordings.
- Use a pop filter
It reduces sharp air sounds and makes your voice clearer. - Check advanced device properties
Sample rate changes can improve sound quality in some cases. - Turn off exclusive mode
This stops apps from taking full control of your microphone. - Use noise suppression when needed
This helps reduce traffic noise or typing sounds. - Keep only one virtual audio tool
Too many virtual devices can confuse the system. - Test the microphone with a recording app
A short recording helps you understand how others hear you. - Avoid using USB hubs for microphones
Direct ports offer better stability and fewer errors. - Use a light audio interface for better clarity
Small external interfaces improve the sound for studio work.
Conclusion
Managing audio input devices is easier when you know where to start. The tools inside Windows give you many ways to set the right microphonefix problemstest the qualityand improve clarity. With the methods in this guidemost users can handle common issues on their own.
When you check your device regularlyupdate your driversand keep your settings organizedyour microphone remains reliable. Clear sound helps you stay productive in callsmeetingsand recordings. With steady habits and simple stepsyou can avoid most sound problems and enjoy smooth communication.
FAQs:
1. How do I choose a default microphone?
You can set the default microphone through the Sound settings or the Control Panel. Once selectedWindows sends all voice input through that device. Your apps will then use the chosen mic without needing extra changes.
2. Why does Windows switch microphones on its own?
Windows sometimes changes devices when you plug in a new audio accessory. Some apps also switch to the best available device. You can stop this by disabling unused microphones and setting one default device.
3. Should I disable noise suppression for better quality?
Noise suppression helps in busy places but may reduce the natural tone of your voice. If you record music or videosturning it off gives a clearer result. For meetingsit is usually better to keep it on.
Author Bio:
Dinesh Lakhwani 

Dinesh Lakhwanithe entrepreneurial brain behind “TechCommuters,” achieved big things in the tech world. He started the company to make smart and user-friendly tech solutions. Thanks to his sharp thinkingfocus on quality and the motto of never giving upTechCommuters became a top player in the industry. His commitment to excellence has propelled the company to a leading position in the industry.
Popular Post


Recent Post

How to Switch Windows 10 to a Local Account: Complete Guide
Windows 10 allows users to sign in with either a Microsoft account or a local account. When you set up a new computerthe system often suggests using a Microsoft account. This account connects your device to Microsoft services such as OutlookOneDriveand the Microsoft Store. It also syncs settingsthemesand passwords across […]

How To Change Default Apps For File Types In Windows
Windows is designed to make using your computer easy. One way it does this is by assigning default apps to different file types. This means when you open a fileWindows automatically opens it with a specific program. For examplephotos may open with Photosmusic with Groove Musicand PDFs with Edge. These default […]

How To Adjust The Mouse Pointer Speed: Complete Guide
Using a computer every day means you use the mouse a lot. The mouse pointer moves on the screen and helps you clickscrolland select items. Many people never think about the speed of the mouse pointer. They have used the default setting for years. This can cause small problems over time. A slow […]

How to Change Mouse Scrolling Settings In Windows
A mouse is one of the most used computer tools. People use it every day. They scroll through emails. They scroll through documents. They scroll through websites and images. The movement becomes automatic. Most users do not notice it. That is why problems often go unnoticed. Scrolling problems show up slowly. At firstit feels […]

Keyboard Light Settings: Keyboard Lighting Control [Complete Guide]
Keyboards are no longer simple typing tools. Wellyes! Over timethey have evolved to include features that improve comfortvisibilityand overall experience. One of the most useful features today is keyboard lighting. It helps users work comfortably in low-light conditions. It also reduces strain when typing for long hours. Many users first notice […]

Customizing Pointer Appearance: Complete Guide
The way your mouse pointer looks on your computer may seem like a small detail. But customizing pointer appearance can make using your PC more comfortable and visually appealing. Many users do not realize that they can change the pointer sizecolorand to fit their needs. Whether you want a bigger pointer for […]

How To Choose a Computer Monitor: Monitor Buying Guide
Buying a monitor looks easy. Many people think all screens are the same. That belief causes regret later. A monitor is not just a display. It is a daily tool. You read on it. You work on it. You relax with it. Small problems become big over time. Poor brightness hurts eyes. Bad size causes […]

How To Get Help With File Explorer in Windows 11 [Complete Guide]
File Explorer is one of the most important tools in Windows 11. It is used to open foldersview filesand manage stored data. Almost every action on a Windows computer depends on it in some way. When users open documentssave downloadsor organize photosFile Explorer is always involved. Because it is used […]

How To Fix A Frozen Computer: Complete Guide [Windows 11/10]
A frozen computer is one of the most common problems Windows users face. The screen stops responding. The mouse pointer does not move. Keyboard inputs do nothing. You may hear the fan running loudly. Sometimes the system looks alivebut nothing works. This situation often happens when you are busy or working on something important. […]

How to Upgrade Computer RAM: Complete Guide
Upgrading RAM is one of the simplest ways to improve a computer. It helps the system feel faster and smoother. Apps open quicker. Browsers handle more tabs. Games and tools run with less delay. Many users search for how to upgrade computer RAM because it gives real results without high cost. You do not need […]

