Modified on 08.10.2025
The default printer is the one to which all print jobs are sent (unless otherwise specified by the user or the apps sending the print jobs). If you’re using Windowsthere’s a high chance that your operating system is set to automatically select your default printer. Howeveryou can disable this option and manually set your default printer using the instructions shared in this guide. Here’s how to set your default printer in Windows 11Windows 10and even in older versions like Windows 7:
 See the default printer set in Windows
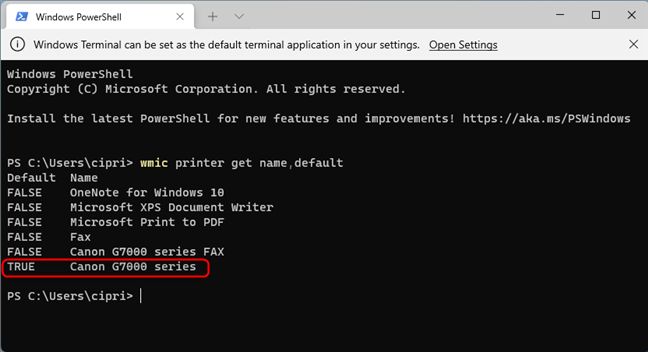
Your default printer is the one that’s marked TRUE in the Default column. In our casethe default printer is the Canon G7000 series.
IMPORTANT: If you don’t see the printer you want to set as the default listed by this commandyou first need to install it. Here are two guides that help:
See the default printer set in Windows
Your default printer is the one that’s marked TRUE in the Default column. In our casethe default printer is the Canon G7000 series.
IMPORTANT: If you don’t see the printer you want to set as the default listed by this commandyou first need to install it. Here are two guides that help:
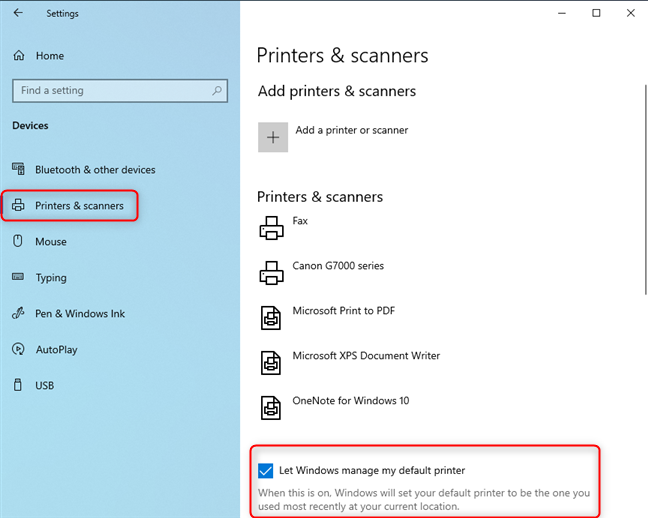
 In Windows 10 Settingsgo to Devices
On the leftclick or tap “Printers & scanners” and then uncheck the box that says “Let Windows manage my default printer.” When this setting is enabledWindows 10 manages the default printer for youand it always sets it to be the printer you last used.
In Windows 10 Settingsgo to Devices
On the leftclick or tap “Printers & scanners” and then uncheck the box that says “Let Windows manage my default printer.” When this setting is enabledWindows 10 manages the default printer for youand it always sets it to be the printer you last used.
 Go to Printers & scanners
After you’ve unchecked this optionclick or tap on the name of the printer you want as your defaultand then on Manage.
Go to Printers & scanners
After you’ve unchecked this optionclick or tap on the name of the printer you want as your defaultand then on Manage.
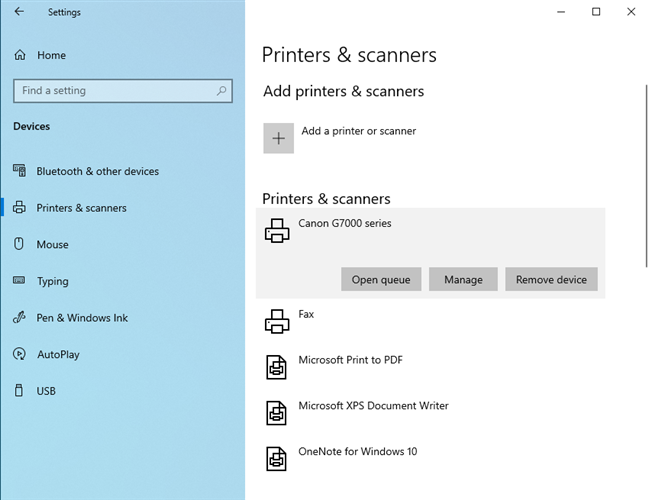
 Select the printer you want to useand click or tap Manage
You see links to several configuration options. Click or tap the “Set as default” buttonand then you should see Default as the Printer status.
Select the printer you want to useand click or tap Manage
You see links to several configuration options. Click or tap the “Set as default” buttonand then you should see Default as the Printer status.
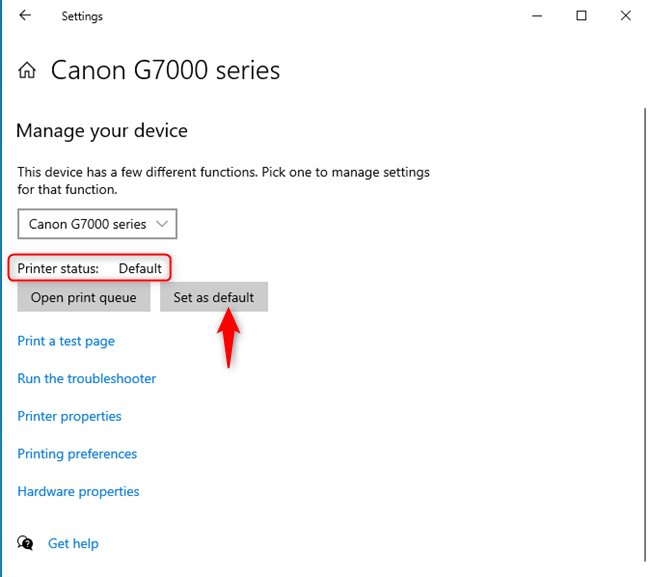
 Click or tap Set as default
If you don’t see the “Set as default” buttonthat means you have not unchecked the “Let Windows manage my default printer” option mentioned earlier in this section.
TIP: After you’ve set your default printeryou may want to know how to print an article without ads in all major browsers (ChromeFirefoxEdgeOperaor Safari).
Click or tap Set as default
If you don’t see the “Set as default” buttonthat means you have not unchecked the “Let Windows manage my default printer” option mentioned earlier in this section.
TIP: After you’ve set your default printeryou may want to know how to print an article without ads in all major browsers (ChromeFirefoxEdgeOperaor Safari).
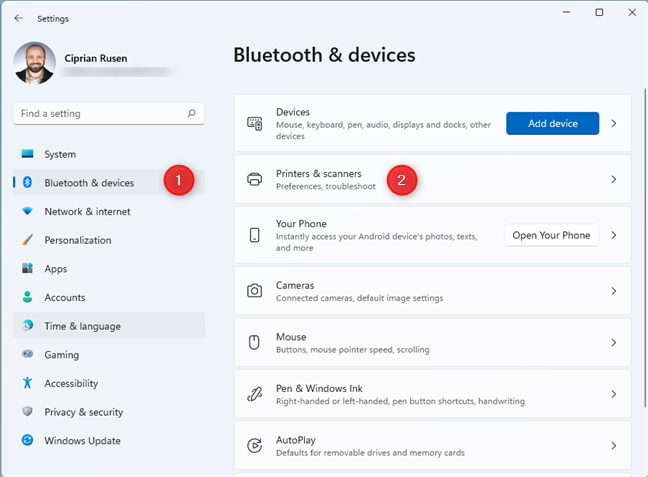
 In Windows 11 Settingsgo to Bluetooth & devices
Scroll down the list of printersand set the “Let Windows manage my default printer” switch OFF. If you don’t do thisWindows 11 will manage the default printer for you by selecting the last printer used on your device.
In Windows 11 Settingsgo to Bluetooth & devices
Scroll down the list of printersand set the “Let Windows manage my default printer” switch OFF. If you don’t do thisWindows 11 will manage the default printer for you by selecting the last printer used on your device.
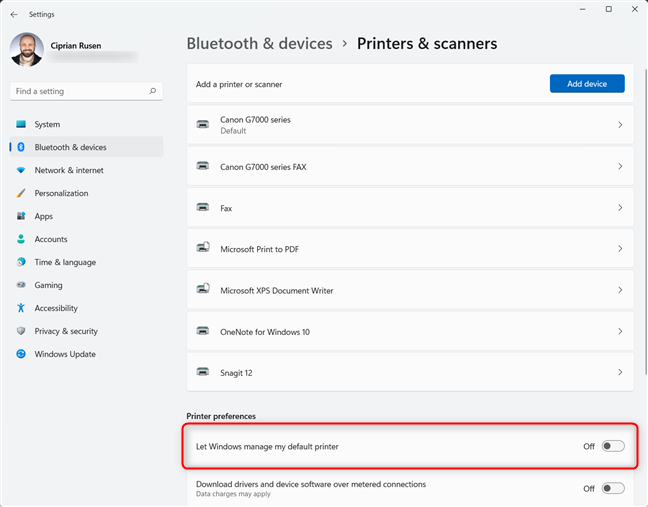
 Set the Let Windows manage my default printer switch to OFF
In the list of printersclick or tap on the name of the printer you want as the default. Thenclick or tap the “Set as default” button and notice its Printers status changing to Default.
Set the Let Windows manage my default printer switch to OFF
In the list of printersclick or tap on the name of the printer you want as the default. Thenclick or tap the “Set as default” button and notice its Printers status changing to Default.
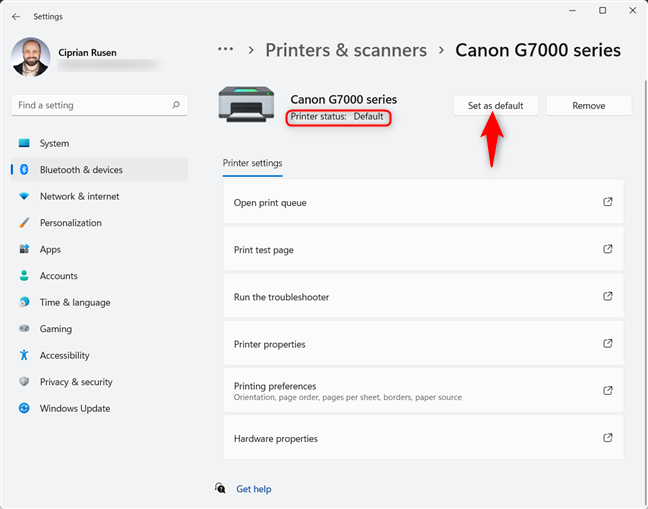
 Click or tap Set as default
If you don’t see the “Set as default” buttonyou didn’t uncheck the “Let Windows manage my default printer” option.
TIP: Do you want to take screenshots in Windows and send them directly to the printer? Here are two ways to “screenshot to a printer”.
Click or tap Set as default
If you don’t see the “Set as default” buttonyou didn’t uncheck the “Let Windows manage my default printer” option.
TIP: Do you want to take screenshots in Windows and send them directly to the printer? Here are two ways to “screenshot to a printer”.
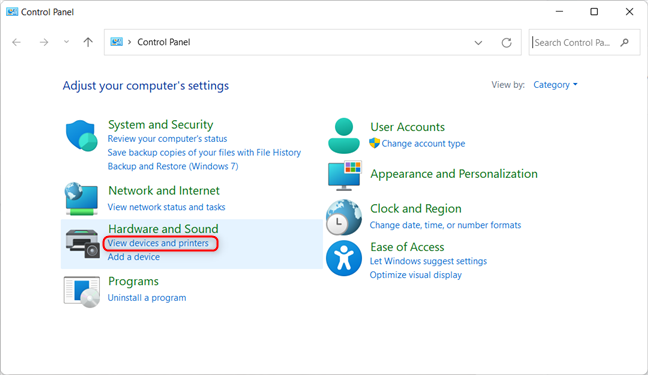
 In Control Panelclick View devices and printers
You see a list of installed devices. Nextscroll to the Printers sectionfind the printer you’re interested in and right-click on it. In the menu displayedclick “Set as default printer.” For multifunctional printers like the Canon Pixma G7000 series we’re usingyou also need to click on the printer’s name in the sub-menu that opens. For other printersthere’s no such sub-menu.
In Control Panelclick View devices and printers
You see a list of installed devices. Nextscroll to the Printers sectionfind the printer you’re interested in and right-click on it. In the menu displayedclick “Set as default printer.” For multifunctional printers like the Canon Pixma G7000 series we’re usingyou also need to click on the printer’s name in the sub-menu that opens. For other printersthere’s no such sub-menu.
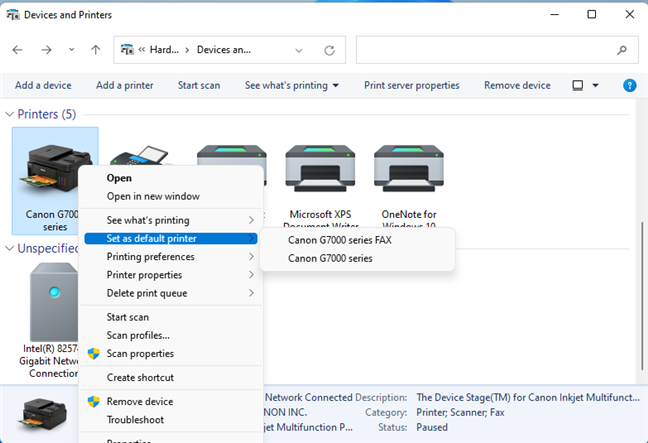
 Right-click the printer you want as the default
You are warned that setting this printer as the default means Windows will stop managing your default printer. Click OK to set the printer you’ve chosen as the default.
Right-click the printer you want as the default
You are warned that setting this printer as the default means Windows will stop managing your default printer. Click OK to set the printer you’ve chosen as the default.
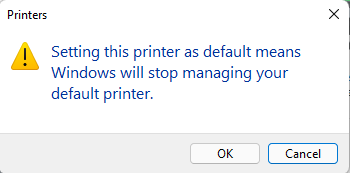
 Confirm your choice
You then see a checkmark next to the printer you’ve set as the defaultconfirming the change.
Confirm your choice
You then see a checkmark next to the printer you’ve set as the defaultconfirming the change.
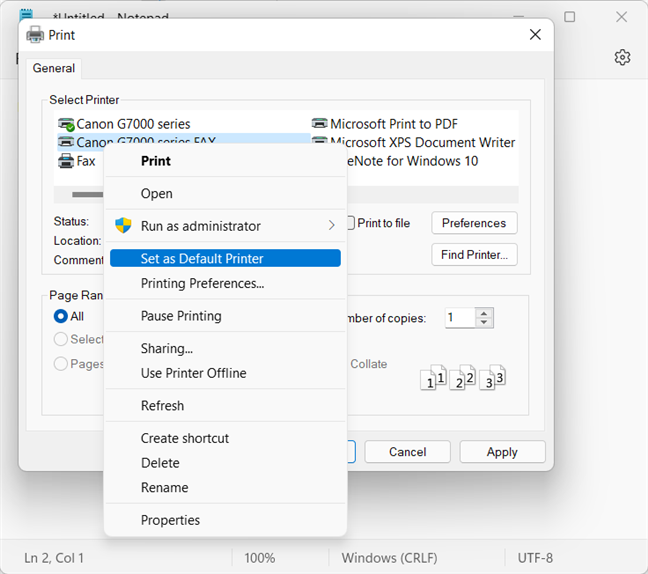
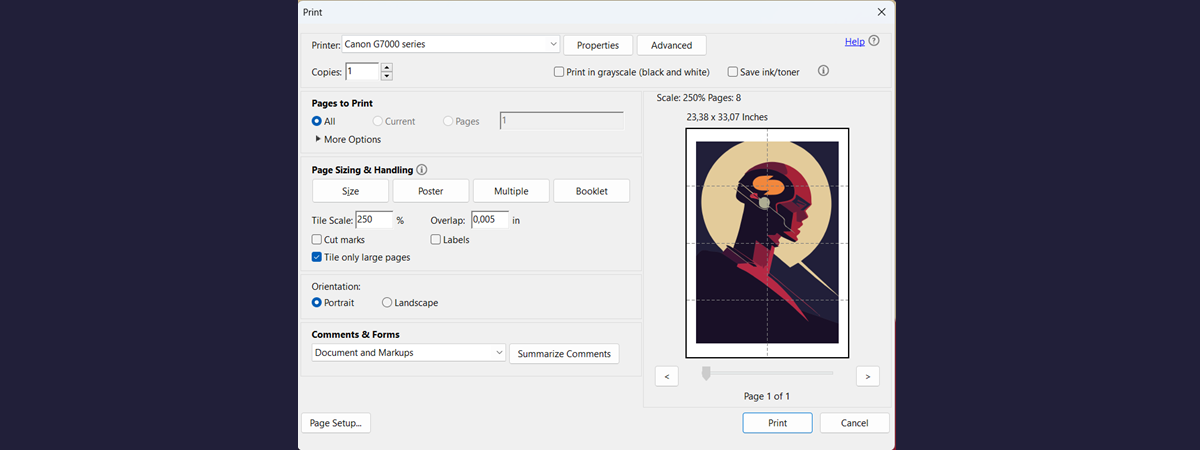
 Set the default printer from the Print window
The default printer is then changed to the one you’ve selectedand hitting the Print button will send the print job to it.
Set the default printer from the Print window
The default printer is then changed to the one you’ve selectedand hitting the Print button will send the print job to it.
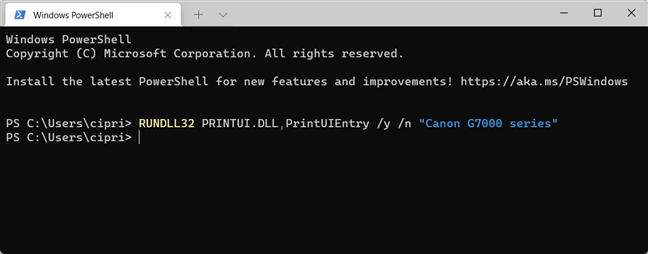
 The command to set the default printer in Windows
How do I find my default printer?
There are many ways to find your default printer. One that’s relatively easy and works in all Windows versions is to start Command PromptPowerShell, or Windows Terminal and run this command:wmic printer get name,default
Thenyou see all the printers installed on your computerlike in the screenshot below.
- How to install a wireless printer in your Wi-Fi network
- How to add a local printer on your Windows 10 computerusing a USB cable
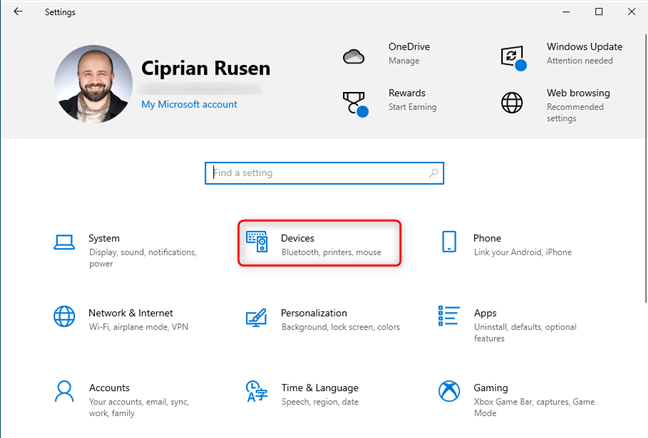
1. How to set the default printer in Windows 10 from Settings
If you’re using Windows 10open Settings and go to Devices.2. How to set the default printer in Windows 11 from Settings
If you’re using Windows 11open Settings. On the leftclick or tap “Bluetooth & devices.” On the rightopen the Printers & scanners section.3. How to set the default printer from the Control Panel (all Windows versions)
This method works in all versions of Windowsincluding the older Windows 7. Start by opening the Control Panel. Thenin the Hardware and Sound sectionclick or tap the link that says “View devices and printers.”4. How to set the default printer from the Print window (all Windows versions)
When you want to print something from Windowsyou usually press CTRL+ P on your keyboard. For examplethis shortcut works in any document editing app from Notepad to WordPad to Word. Thenin the Print windowyou see the printers installed on your Windows computer. Right-click on the printer you want and choose “Set as Default Printer.”5. How to set the default printer from CMDPowerShellor Windows Terminal (all Windows versions)
You can also set the default printer from the command line. Firststart the app you wish (Command PromptPowerShellor Windows Terminal) in any Windows versionincluding the old Windows 7. If you’re using Windows 11here’s how to open the Windows Terminal. Thentype the following command:rundll32 printui.dll,PrintUIEntry /y /n "printer name"
Make sure to replace the printer name part of the command with the actual name of the printer you want to set as the default. If you don’t know its nameyou can find it by running the command we shared in the first chapter of this guide.