This article explains how to manage basic and dynamic disks in Disk Management. It covers creatingdeletingand formatting partitionsextendingshrinkingconverting disk typesand managing dynamic volumes like simplespannedstripedmirroredand RAID-5.
What Is Disk Management
Disk Management is a Windows built-in hard drive management program. It was embedded in Windows Desktop OS and Windows Server OS with a little bit difference from one version to another. Windows Disk Management can handle various hard disk drives like internal and external disksoptical discsand flash drives. Relatively speakingit is a free and reliable disk management tool.
How to Access Disk Management
There are multiple ways to get access to Disk Management. Take Windows 11 Disk Management for example.
#1. Run Disk Management via Windows Start Menu
The easiest way to launch Disk Management is through the Windows Start menu. Right-click on the Start logo and select Disk Management in the popup.
#2. Open Disk Management from Computer Management
Similar to running Disk Management from the Start menuyou can first access Computer Management in the Start menuand then switch to Disk Management in the right panel.
#3. Access Disk Management Through Search
Windows Search is a useful feature that can help you find most applications on your computer including Disk Management. Just input Disk Management into the search box. In the pop-up search result windowfind the best match named Create and format hard disk partitions and click on it to open Disk Management.
#4. Launch Disk Management via Windows Run
Besides Windows Searchyou can also rely on Windows Run box to directly open the target software. For Disk Managementtype diskmgmt.msc into the Run box and click OK to launch Disk Management immediately.
#5. Run Disk Management via Command Prompt
Command Prompt (cmd.exe) is another way to open your desired app. To get access to Disk Management through command promptsearch for CMD and open the best match resultthen in the commnad line windowinput diskmgmt.msc and press the Enter key.
#6. Open Disk Management by File Explorer
You can also explore Disk Management in Windows File Explorer. Key in diskmgmt.msc in the address bar of File Explorer and press Enter or click the arrow next to the address bar. ThenDisk Management will appear.
#7. Access Disk Management Within Control Panel
Go to the Control Panel firstthen view its items by Category. Nextselect the System and Security categoryscroll down to the Windows Tools section and click on Create and format hard disk partitions to open Disk Management.
Or you can directly search Disk Management in the Control Panel search box in the upper right corner and click on Create and format hard disk partitions to access Disk Management.
Or input disk management or diskmgmt.msc into the address bar of the Control Panel and press Enter to launch Disk Management.
#8. Launch Disk Management in Task Manager
Moreoveryou can reach Disk Management using Task Manager. From the Taskbaropen Task Manager. Then click on File from the top left menuchoose Run new taskand then input diskmgmt.msc.
#9. Open Disk Management with Desktop Shortcut
Finallyyou can create a shortcut of Disk Management on your desktop. This wayyou can quickly find and open it.
To create a Disk Management shortcutfollow these steps.
Step 1. Right-click on any blank area on your desktop and choose New > Shortcut.
Step 2. Input diskmgmt.msc as the location of the shortcut item and click Next.
Step 3. Name the shortcut as Disk Management and click Finish.
Furthermoreif you want quick access for Disk Management everywhereyou can pin this shortcut to your taskbar or Start menu. Just right-click on this shortcutchoose Show more optionsand select Pin to Start or Pin to taskbar.
Overview of Disk Management Interface
In this chapterwe will introduce the general layout of Disk Management.
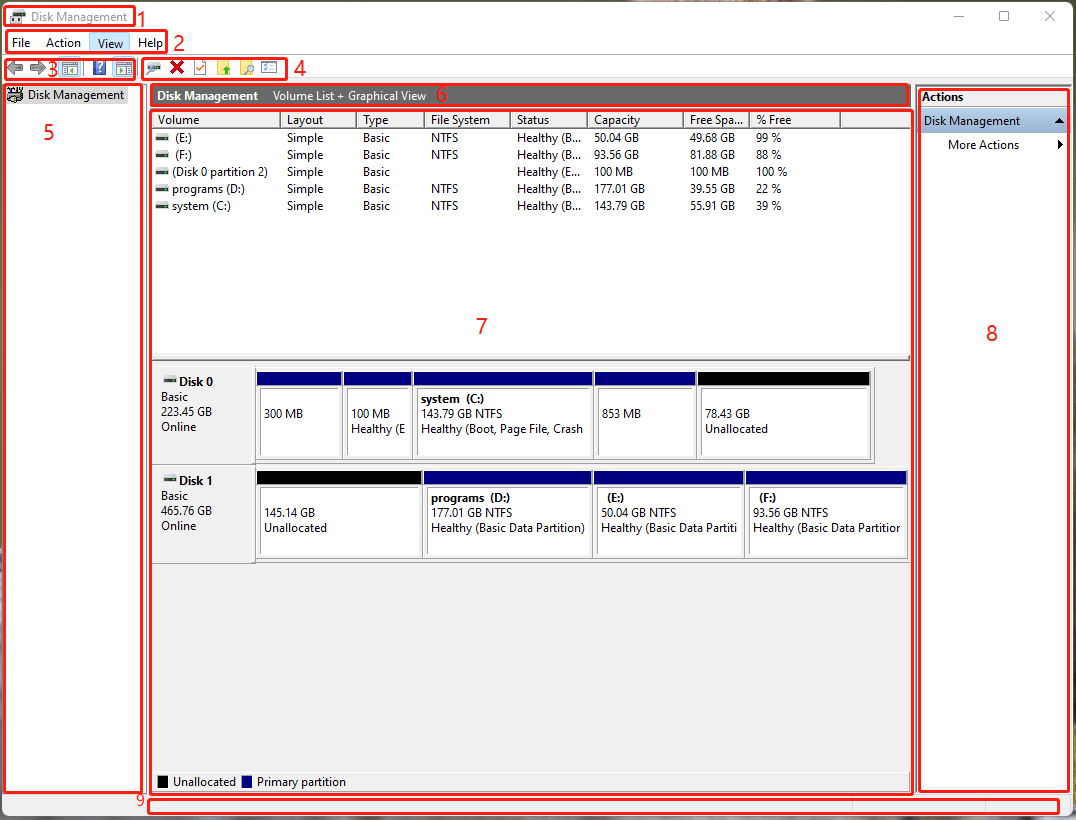
1. Program name
2. Top menu including Standard menus (Action and View)
3. Standard toolbar
4. Toolbars
5. Console tree
6. Description bar
7. Main hard disks and volumes information window
8. Action pane
9. Status bar
1. Disk Management Top Menu
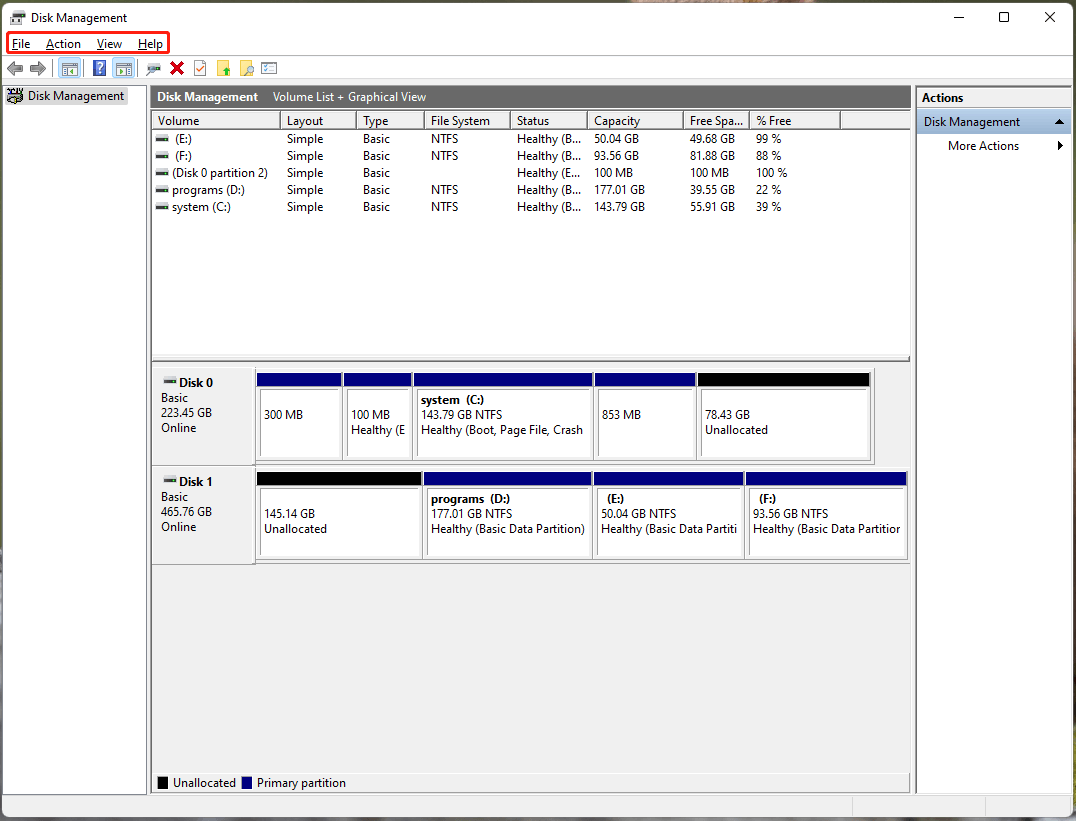
The top menu of Disk Management mainly contains 4 options and each option consists of several suboptions. They are listed below.
File
| Options | Trigger a feature named Disk Cleanupwhich enables you to delete files that store the changes of the view of a console file to save disk space. |
| Exit | Close Disk Management. |
Action
| Refresh | Reload Disk Management. |
| Rescan Disks | If there is an external disk that’s not showing up in Disk Managementunplug the diskplug it back inand then use this feature to make Disk Management detect the drive. |
| Create VHD | Create a virtual hard disk (VHD) from scratch. |
| Attach VHD | Add a virtual hard disk (VHD) to Disk Management. |
| All Tasks | When nothing is selected, this option is missing. When a disk is selected: New Spanned Volume: create a new spanned volume. New Striped Volume: create a new striped volume. New mirrored Volume: create a new mirrored volume. New RAlD-5 Volume: create a new RAID-5 volume. Convert to Dynamic/Basic Disk: convert the selected disk between basic and dynamic. Convert to MBR/GPT Disk: convert the selected disk between GPT and MBR. Offline/Online: offline a disk will prevent access to its storage while online a disk will enable access to its storage. Detach/Attach VHD: remove a virtual hard disk (VHD) from Disk Management or add a virtual hard disk (VHD) to Disk Management. Properties: display general information about the selected disk. When a volume is selected: Open: open the selected volume in File Explorer. Explore: locate the selected volume in File Explorer. Mark Partition as Active: set the selected volume as active partition. Note that only volume containing system boot files can be activated. Change Drive Letter and Paths: addchangeor remove drive letter for the selected volume. Format: reformat the selected volume and change its volume labelfile systemand allocation unit size. Extend Volume: increase the size of the selected volume. Shrink Volume: decrease the size of the selected volume. Add Mirror: maintain multiple copies of the selected volume’s data on different disks to provide data redundancy. Delete Volume: delete the selected volume to erase all data on it. Properties: show general information about the selected volume. |
| Help | Navigate to Microsoft Management Console (MMC) where it offers further help for Windows users. |
View
| Top | Disk List: show your disks in the upper part of Disk Management. Volume List: display your volumes in the upper part of Disk Management. Graphical View: demonstrate your volumes on disks in a graphic layout in the upper part of Disk Management. |
| Bottom | Disk List: display your disks in the lower section of Disk Management. Volume List: show your volumes in the lower section of Disk Management. Graphical View: illustrate your disk volumes in the lower section of Disk Management. Hidden: do not show the lower section in Disk Management. |
| Settings | Set the color and pattern for the listed regions to help distinguish them and set the display proportions for disks and disk regions to help organize themboth in the details pane. |
| Drive Paths | Manage drive paths that are currently set for the volumes listed. |
| Customize | Customize what items to be displayed in the console window. There are console treestandard menus (Action and View)standard toolbarstatus bardescription bartaskpad navigation tabsaction panemenusand toolbars. |
Help
| Help Topics | Navigate to Microsoft Management Console (MMC) where it offers further help for Windows users. |
| TechCenter Web Site | Redirect to Microsoft Learn: Build skills that open doors in your career. |
| About Microsoft Management Console | Information about this Management Console. |
| About Disk Management | Information about Disk Management. |
2. Standard Toolbar
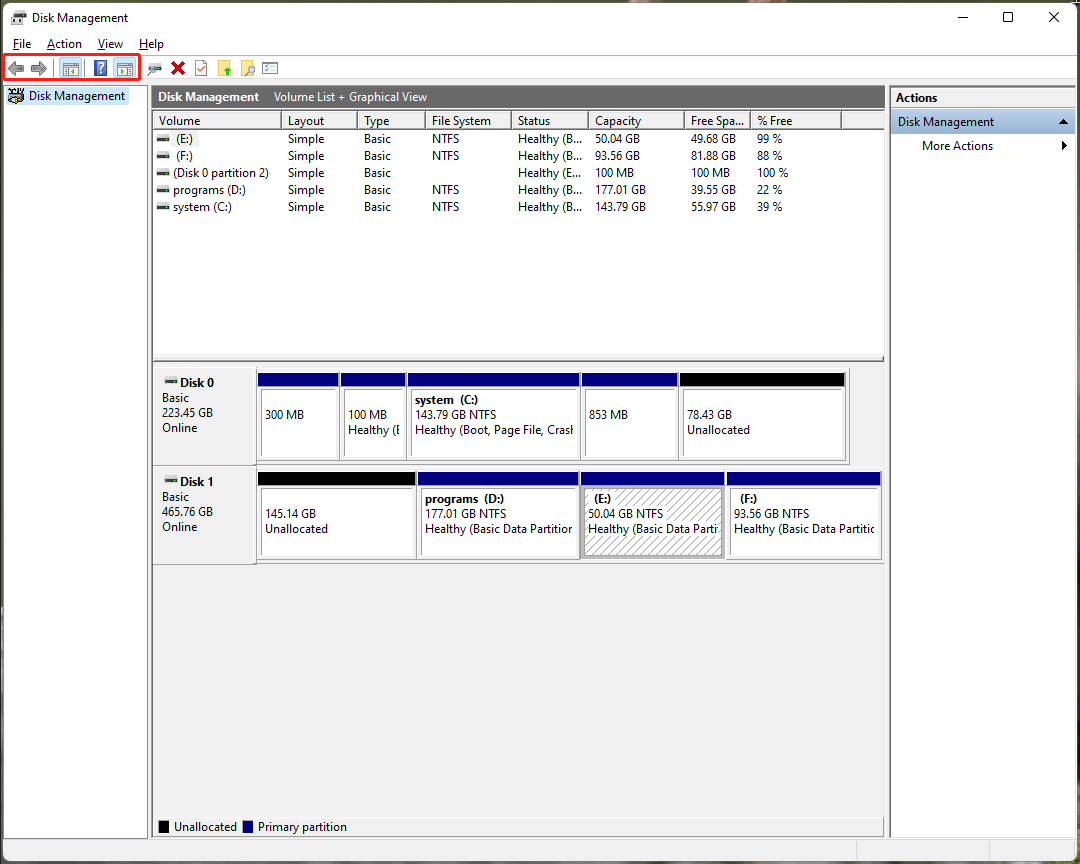
The standard toolbar refers to the 5 tools in the left side of the toolbar:
- Back
- Forward
- Show/Hide Console Tree
- Help: search Windows Disk Management in Microsoft Bing.
- Show/Hide Action Pane
3. Toolbars
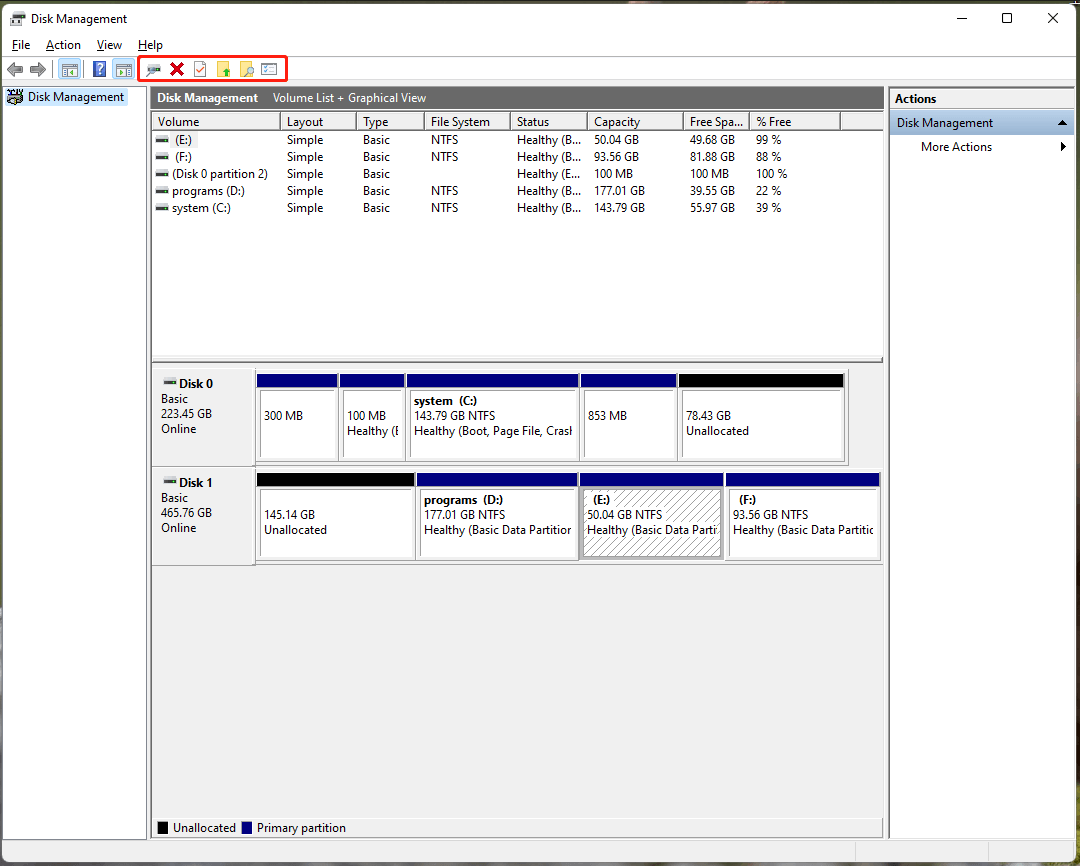
Disk Management toolbars contain 6 optionsbut sometimes you may not see all of them:
| Refresh | Reload Disk Management |
| Delete | Delete a volume to erase all data on it |
| Properties | Show information about the current volume or disk |
| Open | Open the current volume in File Explorer |
| Explore | Locate the current volume in File Explorer |
| Settings | Set the color and pattern for the listed regions to help distinguish them and set the display proportions for disks and disk regions to help organize themboth in the details pane. |
4. Main Hard Disks and Volumes Information Window
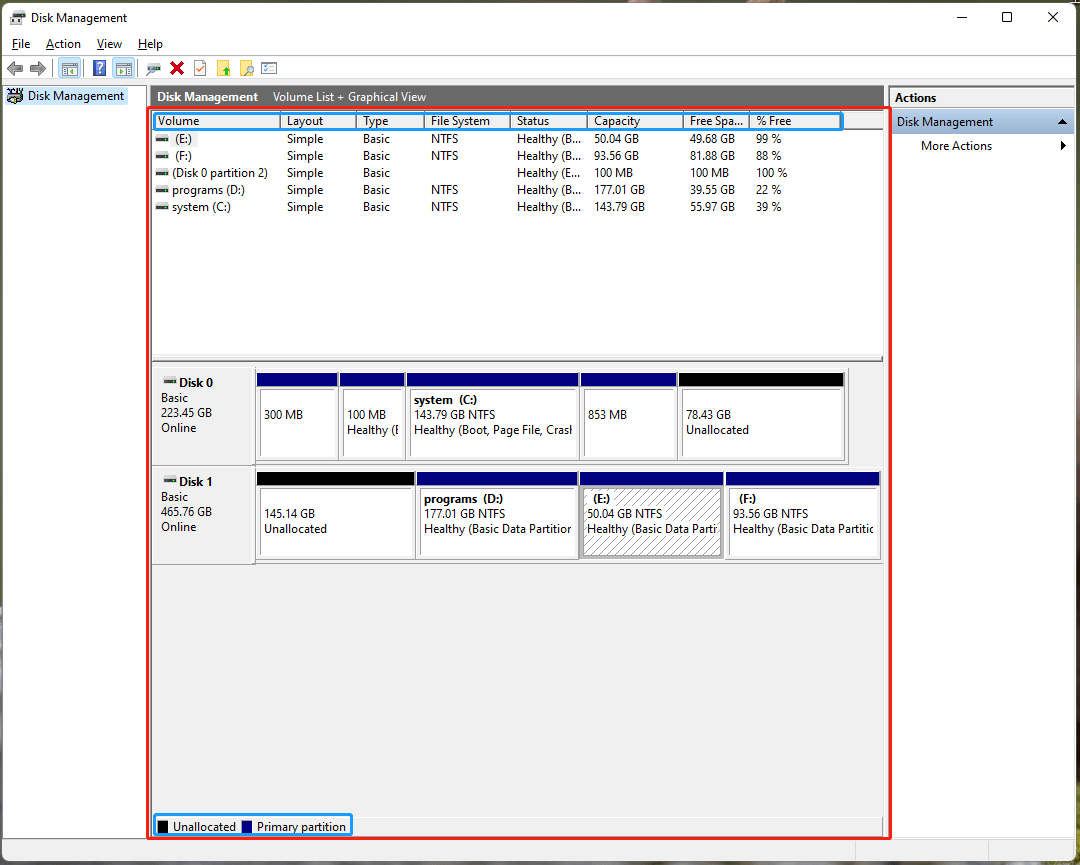
At the upper sectionthe default Volume List shows the following parameters of a volume:
| Volume | Shows drive letter and volume label |
| Layout | Volume type |
| Type | The type of the disk that contains the volume |
| File system | Volume file system |
| Status | Shows whether the volume is healthy or not and what content it has. |
| Capacity | The size of the volume |
| Free space | Usable space of the volume |
| %Free | The percentage of the free space |
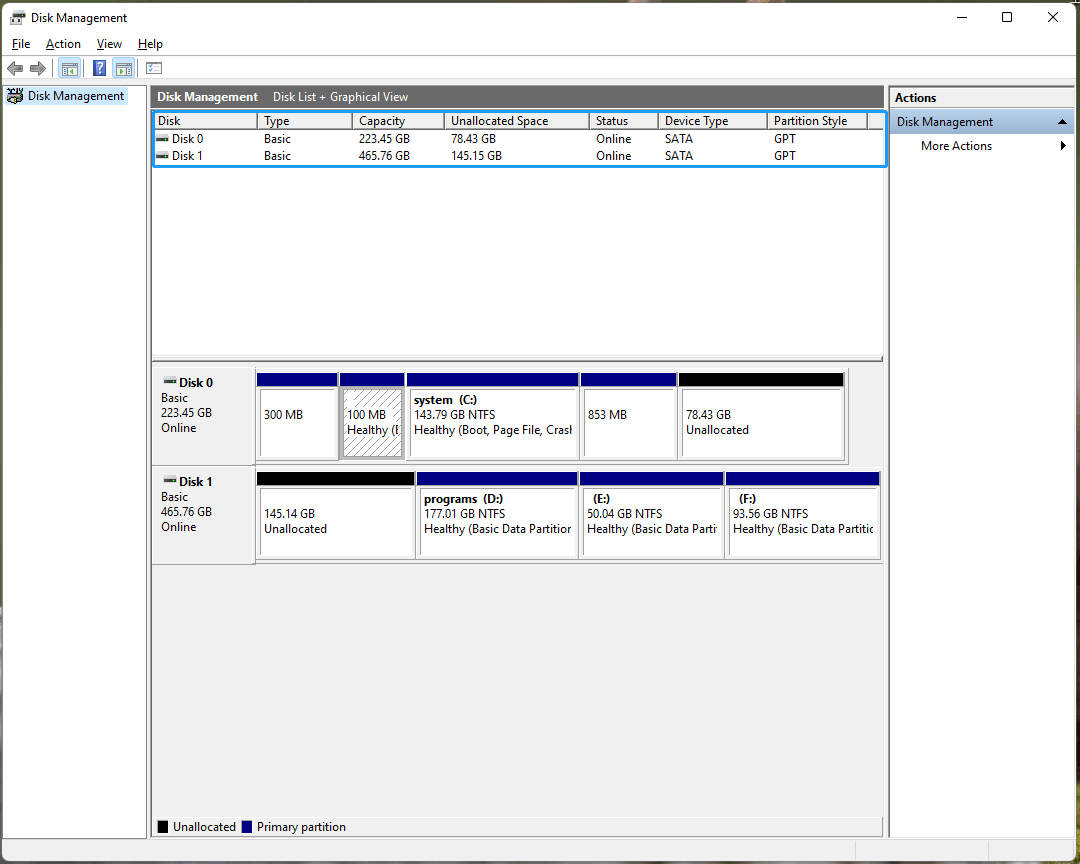
If you choose to view in Disk Listyou will see:
| Disk | Disk name |
| Type | Disk typebasic or dynamic |
| Capacity | How much storage space the disk has |
| Unallocated space | The disk space that hasn’t been allocated for use |
| Status | Whether the disk is online (available) or not (offline) |
| Device type | How the hard disk is connected to your computer’s motherboardvia SATAIDEor PATA |
| Partition | Partitioning method of the diskGPT or MBR |
At the bottom of the main window shows the legendwhich can be customized with the above-mentioned Settings option. The below picture shows all partition and volume types in Disk Management.
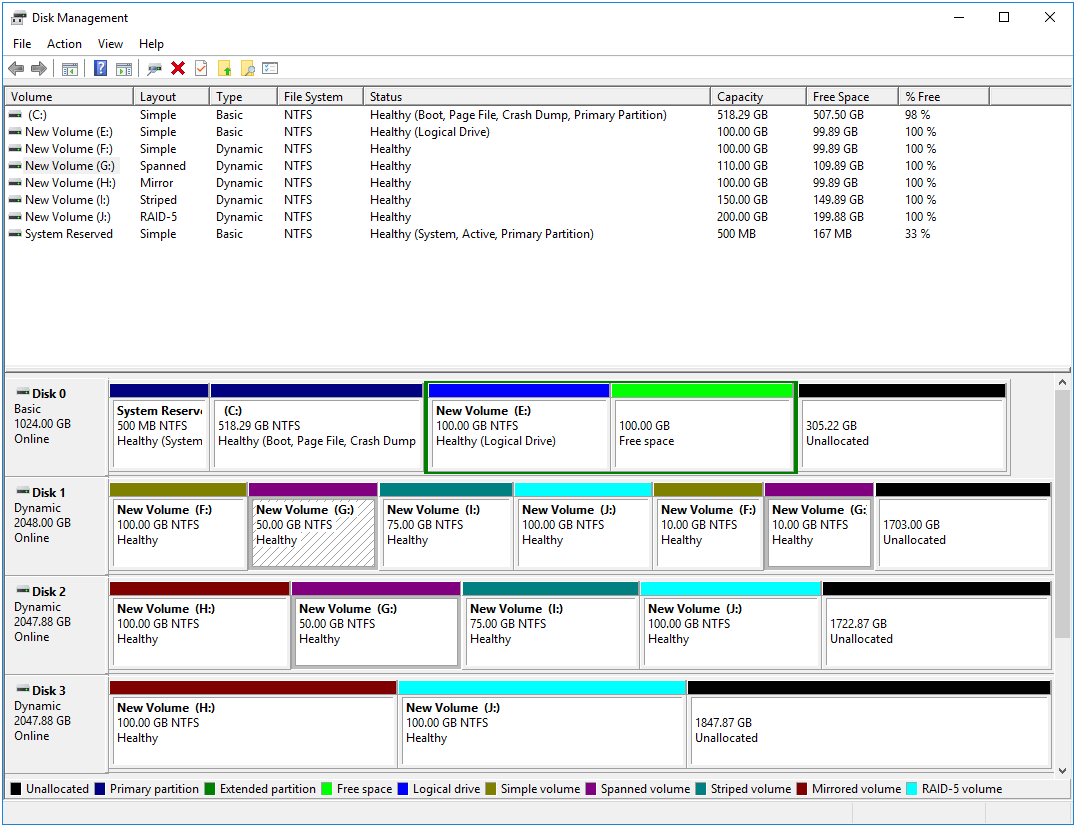
Legend explanation:
| Unallocated | Unallocated and unused storage space on a hard disk that can be used to create a new partition/volume. You can’t save data on it and it is invisible in File Explorer. |
| Primary partition | A partition type on which the operating system (OS) can be installed. On an MBR diskat most 4 primary partitions can be created; while on a GPT diskyou can create up to 128 primary partitions. Learn more >> |
| Extended partition | A partition type for MBR disks. An extended partition can hold multiple logical partitions. If you want to create more than 4 partitions on an MBR diskyou must first create an extended partition. Learn more >> |
| Free space | Usable storage space within an extended partition that can be accessed in File Explorer. |
| Logical drive | Usable storage space within an extended partition that can be accessed in File Explorer. |
| Simple volume | A simple volume on a dynamic disk is equivalent to a primary partition on a basic disk. Learn more >> |
| Spanned volume | A simple volume on a dynamic disk is equivalent to a primary partition on a basic disk. Learn more >> |
| Striped volume | A logical volume on dynamic disks which contains disk space from more than one physical disks. Learn more >> |
| Mirrored volume | A dynamic disk volume that is fault-tolerant. It offers data redundancy by using two copies/plexes of the volume to duplicate the data. With two copies saved on different disksthe system can continue operating using the unaffected copy when the other copy is damaged. Learn more >> |
| RAID-5 | Redundant arrays of independent disksalso called striped with parity volume. It provides data redundancy by saving data and parity striped intermittently across 3 or more disks. If a portion of a disk was damagedits data can be recreated from the rest unaffected data and parity. |
5. Right-Click Menu
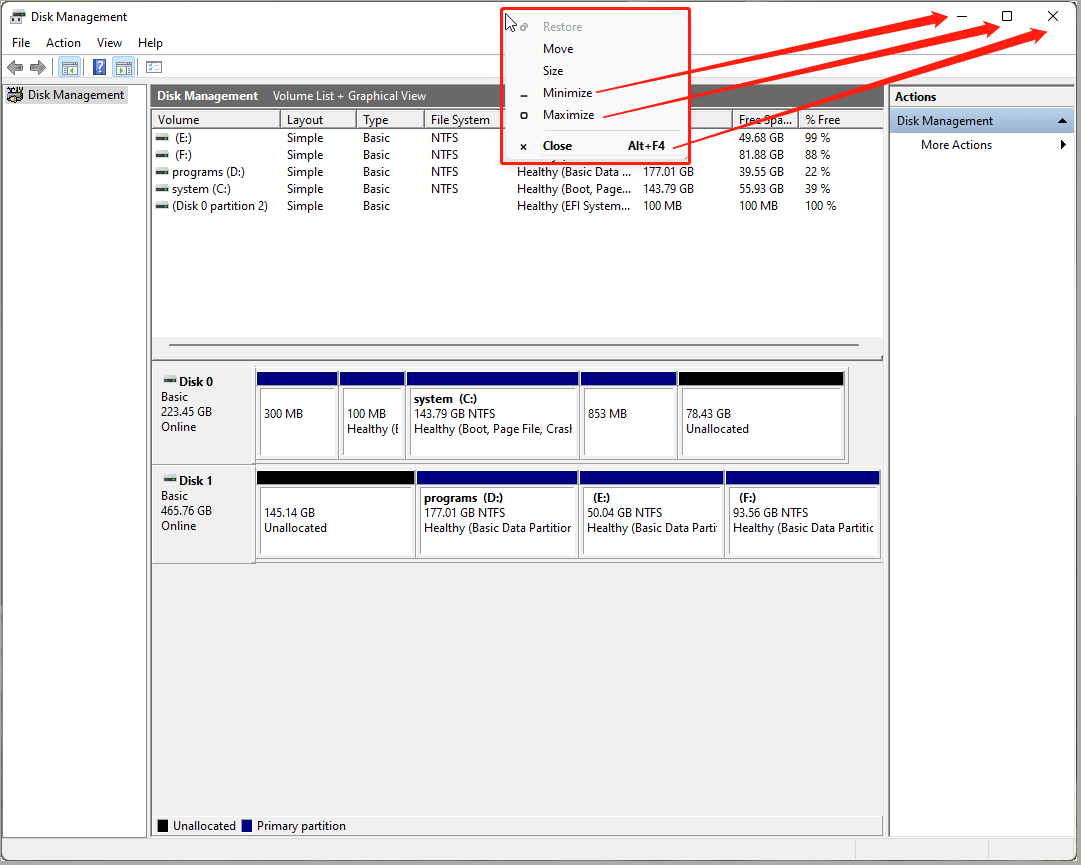
When you right-click on any place that is in the same row of the program name – Disk Managementyou will get the right-click menu:
| Restore | Restore the Disk Management windowwhich is always grayed out since the window is already open in the front when you see the right-click menu. |
| Move | It will turn your mouse pointer into a four-way arrow and put it in the top middle of the Disk Management windowthus you can move the window by dragging the mouse. You can also move the window by left-clicking and holding the mouse. |
| Size | It will turn your mouse pointer into a four-way arrow and put it in the center of the Disk Management windowthus you can change the size of the window. You can also resize the window by putting the mouse pointer at any edge of the window and dragging when the pointer turns into a two-way arrow. |
| Minimize | Minimize Disk Management window and hide it in the taskbar. This feature is also available on the top right of the main window. |
| Maximize | Maximize Disk Management window to the full screen. This feature is also available on the top right of the main window. |
| Close (Alt+F4) | Close Disk Management window. This feature is also available on the top right of the main window. Alt+F4 is the shortcut. |
Manage Volume on Basic Disk
A basic disk is a storage type used in Windows that relies on standard partitioning methods like MBR (Master Boot Record) or GPT (GUID Partition Table). On a basic diskyou can find simple volumes and unused disk space such as:
- Unallocated: Disk space that hasn’t been partitioned for useallowing for future creation of primary partitions or extended partitions.
- Primary Partition: Used to hold data and operating systems (up to 4 on MBRor 128 on GPT).
- Extended Partition: A placeholder for logical drives.
- Free Space: Unused space within an existing extended partitionavailable for creating logical drives.
- Logical Drive: Subsections within extended partitions to store data.
Basic disks are widely compatible with all versions of Windows and are simpler to manage compared with dynamic disks. To be specificyou can do the following operations on a basic disk.
1. New Simple Volume (Create Partition)
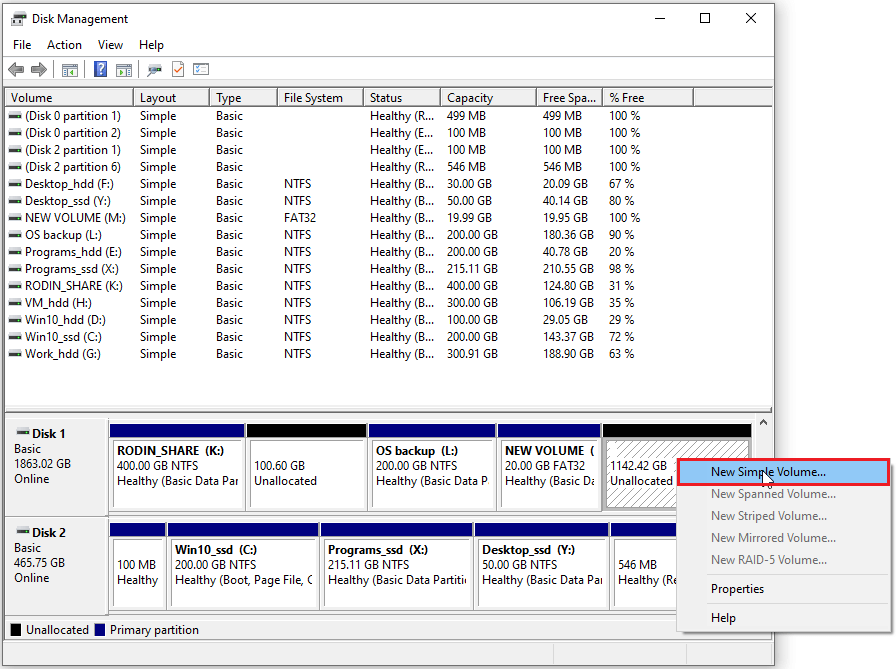
The New Simple Volume feature in Windows Disk Management allows you to create a new partition (volume) on a basic disk using unallocated space. This is ideal for organizing data or adding extra storage without third-party tools.
How to Operate:
Step 1. Right-click the unallocated space and choose New Simple Volume.
Step 2. Follow the Wizard to go through these:
- Specifying the Volume Size: Choose the size within the available unallocated space.
- Assigning a Drive Letter or Path: Assign a unique letter or mount to a folder.
- Formatting the Volume: Select the file system (NTFS is common) and set a volume label.
Step 3. Click Finish to create the volume.
Further Reading: How to create a logical drive on MBR disk?
Typicallywhen creating new partitions on an MBR diskyou can have up to three primary partitionsand the fourth will automatically be created as a logical drive within an extended partition. If the extended partition doesn’t appearyou can manually create it using DiskPart.
Here’s how:
Step 1. Open Command Prompt and type diskpartthen press Enter.
Step 2. Use the command list disk and press Enter to display all disks.
Step 3. Select the target disk by typing select disk n (replace n with the disk number) and press Enter.
Step 4. Create an extended partition by typing create partition extended size=n (replace n with the desired size in MB) and press Enter.
Step 5. Now you can refresh Disk Management to create logical drive in the extended partition.
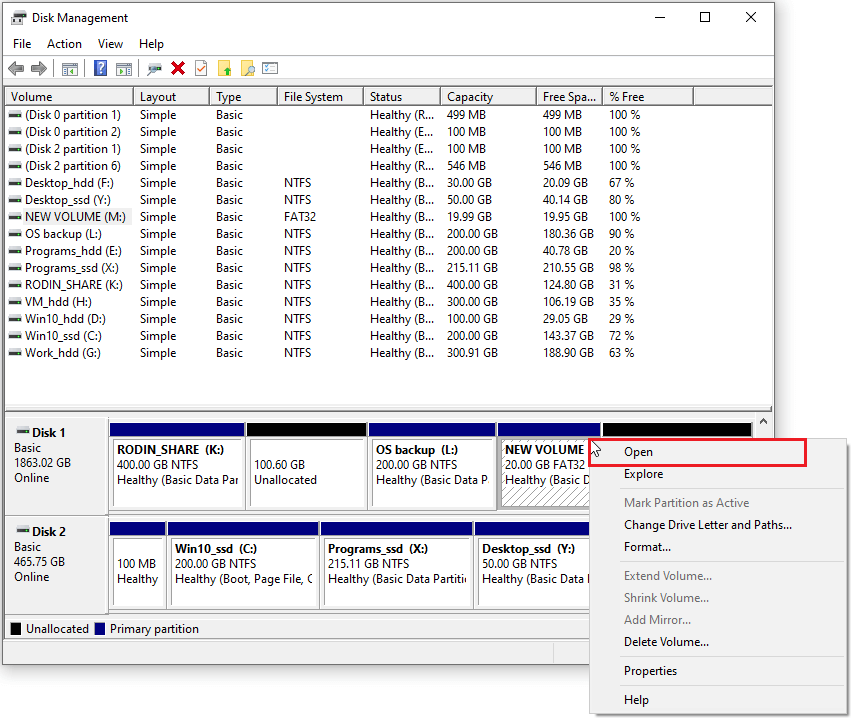
2. Open
After creating a partitionyou can open it to use. Simply right-click on the partition and select Open. This will take you to File Explorerwhere you can view the root directory of the partition.
3. Explore
Explore is very similar to Open. While Open typically refers to opening a filefolderor running an applicationExplore focuses on viewing the contents of a path. Howeverin Disk Managementsince both actions apply to partitionsthere is no practical difference – you’ll simply be directed to the root directory of the partition.
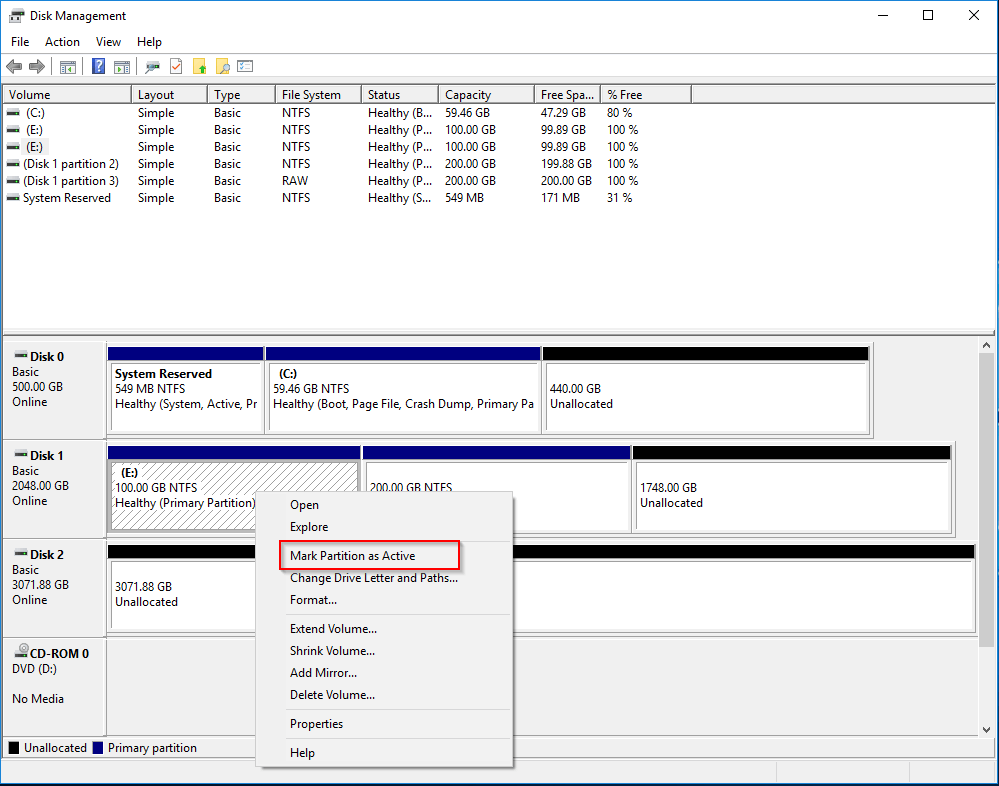
4. Mark Partition as Active
Mark Partition as Active feature is used to set a partition as the active onetelling which partition contains the boot loader or operating system files necessary to start the computer.
Active partitions can appear on MBR disks only. GPT disks do not have active partitions. Insteadthey rely on the EFI System Partition (ESP) to store boot files for UEFI-based systems.
Note that on an MBR diskyou should mark only partition with system boot files as active. Marking the wrong partition can make the system unbootable.
How to Operate:
Step 1. Right-click the target partition (on an MBR disk) which contains valid system files and select Mark Partition as Active.
Step 2. If there is already an active partition on the same diskyou need to confirm the action in the prompt.
5. Change Drive Letter and Paths
The Change Drive Letter and Paths feature in Disk Management lets you assignchangeremove a drive letteror set a mount path for a partition or volume. This helps you organize drives in a way that’s easier to remember or access.
Useful tips when using this feature:
- Avoid using A or B as drive lettersas they are traditionally reserved for floppy drives.
- Do not change the drive letter of system or boot volumes to prevent operating system errors.
- Use this feature when no applications are running in the target partition to prevent interruptions.
- To mount a volume to a folderensure the target folder is empty and located on an NTFS-formatted drive.
How to operate:
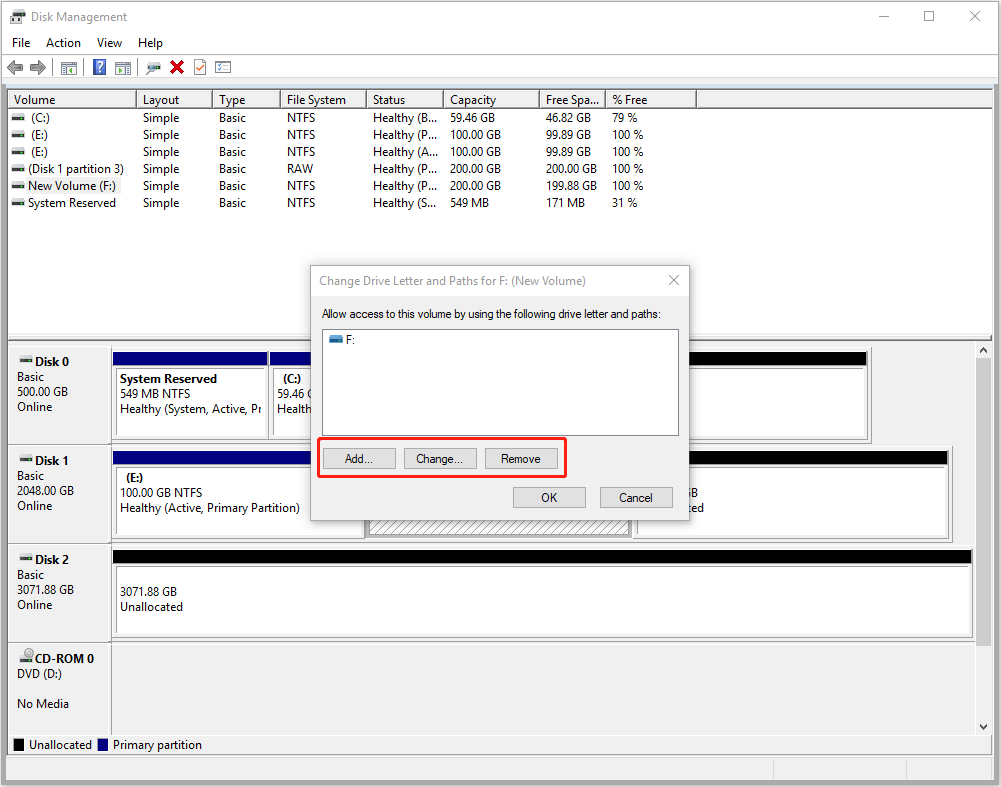
Step 1. Right-click the partition to manage and select Change Drive Letter and Paths.
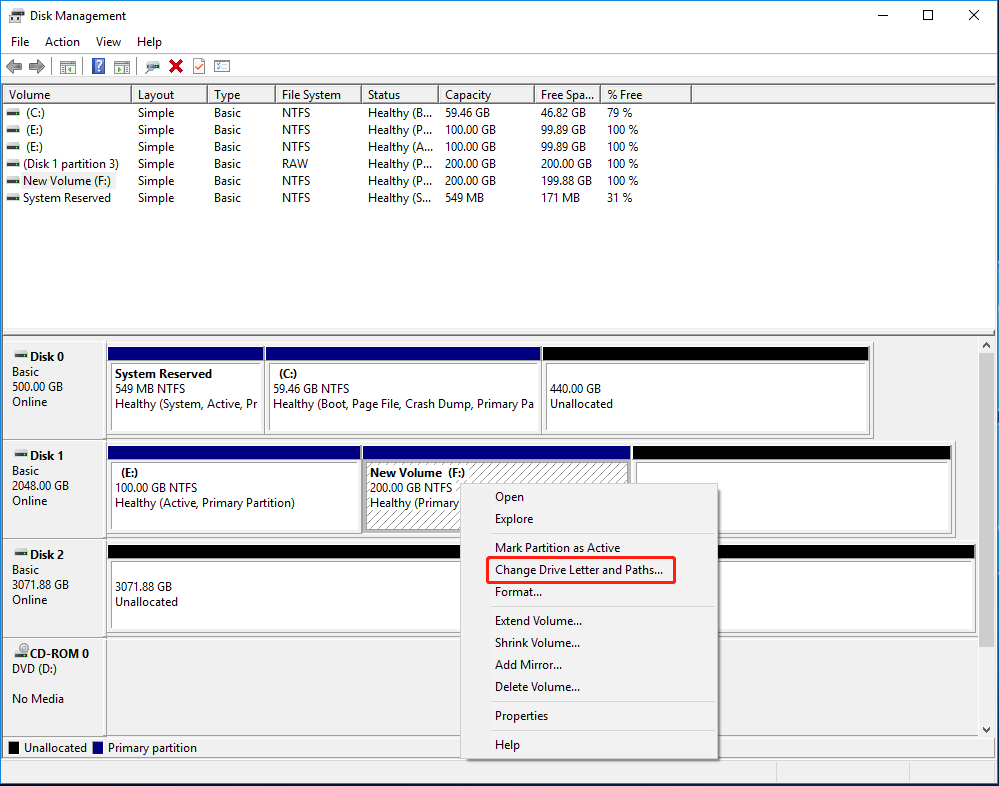
Step 2. ChangeAddor Remove a Drive Letter:
- When there is no drive letter on the partition: Click Addselect the desired letter from the dropdownand click OK.
- To change a letter: Click Changechoose a new letter from the listand click OK.
- To remove a letter: Click Removeconfirm the actionand click Yes.
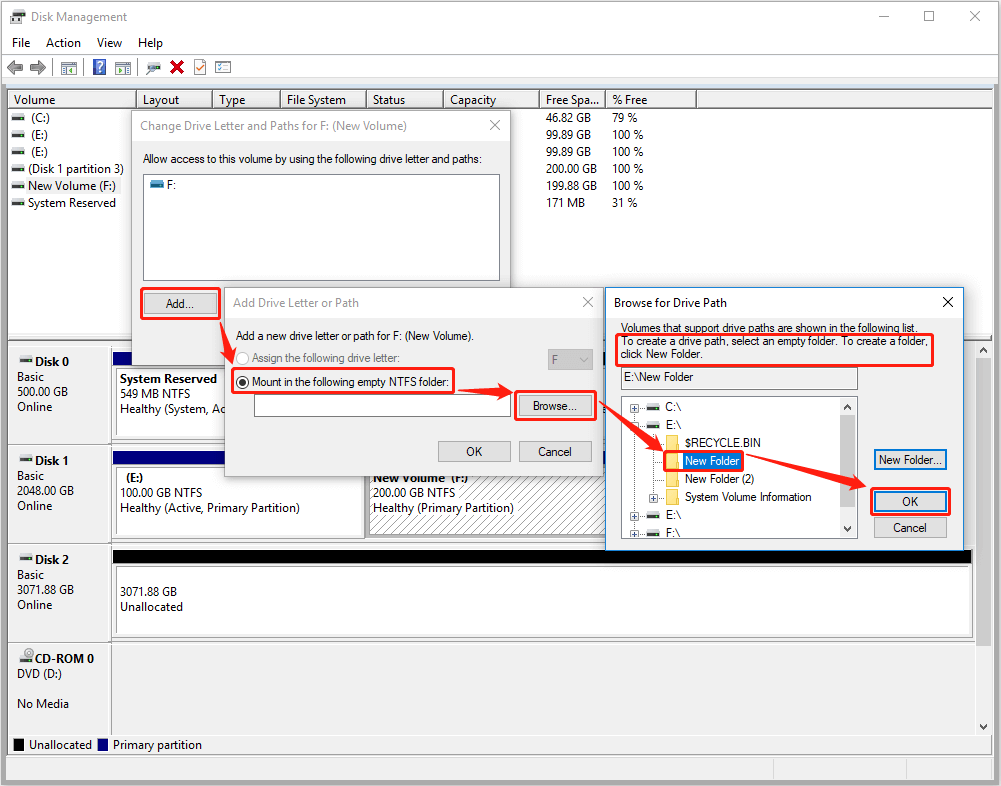
Step 3 (optional). Instead of changing drive letteryou can assign a mount point. Click Addchoose Mount in the following empty NTFS folder and then Browse. Now create or select an empty folder on an existing drive where you want the partition or volume to be mounted.
Step 4. After selecting your preferred optionclick OK to confirm and apply the changes.
6. Format
The Format feature in Disk Management prepares a partition or volume for data storage by creating a file system. Doing formatting is especially useful when you want to use a new driveto change the file systemto fix file system errors or to erase data in the drive. Howeverformatting can remove all data in the partition. So please ensure you’ve saved important files elsewhere.
Common file systems in formatting include:
- NTFS (New Technology File System): The default file system for Windowsoffering advanced features like file permissionsencryptionand support for large file sizes.
- FAT32 (File Allocation Table 32): An older file system compatible with many devicesbut limited to 4GB file sizes.
- exFAT (Extended File Allocation Table): Ideal for external drivesoffering compatibility with multiple platforms and support for large files.
- ReFS (Resilient File System): Designed for fault tolerance and data integritymainly used in specialized scenarios.
How to operate:
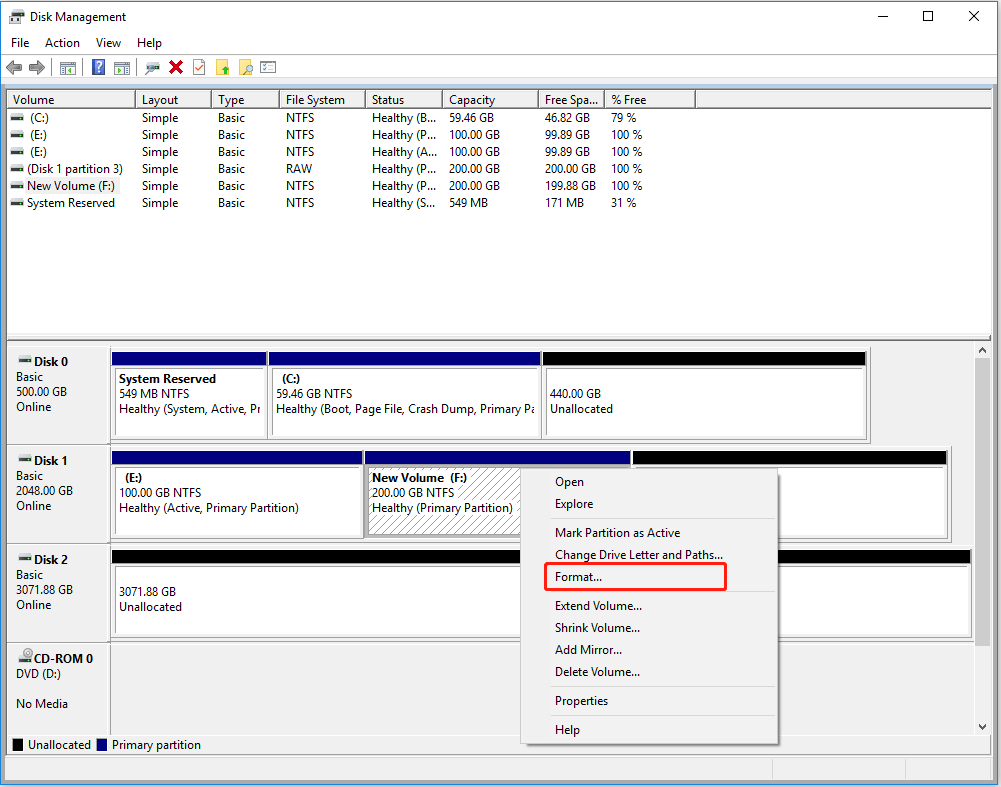
Step 1.Right-click the partition or unallocated space you want to format and select Format.
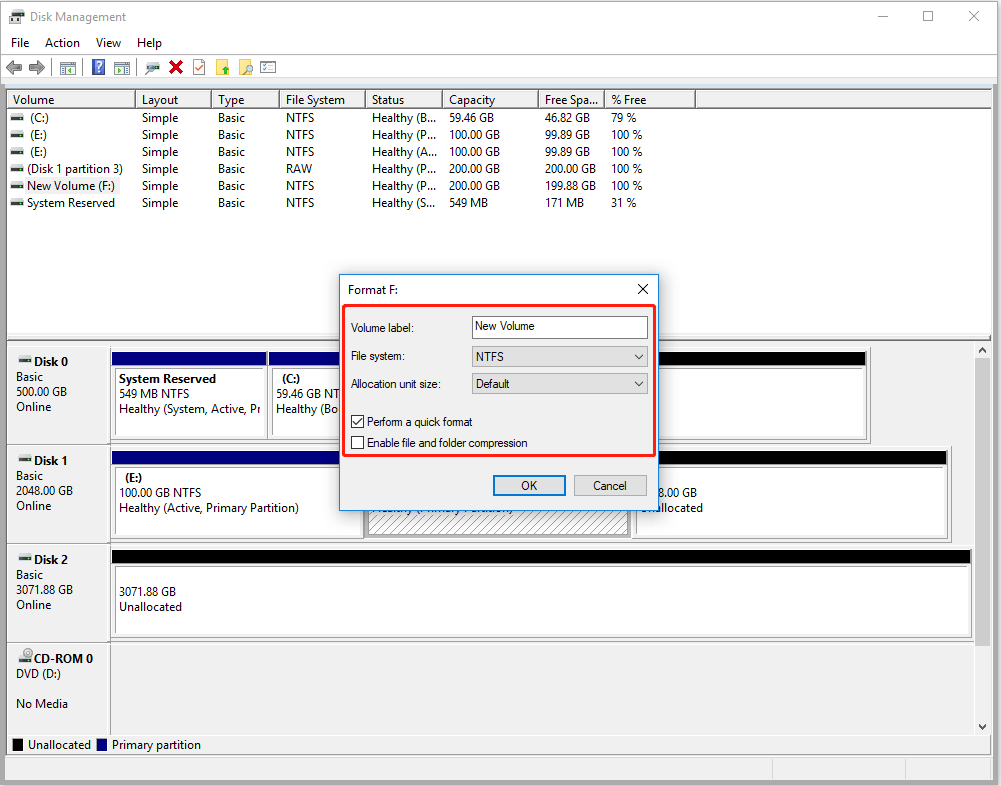
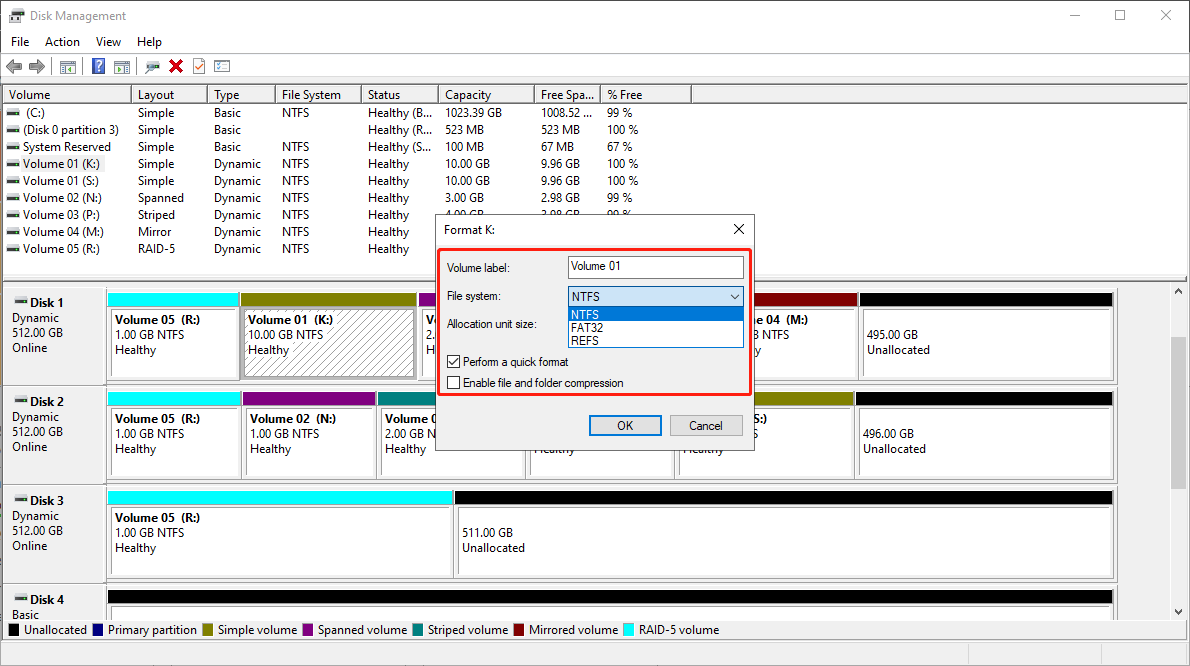
Step 2.Choose your format options:
- Volume Label: Assign a name to the drive (optional).
- File System: Select NTFSFAT32or exFATdepending on your needs.
- Allocation Unit Size: Leave as Default unless you have specific requirements.
- Perform a Quick Format: Check this option for faster formatting (data is not fully erased and can be recovered by free data recovery software). Uncheck for a thorough format (data cannot be recovered).
- Enable file and folder compression: If you have a small drive or limited disk spaceenabling compression can help reduce file sizes.
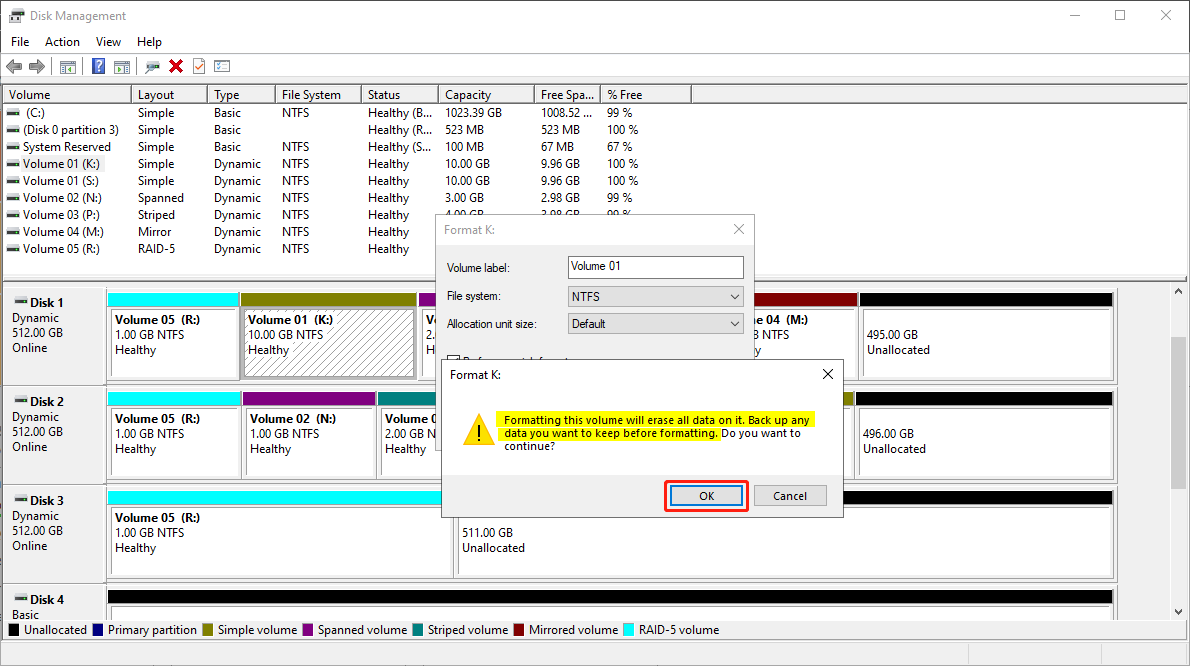
Step 3.Click OK to confirmthen wait for the process to complete.
7. Extend Volume
The Extend Volume feature in Disk Management allows you to increase the size of a selected partition by utilizing unallocated space on the adjacent left or right side. It’s very useful when you need more storage space on a partitionsuch as when your see low disk space warning.
Extend Volume only works on NTFS and RAW partitions. For more informationyou can read why extend volume grayed out.
Be careful when there’s no unallocated space on the adjacent left or right sidebut the Extend Volume option is still available. Proceeding in this case will convert your basic disk to a dynamic disk.
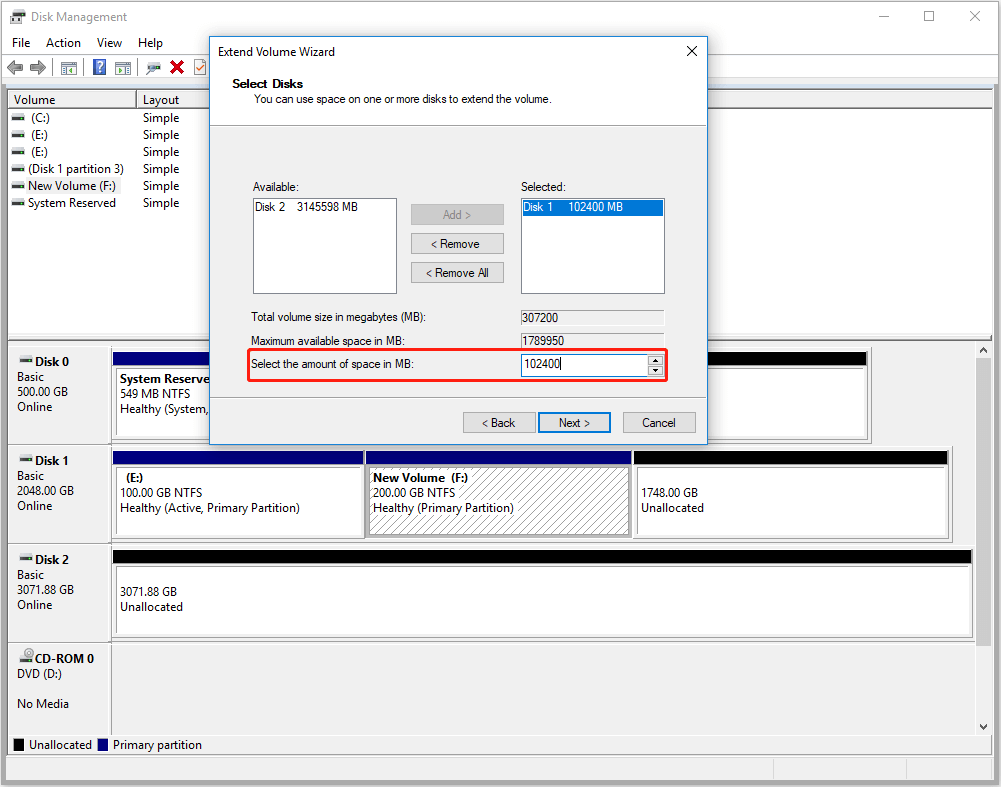
How to operate:
Step 1. Right-click on the partition you want to extendand choose Extend Volume from the context menu.
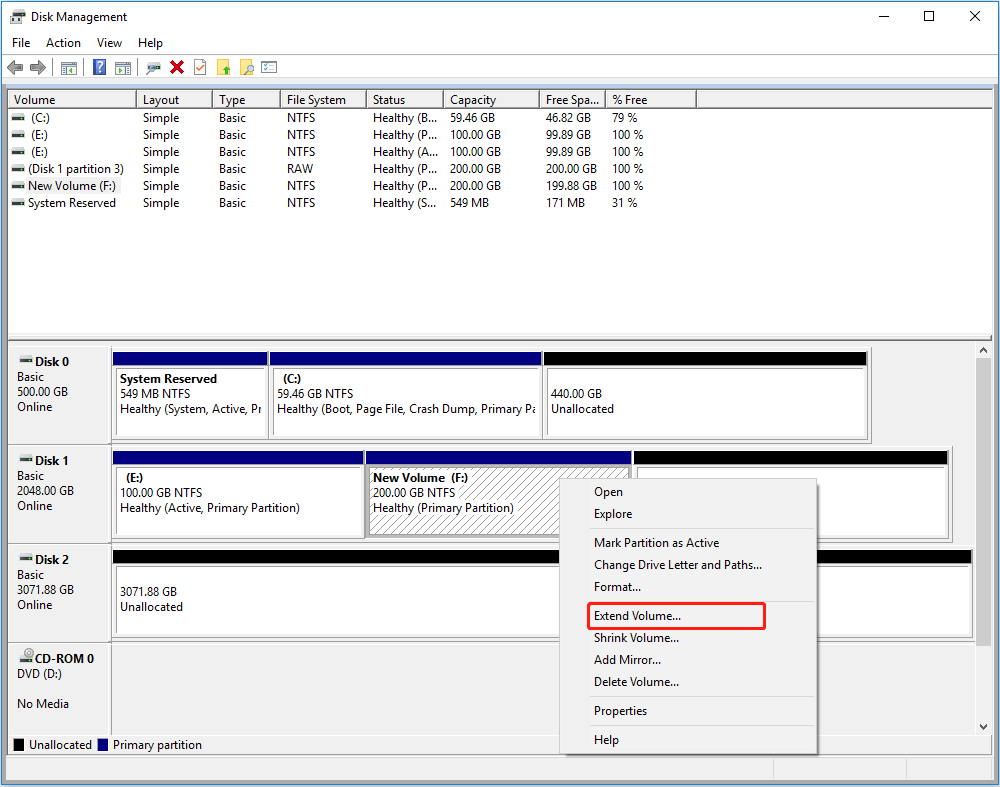
Step 2. The wizard will guide you and automatically list the available space (in MB) you can use to extend the volume. Specify the amount of unallocated space to addor leave it as default to use all available space.
Step 3. Click Next and then Finish to complete the process.
8. Shrink Volume
The Shrink Volume feature in Disk Management allows you to reduce the size of an existing partitionfreeing up unallocated space on the same disk. Please note that you will get unallocated space after shrinking a primary partition and free space (within the Extended Partition) after shrinking a logical drive. These spaces can further be used to create new partitions or extend other partitions.
Tips on Shrink Volume:
- The shrinkable size might be limited due to unmovable files like system or hibernation files. Disabling hibernation or paging can help.
- The Shrink feature works only on partitions formatted with NTFS or RAW partitions.
- Please ensure the partition retains enough free space for system files and proper functioningespecially for the C drive.
How to operate:
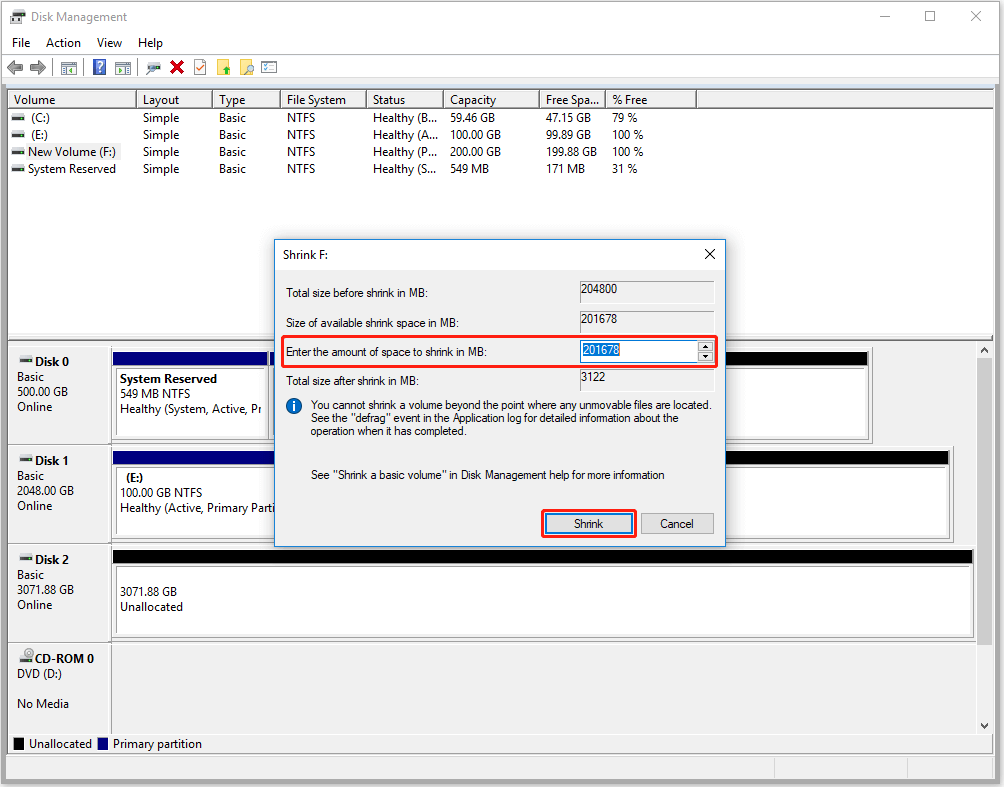
Step 1. Right-click the partition you want to shrink and choose Shrink Volume from the menu.

Step 2. In the dialog boxspecify the amount of space (in MB) to shrink or keep the maximum value suggested.
Step 3. Click Shrink to complete the process.
9. Add Mirror
The Add Mirror option in Disk Management is used to create a mirrored volume (RAID 1) for data redundancy by duplicating data onto another disk. Howeverthis feature may appear grayed out in certain situationsparticularly when there is only one disk available in Windows. Alsothe Add Mirror feature is not available in Windows Home edition. It is supported only in ProEnterpriseand Education editions.
To add mirror to a volumedo the followings:
Note that after adding a mirrorall related disks will become dynamic disks. Thereforebe careful if you want to mirror a partition on your system disk.
Step 1. Make sure you have at least two online disks in Disk Management. For best performanceit is best to create the mirror on two identical disks.
Step 2. Select the partition to which you want to add a mirrorand then select Add Mirror from the context menu.
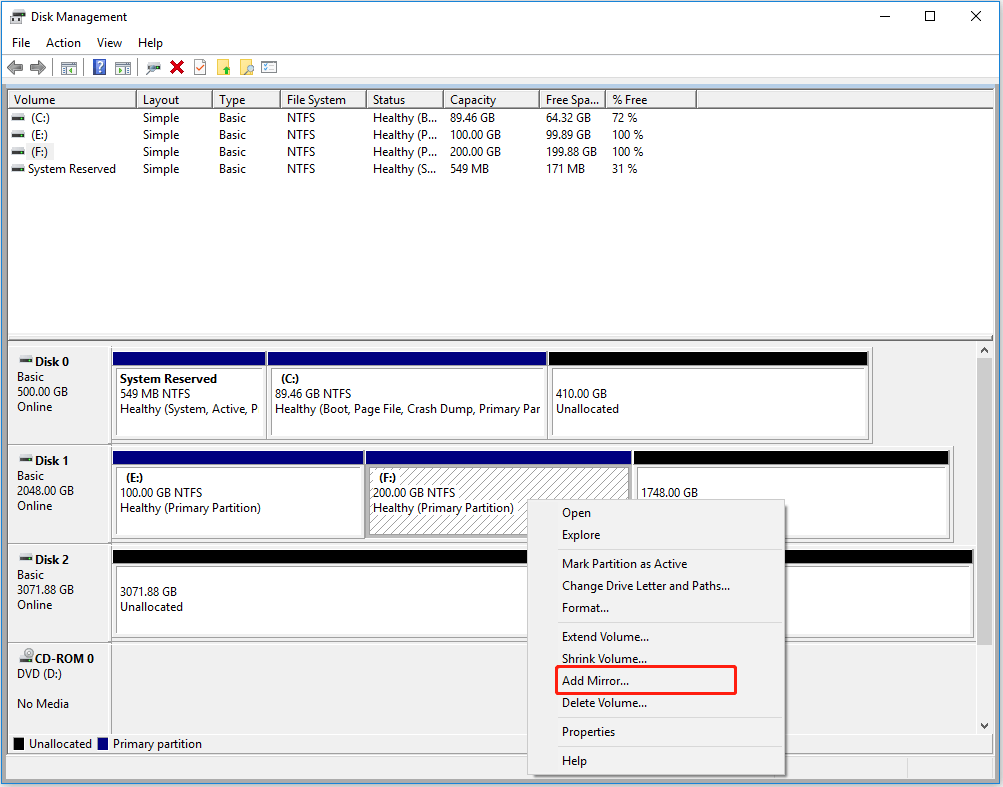
Step 3. From the pop-up menuselect a location to create the mirror and click the Add Mirror button.
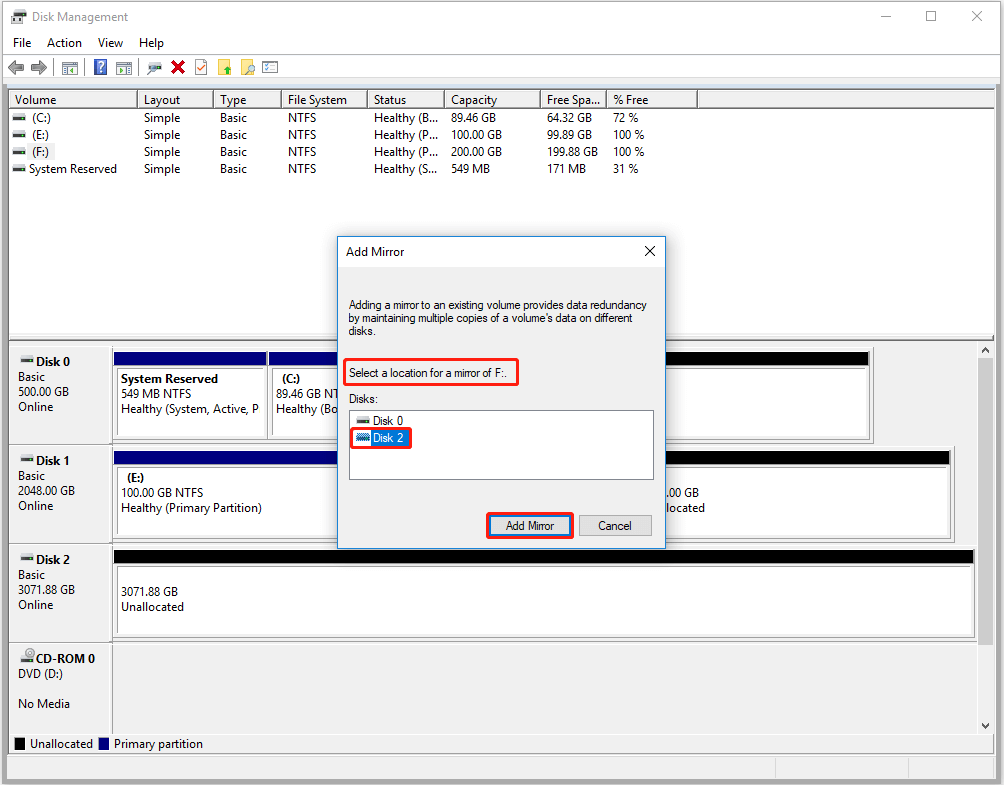
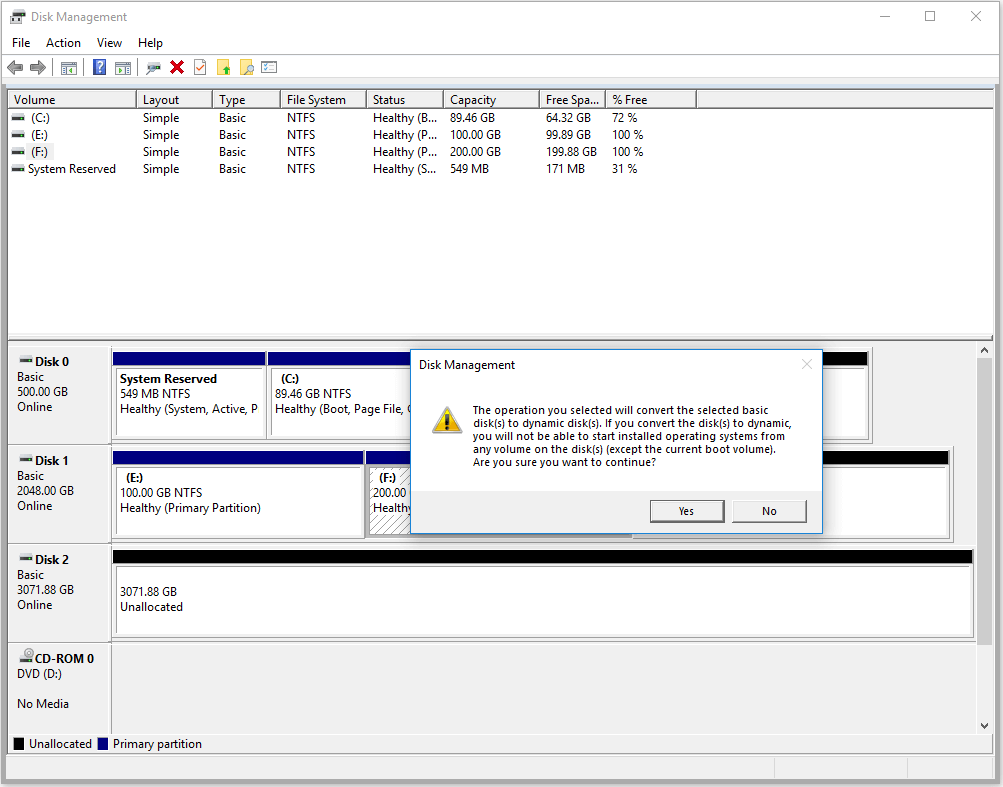
Step 4. You will see a warning message telling your disks will be turned into dynamic disks and the implications of doing so. Make sure you want to do this and click Yes.
Now data saved in both mirrored volumes will keep exactly the same. To stop data synchronizationgo to Break Mirror or Remove Mirror.
10. Delete Volume/Partition
The Delete Volume feature in Disk Management is used to remove a partition and free up its spaceturning it into unallocated space or free space. The released space can then be reused to create a new partition or extend an existing one.
Tips on Delete Volume:
- Always back up important data before deleting a volumeas data on the partition will be permanently erased.
- You cannot delete a systembootor recovery partition using Disk Management.
How to delete volume:
Step 1. Right-click on the volume (partition) you want to delete and choose Delete Volume from the context menu.
Step 2. A warning will appear informing you that all data on the volume will be lost. Click Yes to proceed.

How to delete partition:
Sometimes you will see the Delete Partition option. This can happen when the whole space of the Extended Partition is taken by Free Space. At this timewhen you right-click on the Free Spaceyou can find the Delete Partition feature.
And to delete partitionjust right-click on the Free Space and choose Delete Partition. In a few minutes the Extended Partition will turn into Unallocated Space.
11. Properties (of Volume on Basic Disk)
The Properties feature in Disk Management provides detailed information about a selected disk or partition. It helps you understand the healthperformanceand configuration of your storage devicesalong with options to troubleshoot or adjust certain settings.
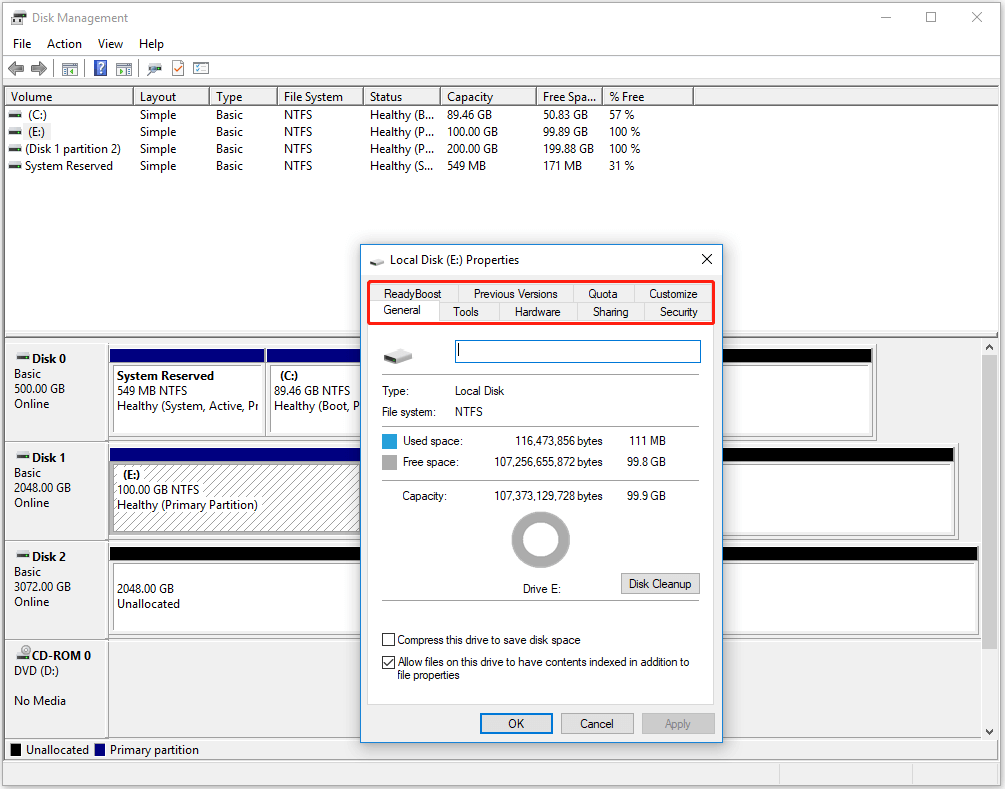
Properties often includes the following 4 function tabs: GeneralToolsHardwareSharingSecurityPrevious VersionsQuotaand Customize.
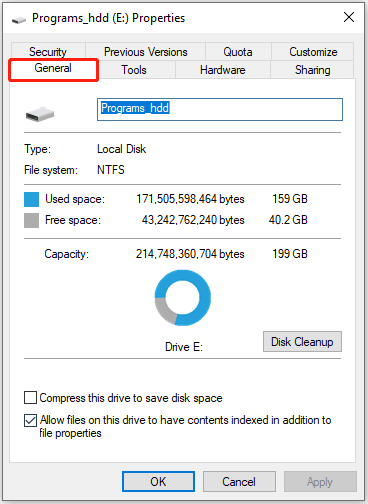
#1. General
The General tab provides various useful detailsincluding:
- Volume Label: The name assigned to the drive for easier identification.
- Device Type: Indicates whether the storage is a local diskUSB driveor DVD/CD-ROM drives.
- File System: Shows the file system formatsuch as NTFSFAT32or exFAT.
- Used Space: Displays the portion of allocated storage that has been used.
- Free Space: Displays the available space that can still store data.
- Capacity: Shows the total storage size of the drive.
- Disk Cleanup: A built-in tool to remove unnecessary files and free up space.
- Compress drive: An option to enable NTFS compression to save disk space.
- Content Index: Determines whether file contents are indexed for faster search results. Alsofor NTFS drives only.
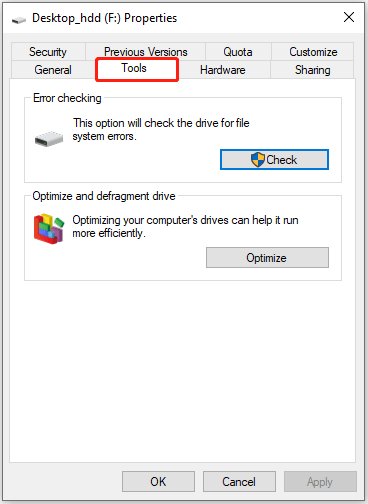
#2. Tools
The Tools tab provides two functions: Disk Error Checking and Disk Optimization & Defragmentation.
- Error checking: This option scans the drive for file system errors and attempts to fix them to ensure data integrity.
- Optimize and defragment drive: Helps improve performance by reorganizing fragmented data and optimizing file storage on the drive. Note that to get into this optionyou may need to remove customized settings (if prompted). After thatjust pick a drive to analyze and optimize. You can also set up a schedule for automatic optimization.
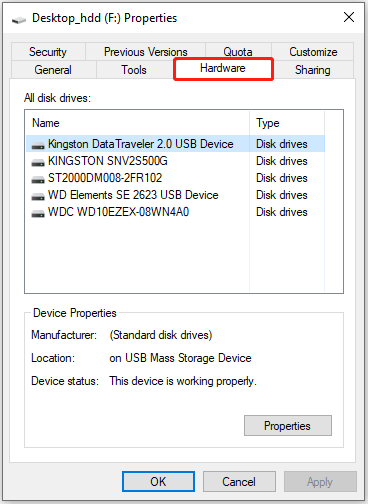
#3. Hardware
The Hardware section shows connected storage devices and their details. You can click each one to check properties like manufacturerlocationand status. For complete hardware informationclick the Properties button to view Disk Properties.
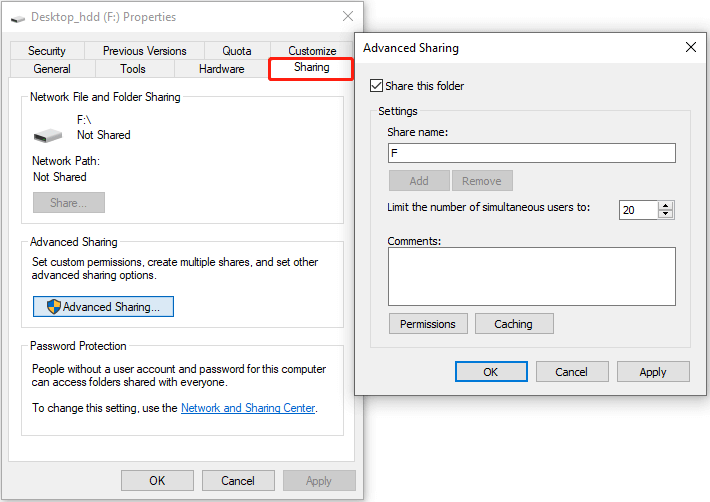
#4. Sharing
The Share option lets you decide if you want to share a hard drive and manage its permissions. You can click the Advanced Sharing button to enable sharingset permissionsand choose which files are available offline. Additionallyyou can control whether users without your account and password can access the shared folder.
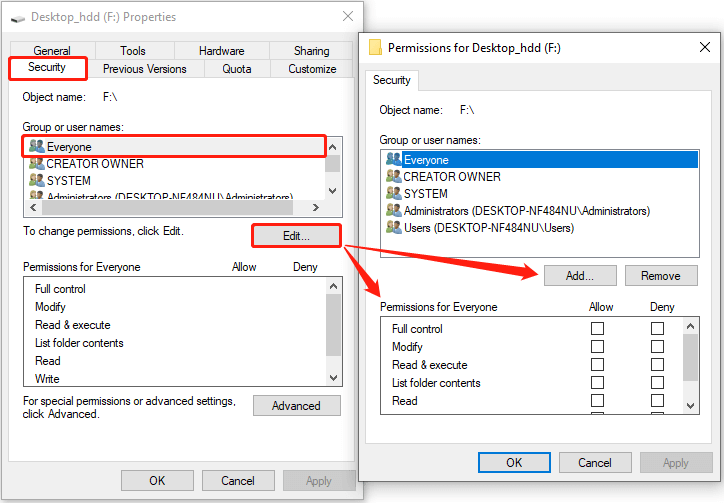
#5. Security
The Security tab allows you to manage user permissions for accessing your computer. You can select a group or username to edit permissionsadd or remove usersand adjust access levels. For advanced settings like Auditing or Effective Accessclick the Advanced button.
#6. Previous Versions
The Previous Versions tab shows saved File History (for LibrariesDesktopContactsand Favorites) or System Restore Points (for system files and settings). You can open a version or restore files to a previous state.

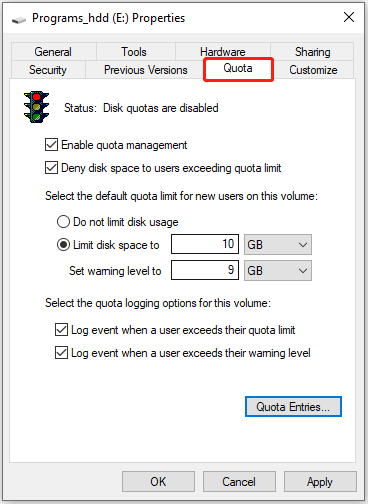
#7. Quota
The Quota tab in the properties of a disk volume is a feature that allows administrators to monitor and limit the amount of disk space each user can consume on an NTFS-formatted volume. This is particularly useful in environments with multiple userssuch as shared workstations or network drivesto prevent any single user from consuming excessive storage space.
Useful settings in Quota:
- Enable or disable quota management
- Allow or deny disk space to users exceeding quota limit
- Limit or do not limit disk usage for granted users
- Set the disk space limit and warning level
- Enbale or disable log event when a user reaches the warning level or exceeds quota limit
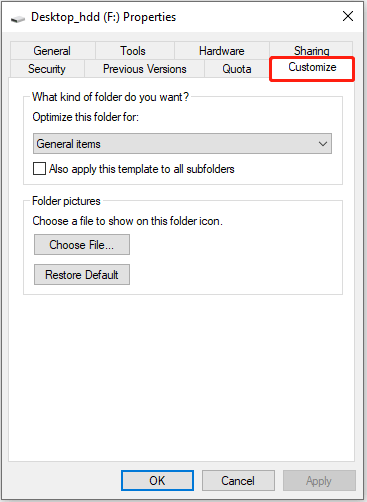
#8. Customize
The Customize tab lets you choose a folder type to optimize (General itemsDocumentsPicturesMusicor Videos) and change the folder icon (also can apply to all subfolders of the selected one). Changing the folder icon also makes it easier to identify at a glance.
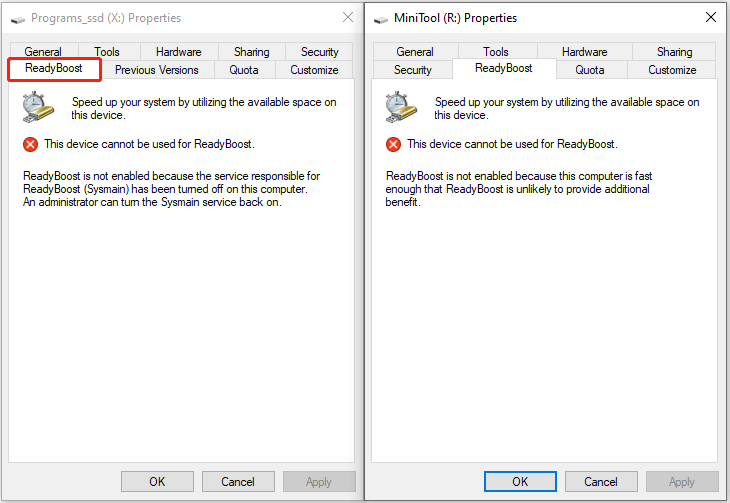
#9. ReadyBoost
ReadyBoost is a Windows feature designed to improve system performance by using a USB flash drive (or non-system partitions on the system drive) as additional cache. It speeds up your system by using the external drive’s faster read and write speedswhich is especially helpful for computers with low RAM. ReadyBoost saves frequently used data on the external drivereducing the hard drive’s workload.
UsuallyReadyBoost allows you to useto not useor to dedicate a device for ReadyBoost. And if you allow the usageyou can determine how much disk space of this device can be used to speed up system speed (which will not be available for file storage).

Howeversometimesyou will see the following error message:
- ReadyBoost is not enabled because the service responsible for ReadyBoost has been turned off. In this caseyou can run services.mscscroll down to find the sysmain service and start it manually.
- ReadyBoost is not enabled because this computer is fast enough. Since your computer is running wellno further action is needed.
- The device does not have the required performance characteristics. In this caseyou need to change another external device to have a try.
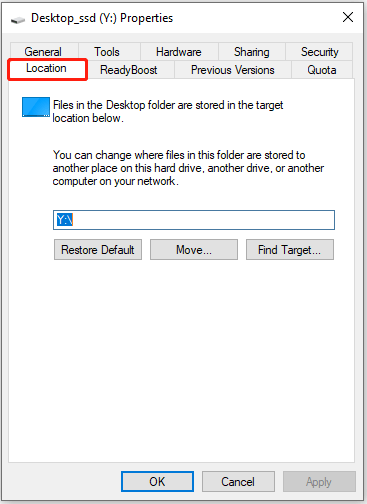
#10. Location
The Location tab in the volume properties allows you to manage and customize the location of certain special folders (e.g.DocumentsDownloadsPictures) stored on that volume. It is commonly used for system folders that can be redirected to another drive to save disk space on the system partition.
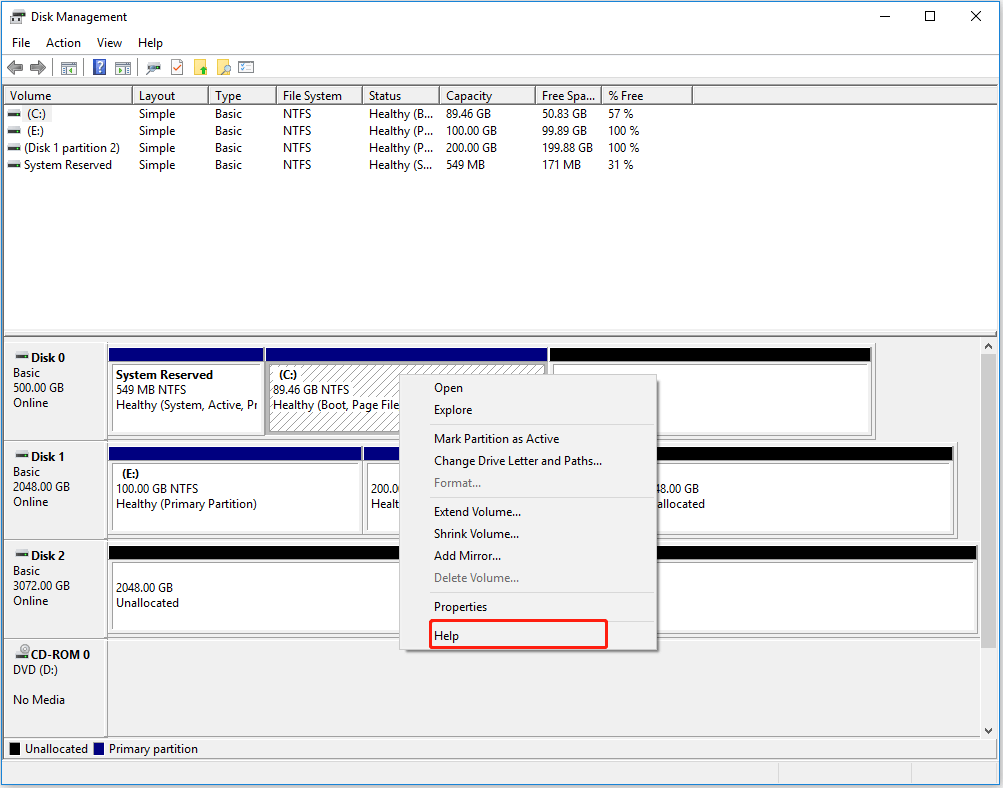
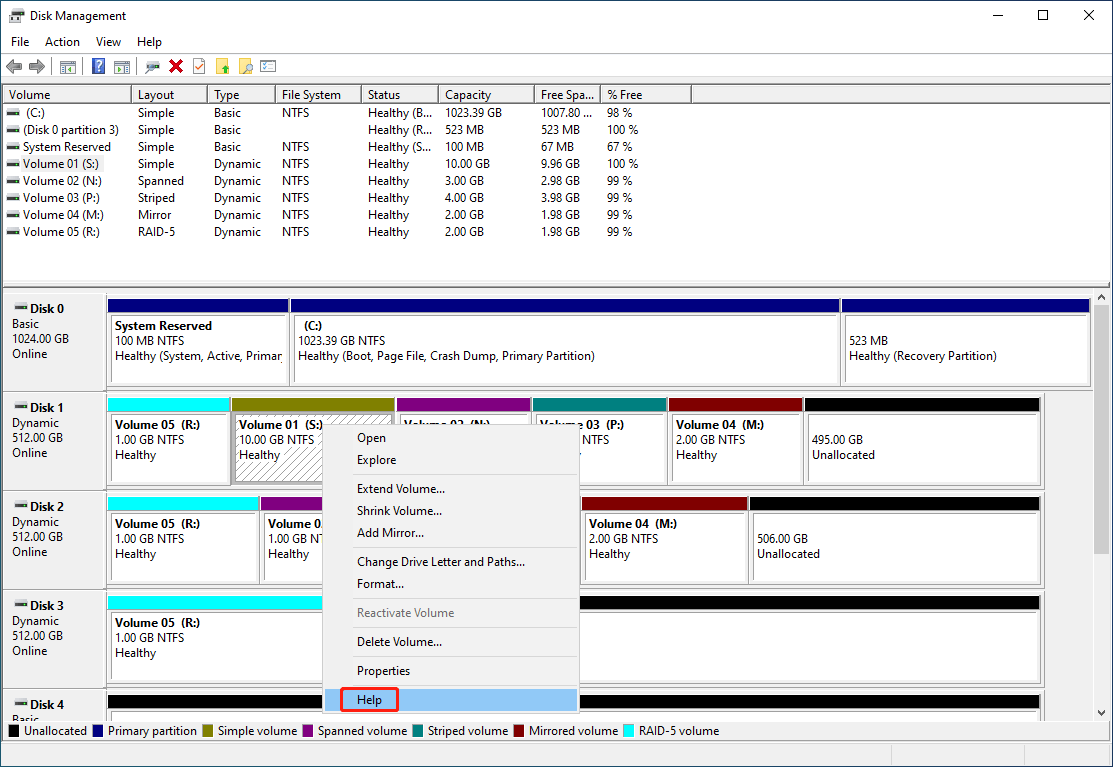
12. Help
The Help feature in Disk Management provides a quick way to find more information about disk management tasks. By defaultit redirects you to Bing search results for Windows 10 Disk Management to guide them toward relevant resources and solutions.
Manage Basic Disk
A basic disk is a storage format commonly used in Windows operating systems. It organizes data using partitions and logical driveswhich can be formatted with file systems like NTFS or FAT32. Basic disks support primary partitionsextended partitionsand logical drives. You can use them for simple tasks like storing filesinstalling operating systemsor running applications.
Unlike dynamic disksbasic disks don’t support advanced features like spanningstripingor mirroring volumes. They’re straightforwardreliableand compatible with most operating systemsmaking them ideal for everyday users and simpler storage needs.
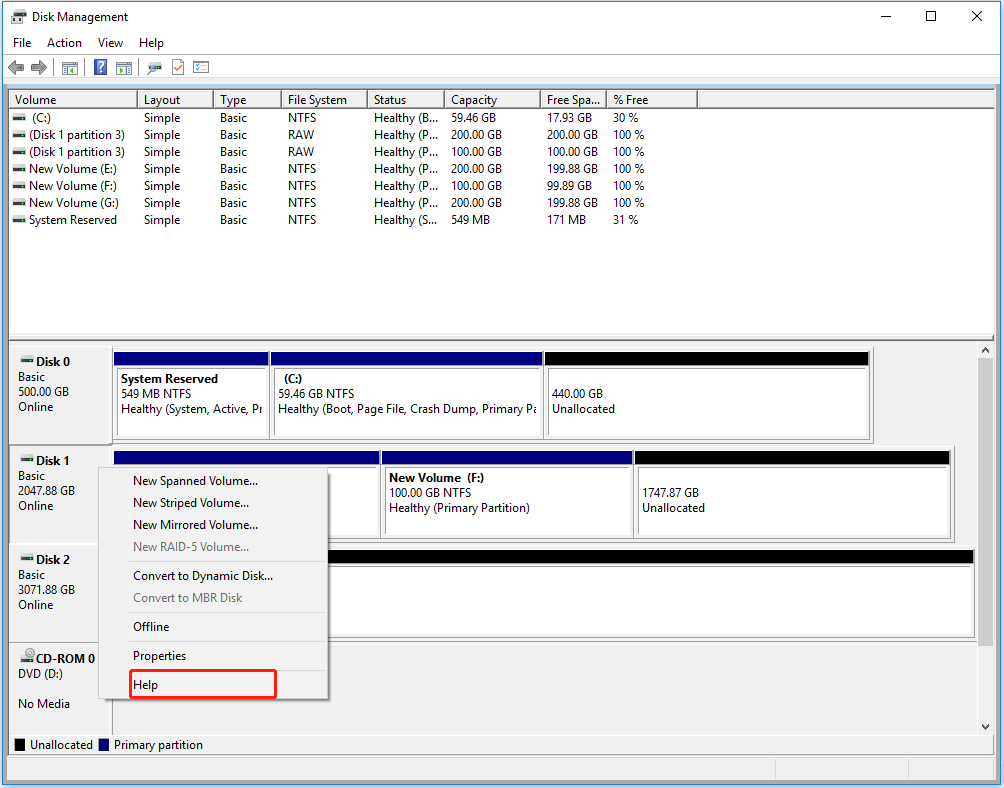
1. New Spanned Volume
Creating a new spanned volume on a basic disk will turn it into a dynamic disk. If you are willing to do thisyou can refer to this part: Manage Volume on Dynamic Disk -> New Spanned Volume.
2. New Striped Volume
Setting up a striped volume on a basic disk will automatically convert it into a dynamic disk. Navigate to this part to create one: Manage Volume on Dynamic Disk -> New Striped Volume.
3. New Mirrored Volume
A basic disk will change to a dynamic disk when a mirrored volume is configured on it. Follow this part to create a mirrored volume if you want: Manage Volume on Dynamic Disk -> New Mirrored Volume.
4. New RAlD-5 Volume
When you create a RAID-5 volume on a basic diskit will be converted to a dynamic disk finally. For the guidance to create onejust refer to this part: Manage Volume on Dynamic Disk -> New RAID-5 Volume.
5. Convert to Dynamic Disk
Converting a basic disk to a dynamic disk allows you to use more advanced storage features. With a dynamic diskyou can create volumes that span multiple disksmaking it easier to expand storage. It also supports features like striped volumes for better performance and mirrored volumes for data protection.
Unlike basic disksdynamic disks allow you to resize or manage partitions more flexibly without losing data. Howeverdynamic disks are mostly used in specific situationsand come with several limits:
- You can’t convert USB flash drives or SD cards to dynamic disks.
- Dynamic disk management is much more complicated than basic disk management.
- If you want to revert to basic diskwithout third-party partition manageryou will have to delete all volumes on the dynamic disk first.
- If you installreinstallor set up dual-bootWindows setup might only recognize the partition with the operating system and ignore others on the dynamic disk.
That being saidto convert your basic disk to dynamic disk in Disk Managementfollow the steps below:
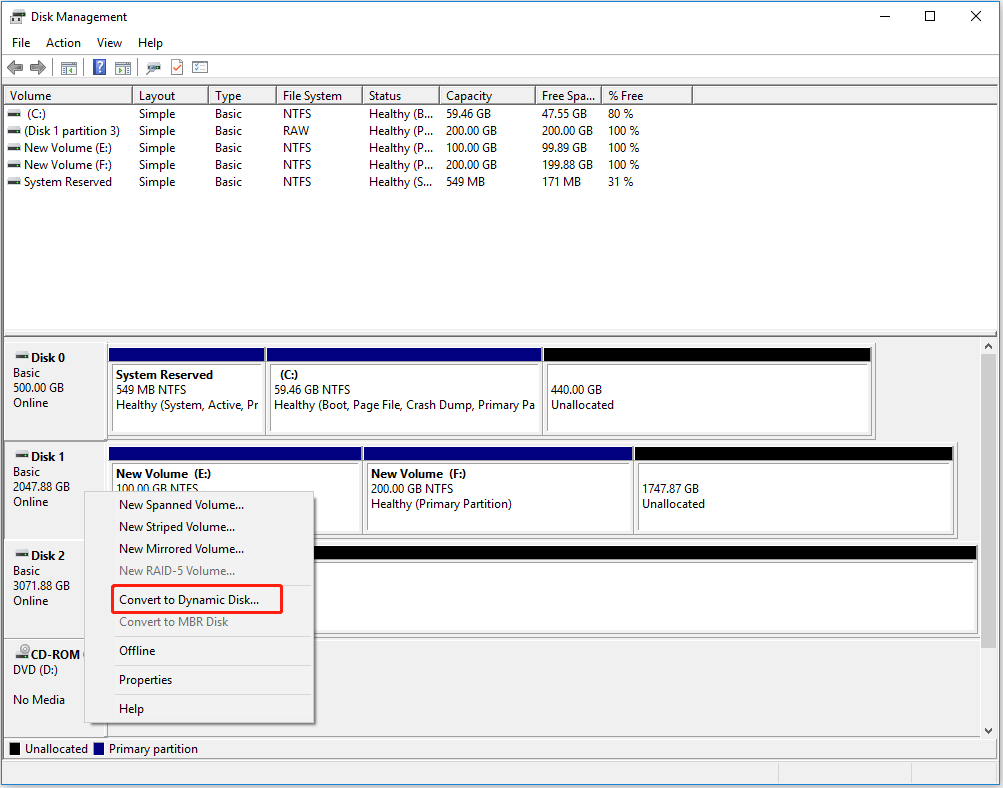
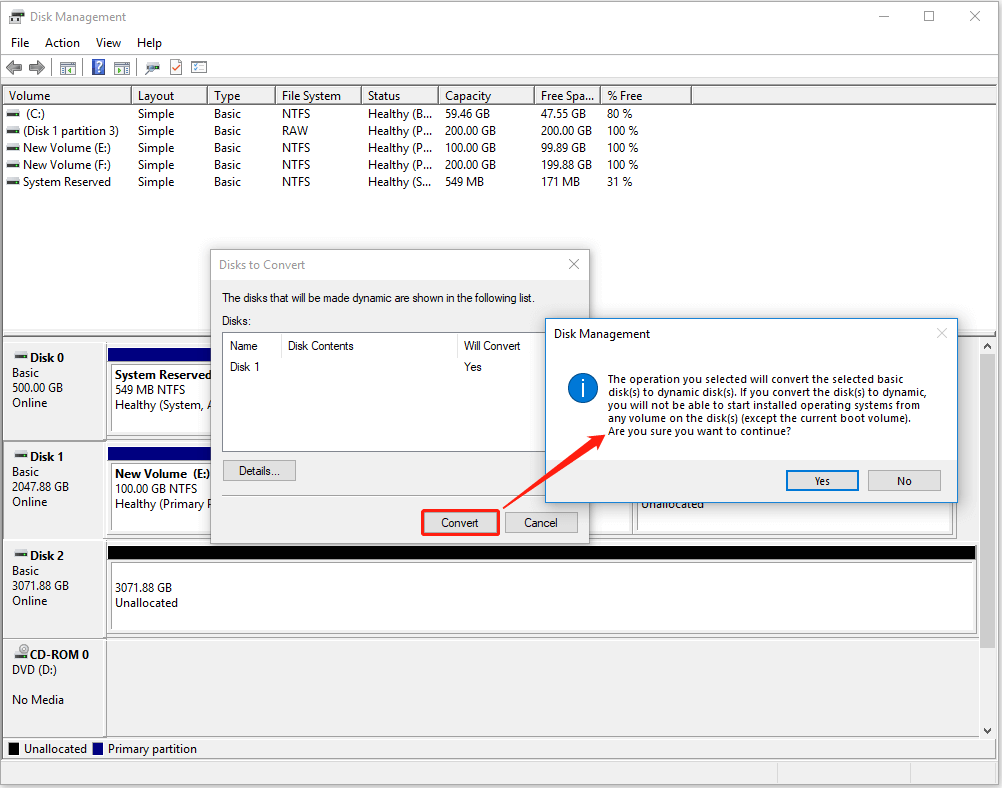
Step 1. Right-click on the basic disk you want to convert and choose Convert to Dynamic Disk feature from the context menu.
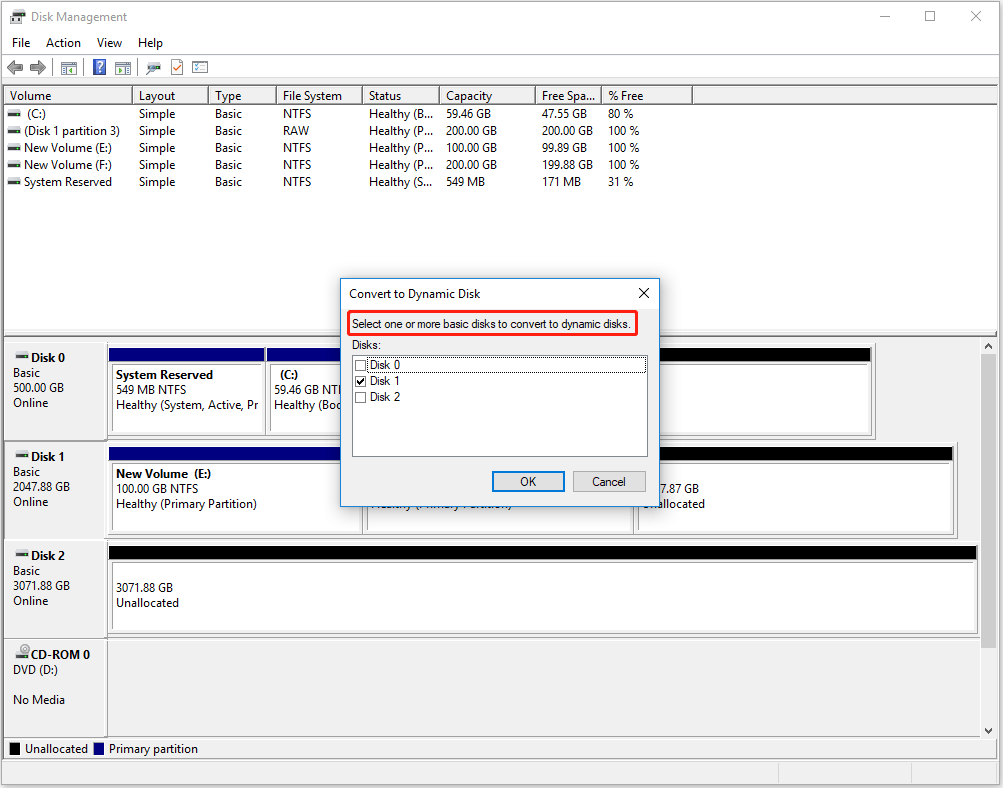
Step 2. A pop-up window appears requiring you to select one or more basic disk to convert. Select the one you prefer and click OK to continue.
Step 3: A confirmation window will appearshowing the selected disk and asking you to click Convert to proceed. You will then see a message explaining the system installation restrictions after converting to a dynamic disk. Read it carefullyand click Yes to confirm if you agree. The selected disk will be converted to dynamicand all primary and logical partitions will become simple volume
6. Convert to MBR/GPT Disk
#1. Convert to MBR Disk
MBR (Master Boot Record) is an older partition that remains useful for specific compatibility needs. You may need to convert a disk to MBR if your system doesn’t support GPTespecially when installing Windows on a Legacy BIOS based system.
Check the following table to determine if you need to convert a disk to MBR:
| Operating System | MBR System Disk | MBR Data Disk | GPT System Disk | GPT Data Disk |
| Windows XP (32-bit) | Yes | Yes | No | No |
| Windows XP (64-bit) | Yes | Yes | No | No |
| Windows Vista (32-bit) | Yes | Yes | No | No |
| Windows Vista (64-bit) | Yes | Yes | Yes (UEFI only) | Yes |
| Windows 7 (32-bit) | Yes | Yes | No | Yes |
| Windows 7 (64-bit) | Yes | Yes | Yes (UEFI only) | Yes |
| Windows 8/8.1 (32-bit) | Yes | Yes | No | Yes |
| Windows 8/8.1 (64-bit) | Yes | Yes | Yes (UEFI only) | Yes |
| Windows 10 (32-bit) | Yes | Yes | No | Yes |
| Windows 10 (64-bit) | Yes | Yes | Yes (UEFI only) | Yes |
| Windows 11 (64-bit) | No | Yes | Yes (UEFI only) | Yes |
How to Convert to MBR Disk in Disk Management
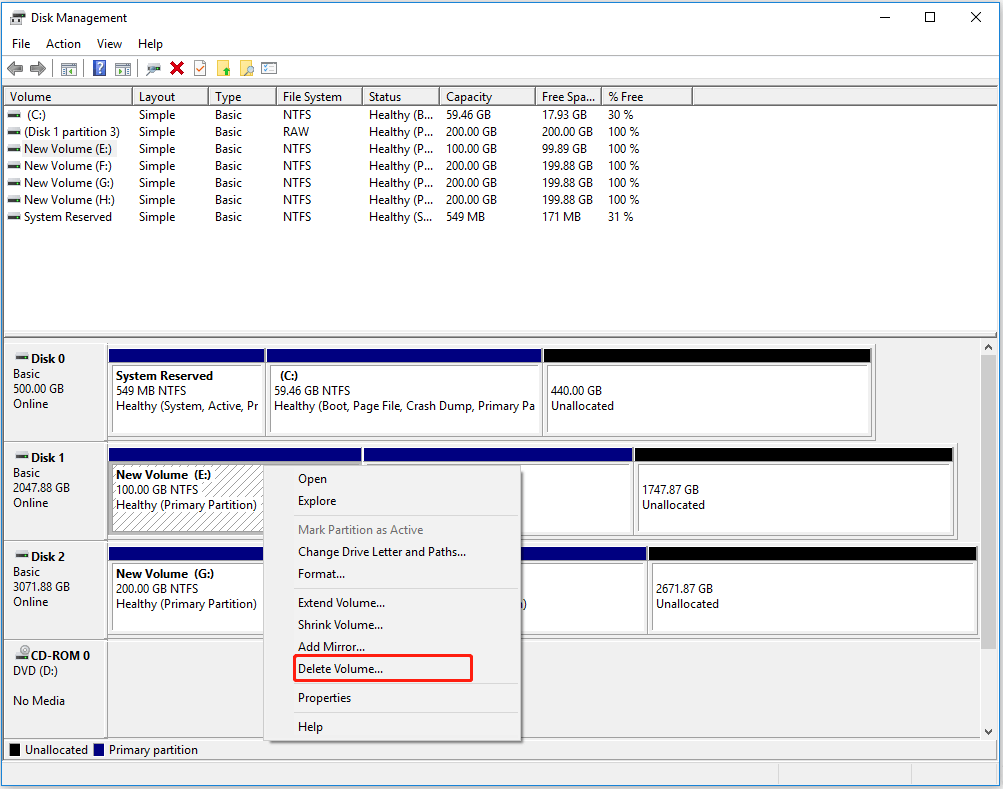
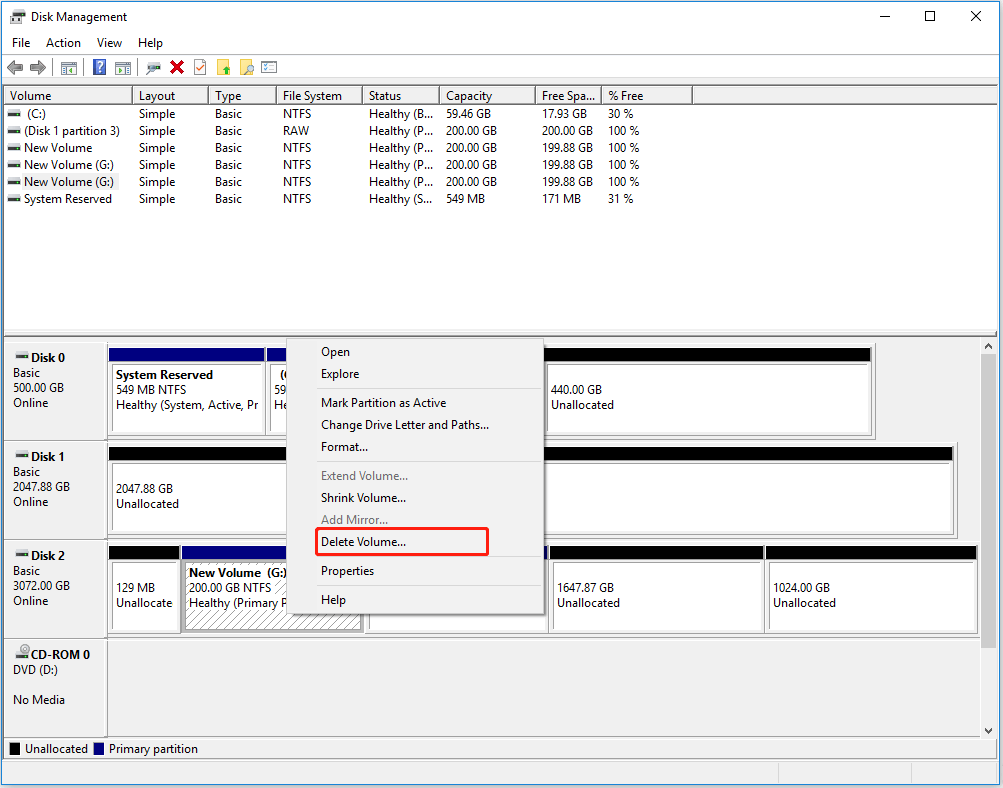
Step 1. Right-click each partition on the disk you want to convert and select Delete Volume to remove all partitions one by one until the whole disk turns into unallocated space.
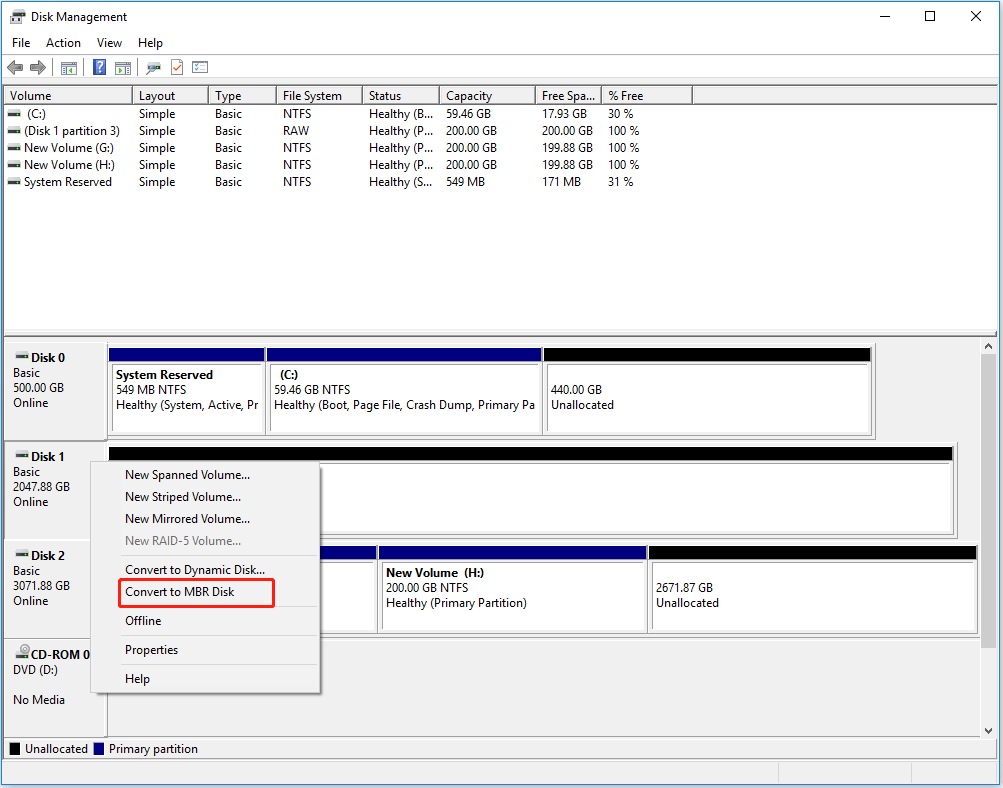
Step 2. Right-click the GPT disk and select Convert to MBR Disk.
After the conversionyou need to create new partitions. For the detailsplease refer to New Simple Volume (Create Partition).
#2. Convert to GPT Disk
GPT (GUID Partition Table) is a modern partition that supports larger storage and more advanced features. You may need to convert a disk to GPT if:
- You are using a system with UEFI BIOS instead of Legacy BIOS (check the above chart for detailed information).
- You need to create partitions beyond the 2TB disk limit.
- You need more than four primary partitions on a single disk.
- You want better data protection with built-in redundancy.
How to Convert to GPT Disk in Disk Management
Step 1. Select each partition on the MBR disk and choose Delete Volume from the context menu to remove all partitions.
Step 2. Right-click the target disk and select Convert to GPT Disk.
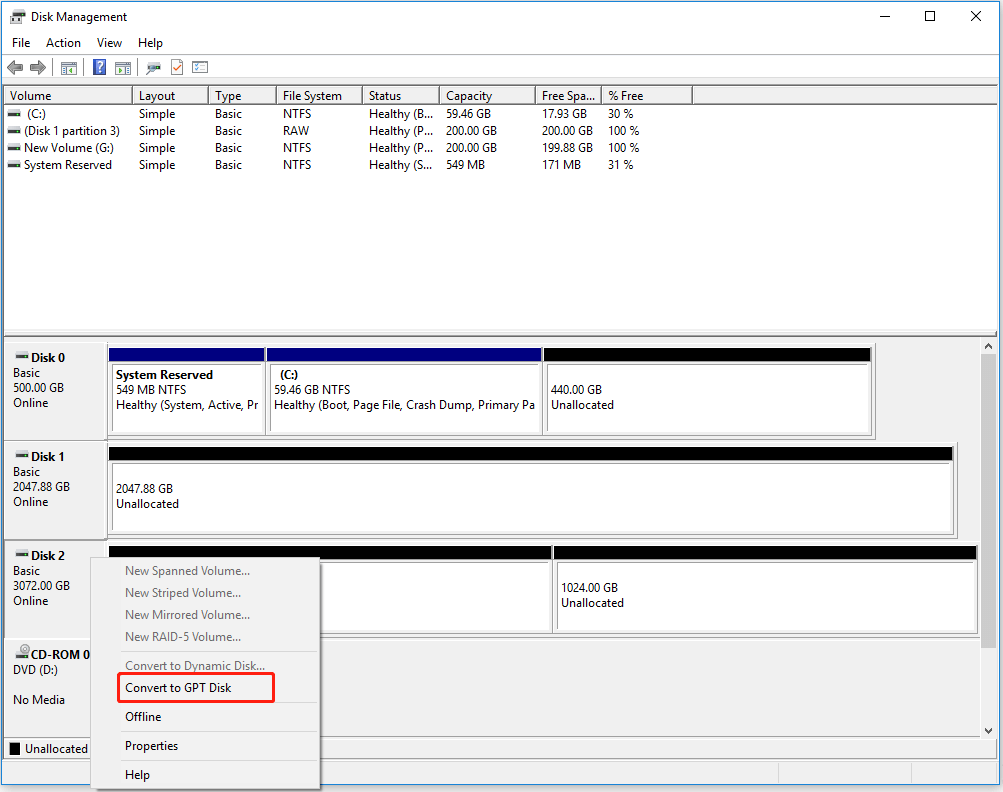
Now the disk is ready for disk space allocation and you can create up to 128 Primary partitions on it.
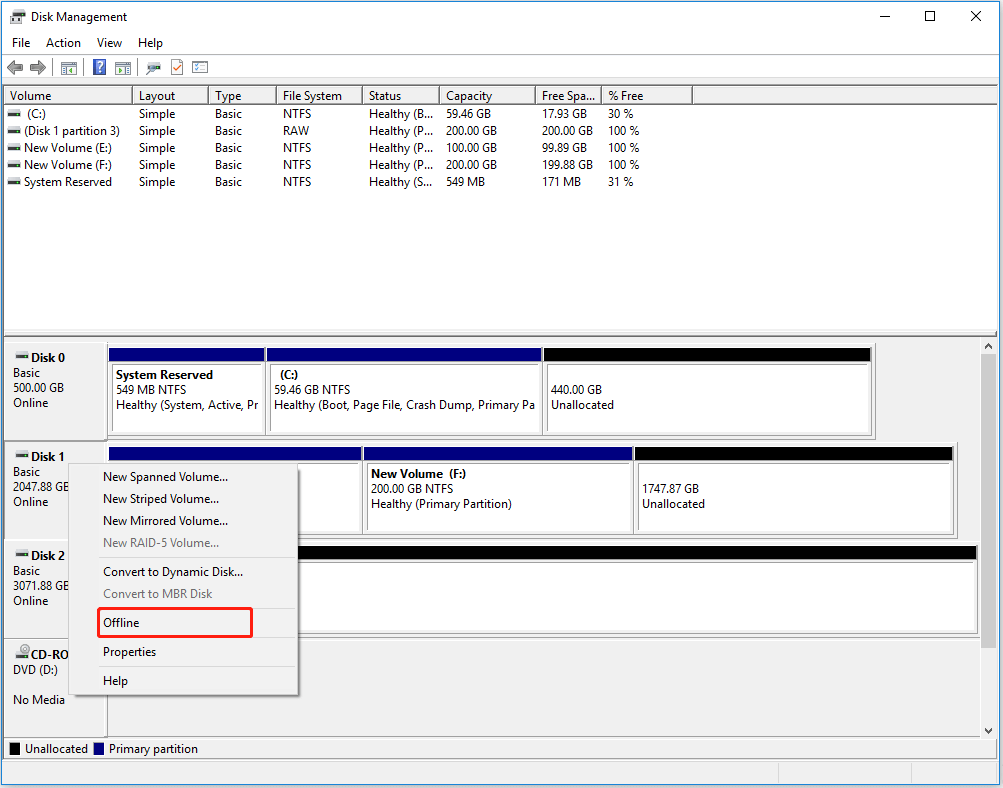
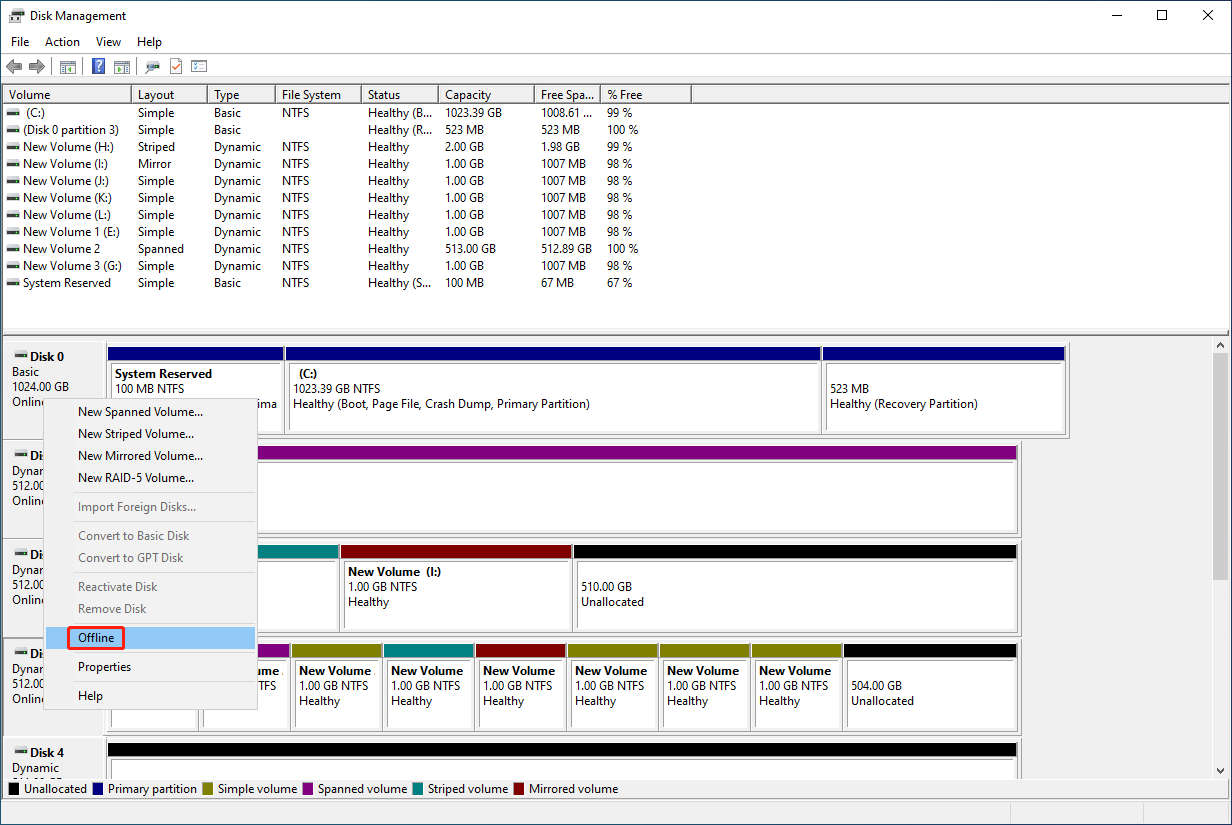
7. Offline/Online
In Disk Managementwhen a disk is set to Offlineit becomes unavailable for use by the operating system. This means Windows will not access or modify the disk until it is brought back Online.
When should you set a disk Offline?
Setting a disk Offline can help prevent accidental modificationsavoid conflicts in dual-boot setupsrestrict access in shared environmentsor assist with troubleshooting. This ensures data protectionsystem stabilityand easier issue resolution.
To bring a disk Offline in Disk Managementright-click an Online disk (except the system disk) and choose Offline from the menu. Then you will see a down arrow sign on the disk icon which indicates Offline.
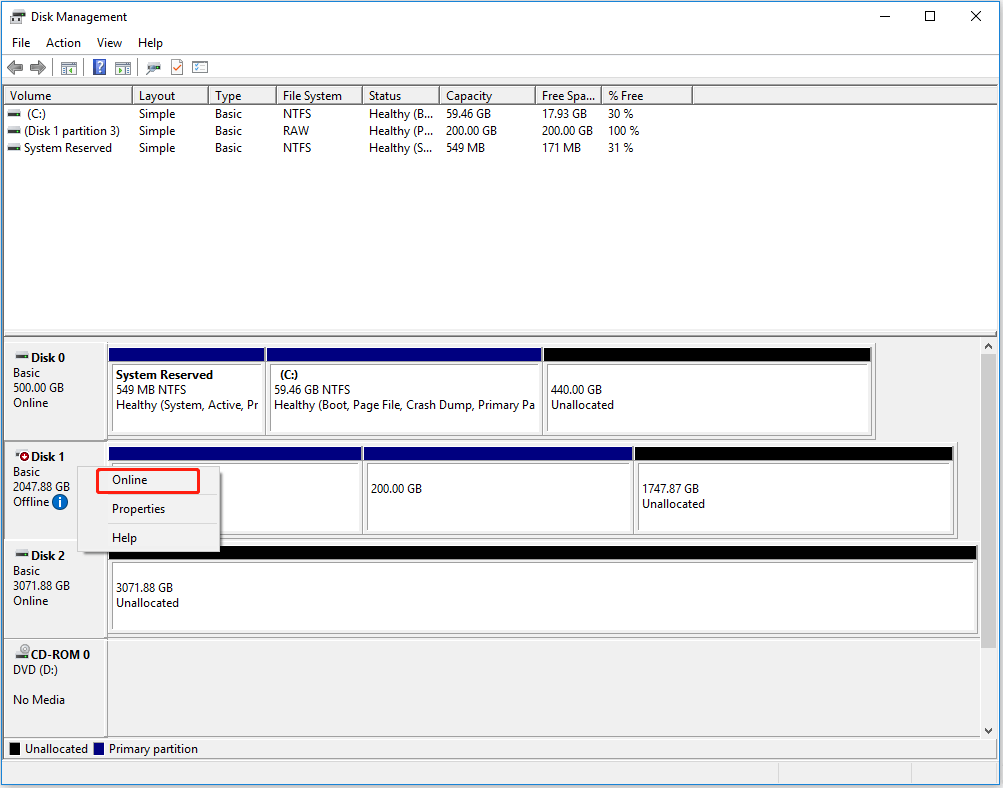
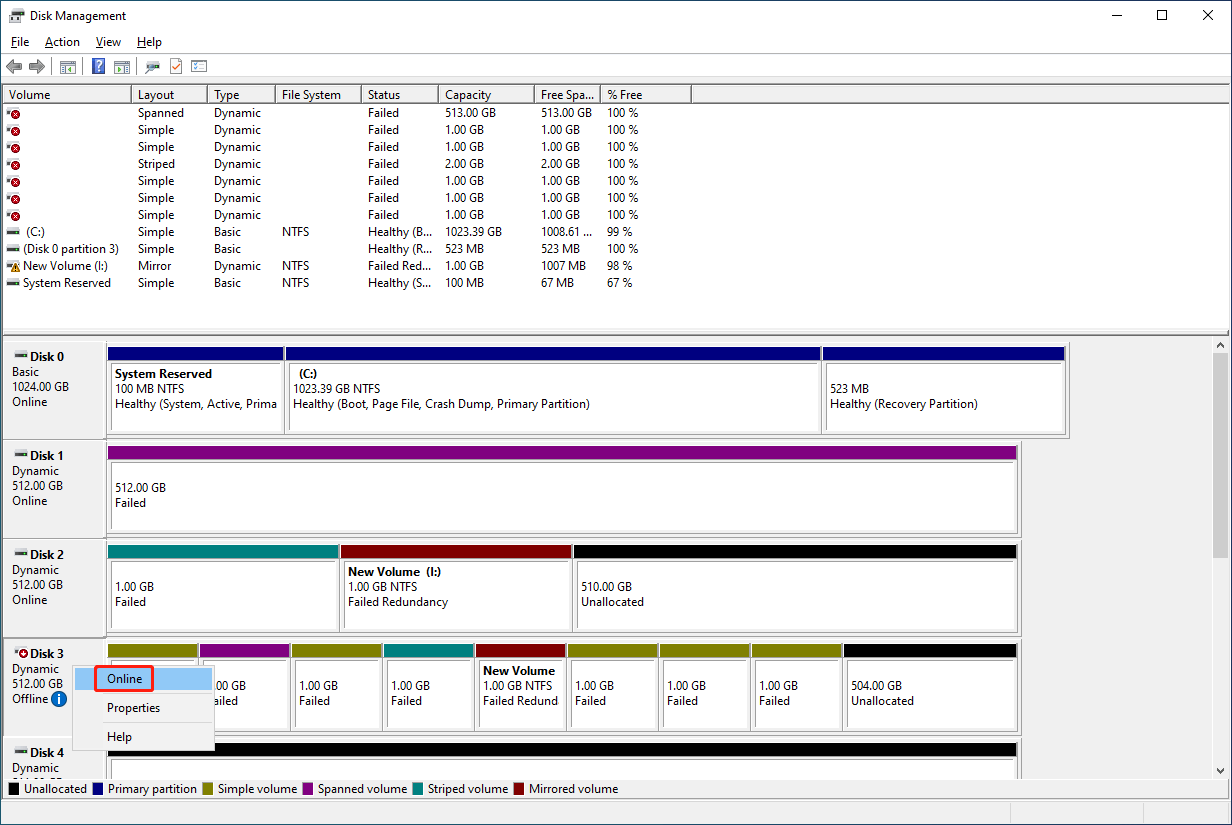
When a disk is Offlineit won’t get Online by refreshing the disk or restarting computer. To restore the disk to a usable stateyou need to set it Online in Disk Management.
Just right-click on the Offline disk and choose Online. Now the disk is available for use again.
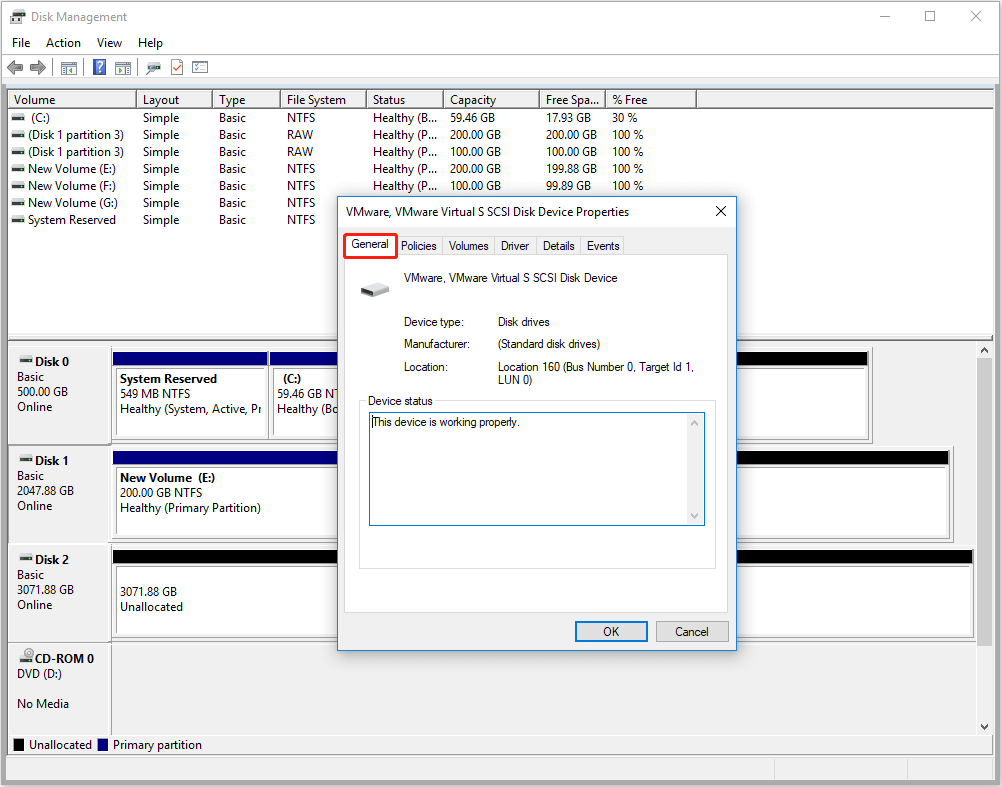
8. Properties (of Basic Disk)
#1. General
In the General tabyou can view the device nametypemanufacturerhard drive locationand its operational status
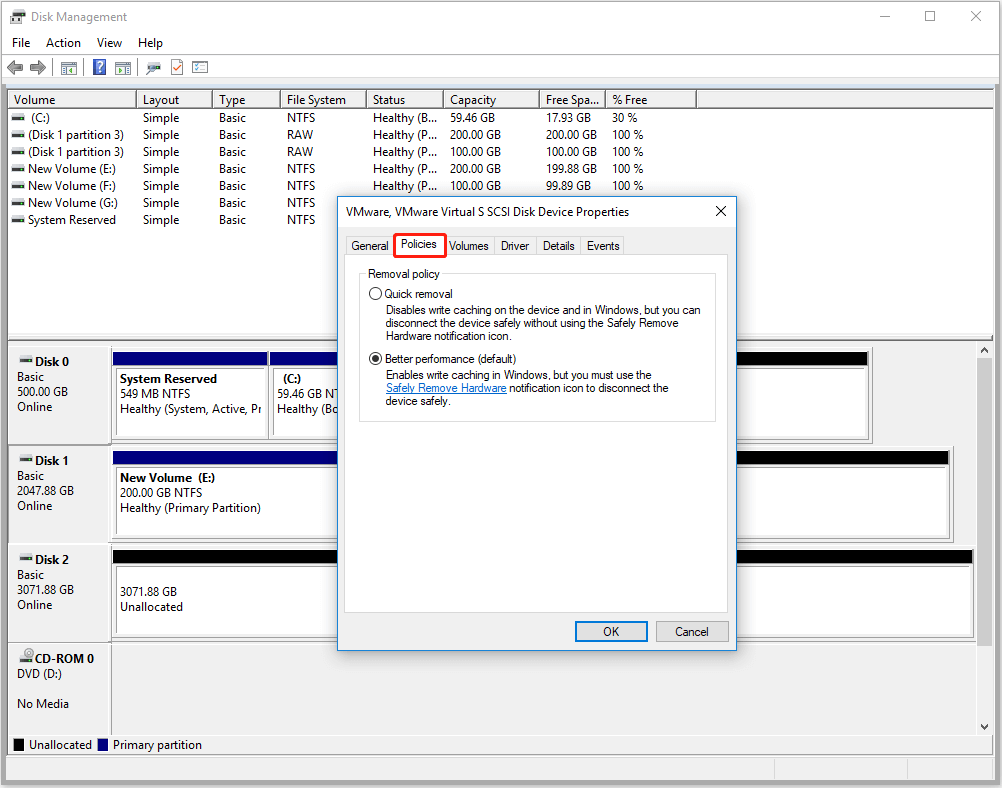
#2. Policies
The Policies (Removal Policies) section lets you choose how to remove a removable device. You can select Quick Removalwhich disables write cachingallowing you to unplug the device without using the Safely Remove Hardware option. Alternativelythe default Better Performance mode enables caching in Windowsrequiring you to use Safely Remove Hardware before disconnecting.
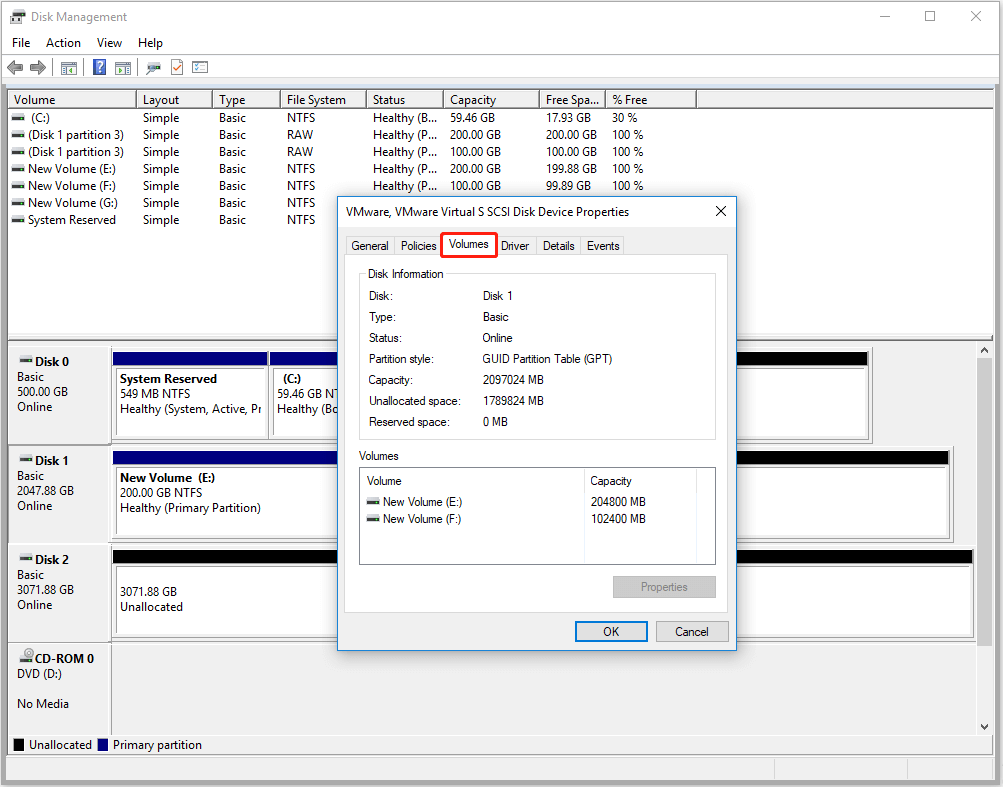
#3. Volumes
The Volumes tab displays both disk and volume information for the selected hard drive. Disk Information includes the disk numbertypestatuspartition capacityunallocated spaceand reserved space. Volume Information shows the capacity of each volume on the drive. You can select a volume and view its detailed propertieswhich leads you to the General tab of Volume Properties.
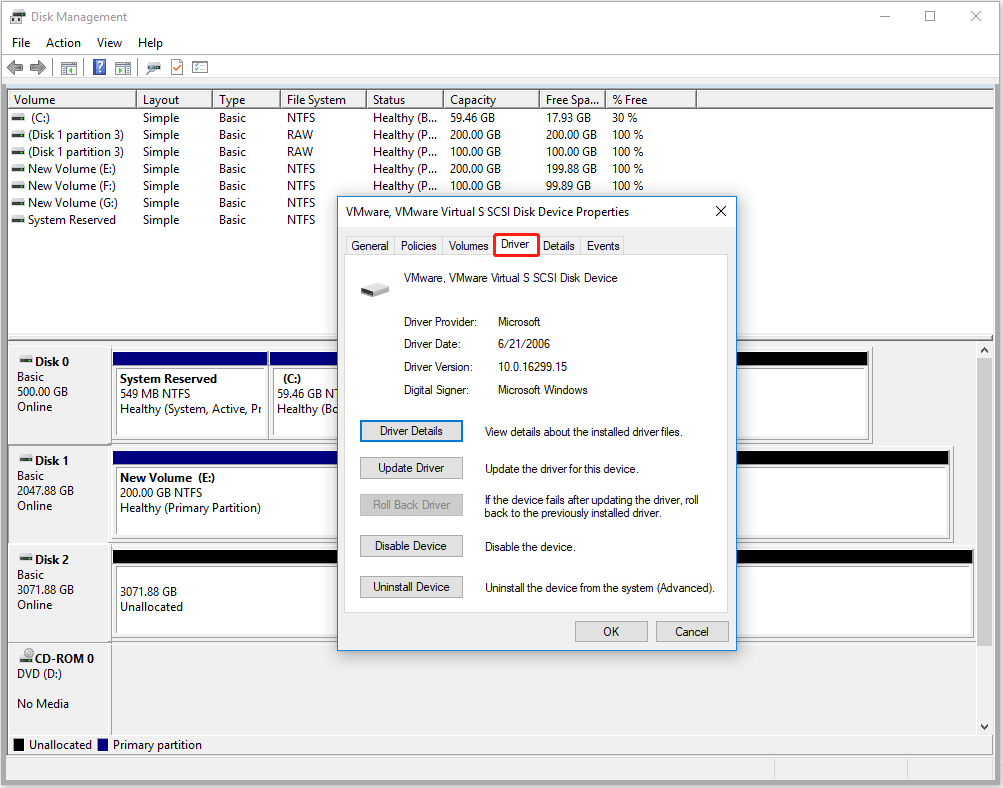
#4. Driver
The Driver tab in the Disk Properties window provides information (including driver providerdateversion and singer) and management options (check the following list) for the device’s driver.
- Driver Details: Displays the driver files currently in use.
- Update Driver: Allows you to update the driver manually or automatically.
- Roll Back Driver: Restores the current driver to previous version if a new update causes issues.
- Disable Device: Temporarily disable the usage of the device without uninstalling it.
- Uninstall Device: Removes the hard drive device. This requires a driver reinstallation upon reconnecting the device.
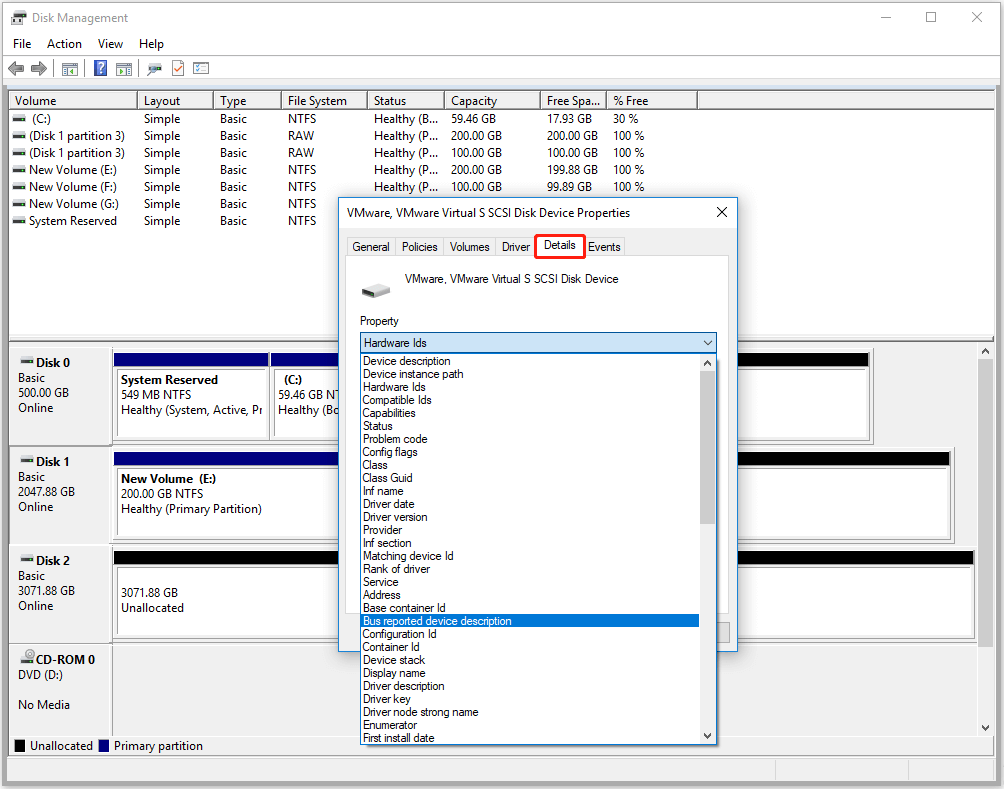
#5. Details
The Details tab shows more technical information about the selected disk or volume. You can find details like the Device NameHardware IDsDevice DescriptionDevice Instance PathHardware IDand many more. This tab is helpful for checking device properties or troubleshooting issues.
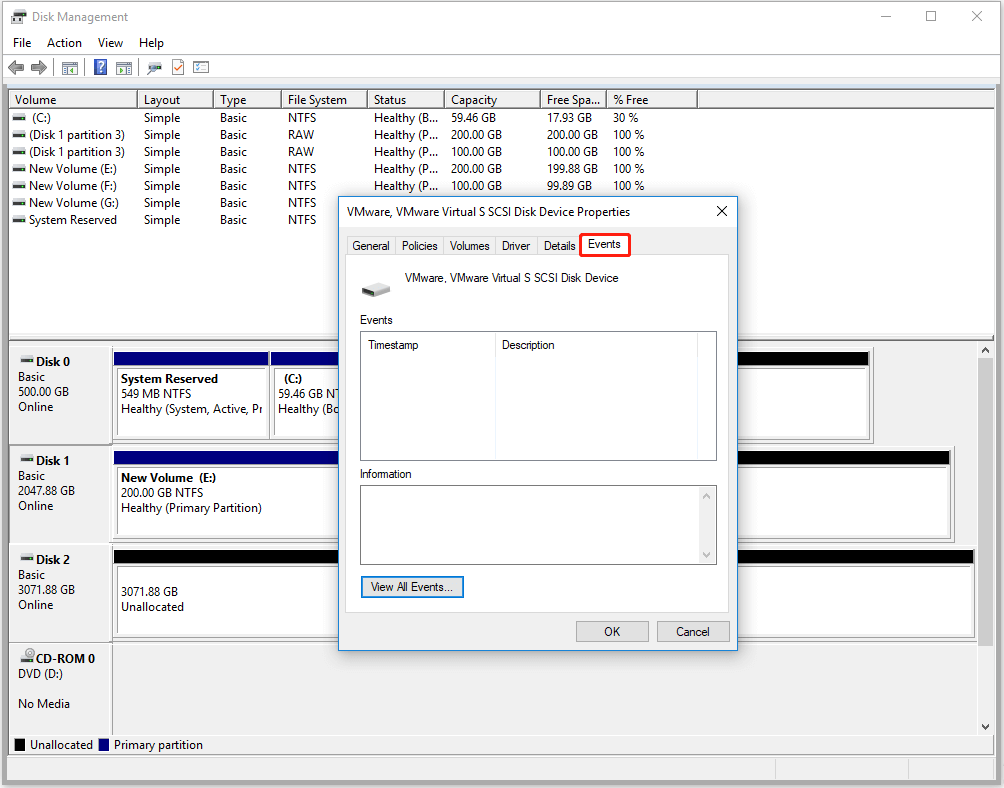
#6. Events
The Event tab in Disk Management shows a history of changes and issues related to the selected disk. It records events like when the disk was connected or removeddriver updatesand errors. This helps you track what happened to the disk and troubleshoot problems if needed.
9. Help
Just like Volume Helpclicking the Help option redirects you to a Bing search for Windows 10 Disk Management topicsallowing you to look up relevant information instantly.
Manage Volume on Dynamic Disk
Dynamic disks offer more flexibility than basic disks. While basic disks only allow for simple partitionsdynamic disks support more types of volumes:
- Simple Volumes
- Spanned Volumes
- Striped Volumes (RAID-0)
- Mirrored Volumes (RAID-1)
- RAID-5 Volumes
In Disk Managementyou can also manage dynamic partitions and disks using different features. Below are the available features to handle dynamic disks and partitions.
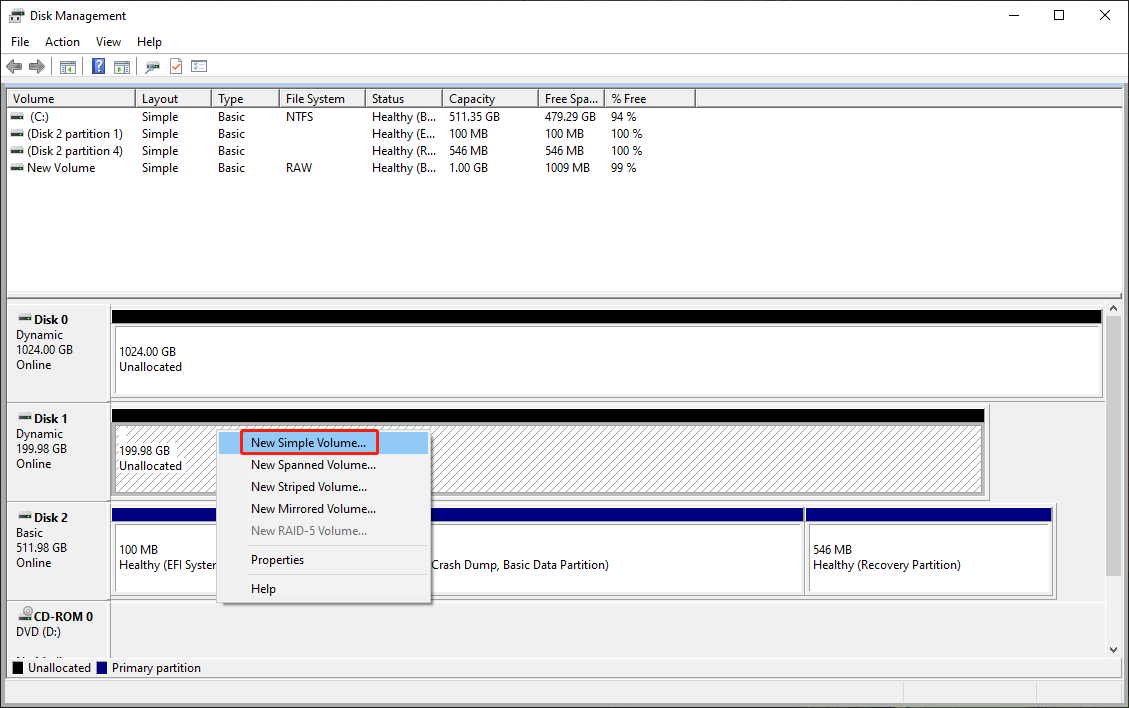
1. New Simple Volume
A simple volume is a volume type in a dynamic disk. You can create a simple on a single physical dynamic disk and then use it to store data without any special configurations for redundancy or performance enhancement.
Key features of the simple volume:
- A simple volume uses space from only one physical diskalthough it can span multiple partitions or disk sections on the same disk.
- Unlike the mirrored volume (RAID 1) or striped volume (RAID 0)a simple volume does not provide redundancy or fault tolerance. If the disk failsyou will lose all data on the simple volume.
Step 1. Right-click on the unallocated space on the target dynamic disk and then choose New Simple Volume.
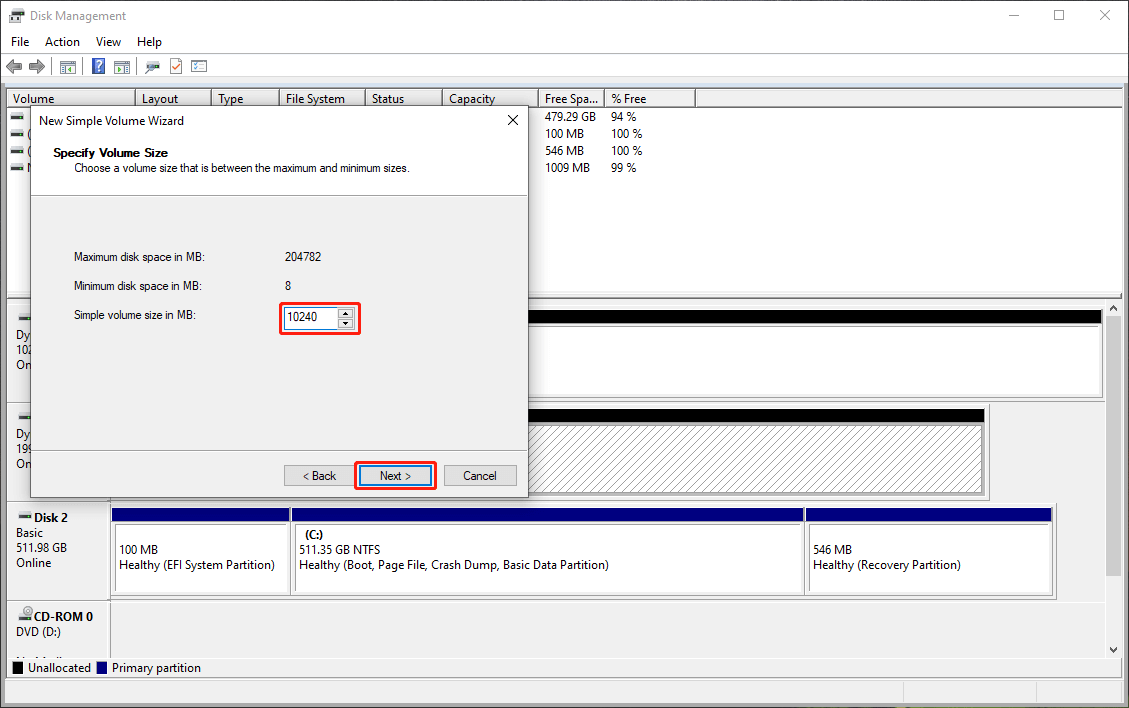
Step 2. On the pop-up windowclick the Next button to continue.
Step 3. On the next pop-up windowmodify the simple volume size in MBthen click the Next button to go to the next step.
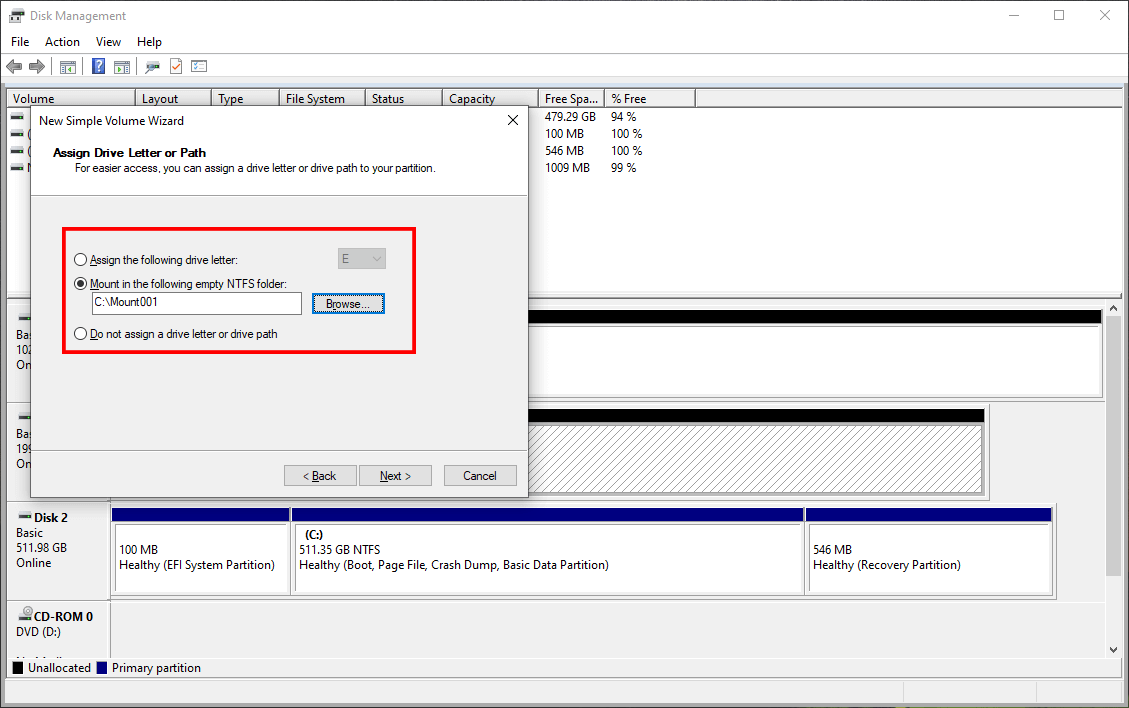
Step 4. You can see 3 options on the next window. After choosing an optionclick the Next button to continue.
- Assign the following drive letter: If the newly created simple volume has no drive letteryou can’t see it in File Explorer. To assign a drive letter for this volumeyou need to unfold the drive letter list next to this option and then select the one you want to use.
- Mount in the following empty NTFS folder: If you want to mount this new simple volume to an empty NTFS folderyou can choose this option. Thenclick the Browse button and select the target empty NTFS folder.
- Do not assign a drive letter or drive path: If you choose this optionthe new simple volume will have no drive letter or drive pathwhich means it will be invisible in File Explorer.
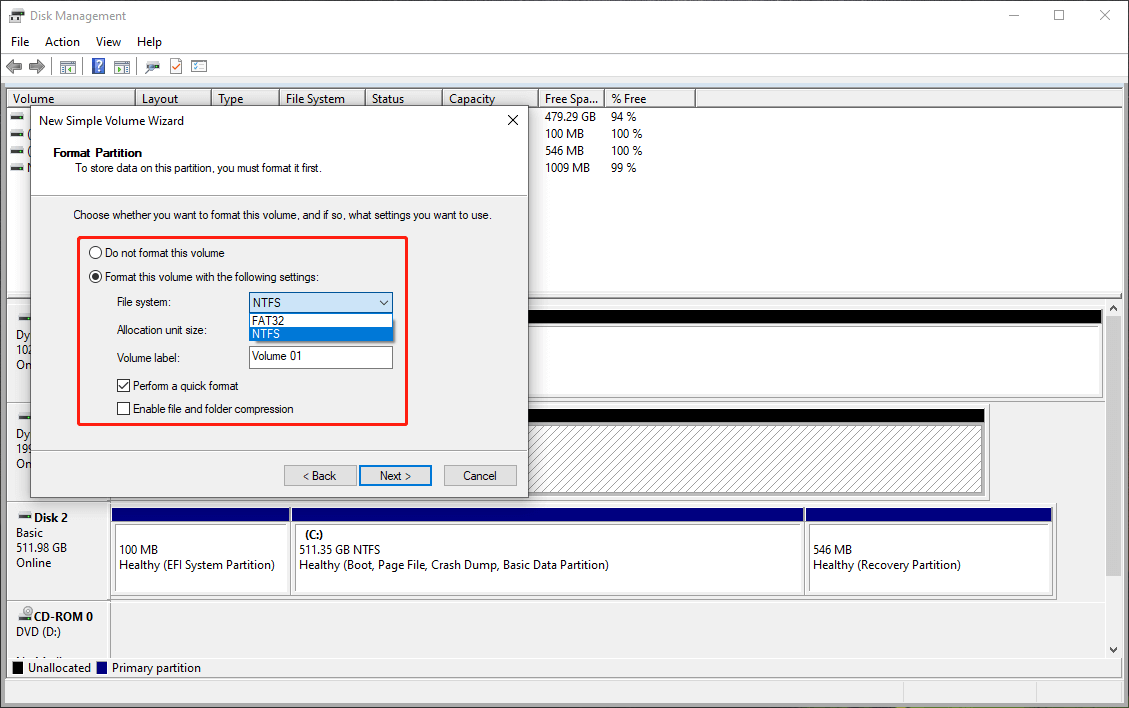
Step 5. You can see two format options on the next page. Select one and click the Next button.
- Do not format the volume: If you choose this oneyou will get a RAW simple volumebut you still need to format it to normal before you use it.
- Format this volume with the following settings: If you want to use the simple volume directly after the creationyou should choose this option to format it by selecting a proper file system. You can use the default allocation unit size and assign a new volume label. Nextyou can select Enable file and folder compression or not according to your requirement.
Step 6. Noweverything is set up. You can click the Finish button to close the New Simple Volume Wizard.
2. New Spanned Volume
A spanned volume can combine multiple physical disks into a single logical volume and then store data across the multiple disks sequentially. This means that the spanned volume will write data to one disk until it is full-written and then save data to the next disk in the span.
You can choose to create a spanned volume when:
- You want to extend volume using the available unallocated space beyond what a single disk can provide.
- You want to combine different-sized disks into a singleunified volume.
Here is a guide on how to create a spanned volume on two disks:
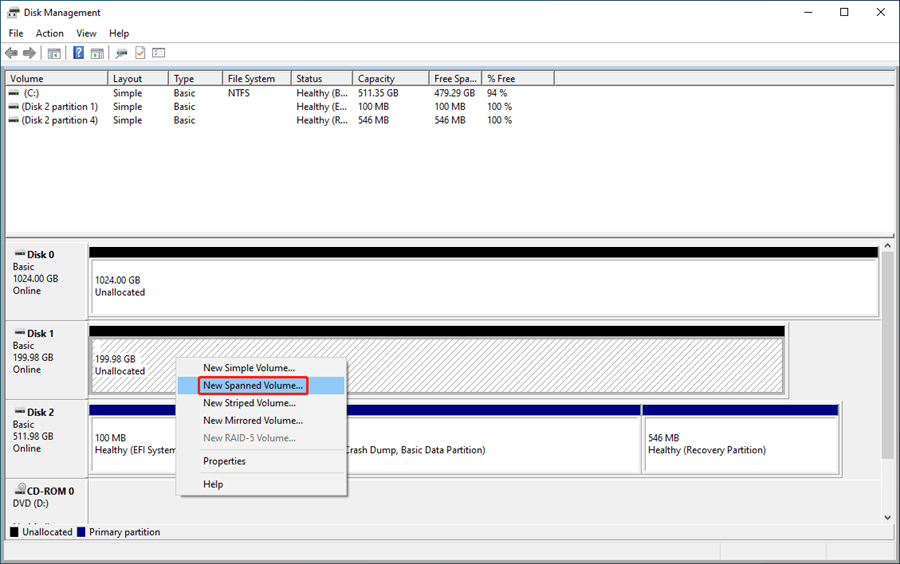
Step 1. Right-click on the target disk or the unallocated space on the target disk and then choose New Spanned Volume.
Step 2. On the pop-up windowclick the Next button to continue.
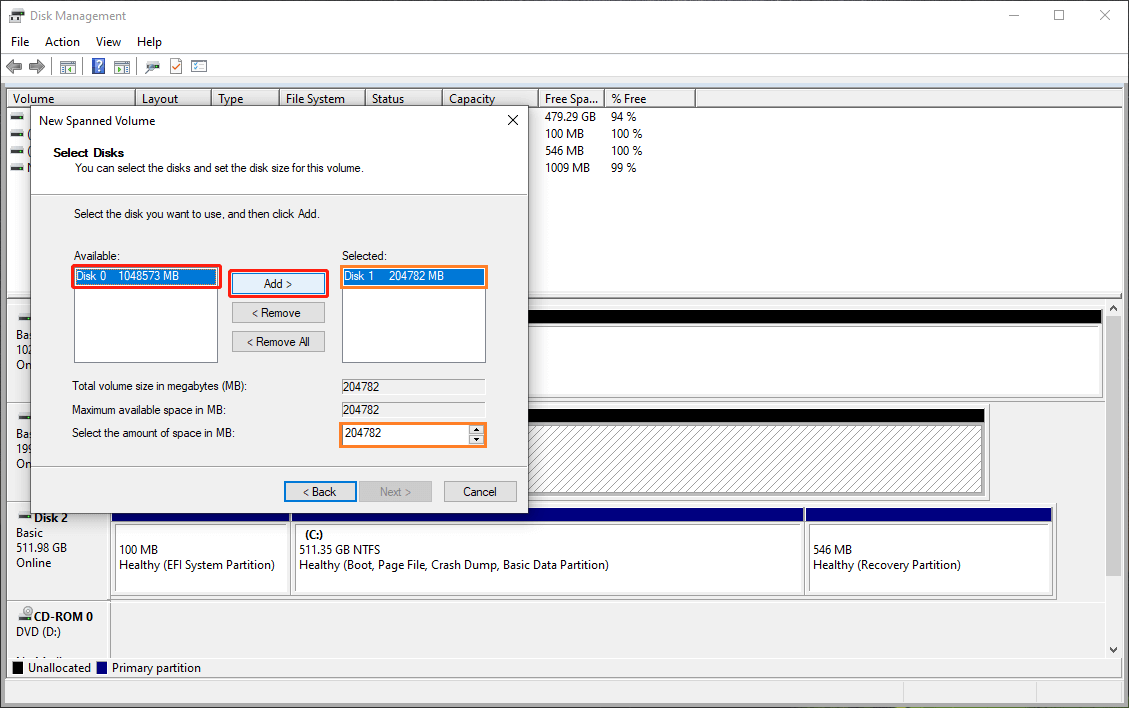
Step 3. On the next windowthe disk you are creating spanned volume on is selected by default. Check the areas marked in orangeyou need to specify how much disk space you want the new spanned volume to occpy. Of coursesince a spanned volume requires two disksyou have to select another disk from the Available sectionclick the Add button to move it to the Selected sectiondetermine the amount of disk space to be usedand finally click Next to go on.
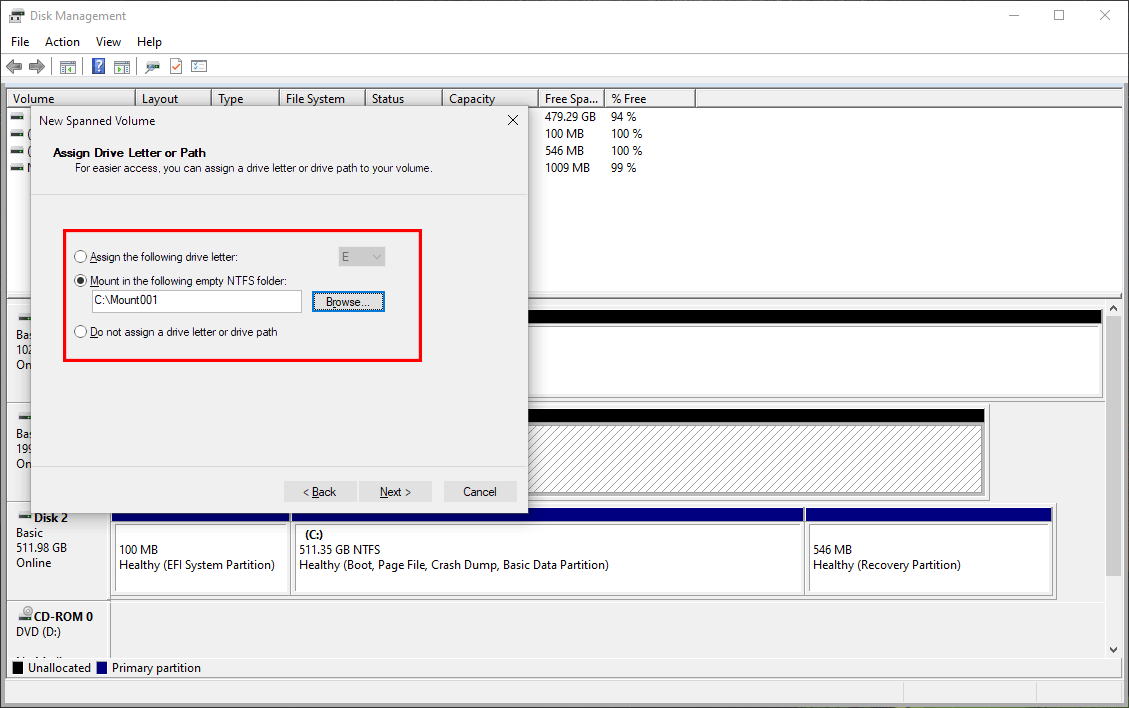
Step 4. You can see 3 options on the next window. After choosing an optionclick the Next button to continue.
- Assign the following drive letter: You need to assign a drive letter for the newly created spanned volume. Soexpand the menu next to this option and select a drive letter from the drop-down menu.
- Mount in the following empty NTFS folder: This feature allows you to mount the spanned volume you are going to create to an empty NTFS folder. To do thisyou can select this option > click the Browse button > select the target empty NTFS folder.
- Do not assign a drive letter or drive path: If you do not want to assign a drive letter temporarilyyou can select this option. If you do thisthis new volume will be invisible in File Explorer.
Step 5. You can see the formatting options on the next page. Choose one to continue.
- Do not format the volume: This option will leave the volume unformatted. This means you will get a RAW spanned volume.
- Format this volume with the following settings: This option is selected by default. You can choose a file systemassign the allocation unit sizeand give volume label for the volume. At the same timeyou can select Perform a quick format and Enable file and folder compression or not based on your own needs.

Step 7. Click the Finish button to close the New Spanned Volume wizard. The whole process will last for a while if the total size is large. You should wait patiently until the entire process ends.
3. New Striped Volume
A striped volume (also known as RAID 0) combines free space from multiple hard disks (at least 2 disksup to 32 disks) into a single logical volume. Data written to a striped volume is written to all disks simultaneously rather than sequentially. Thereforedisk performance on a RAID 0 volume is the fastest compared to any other type of disk configuration.
Key features of the striped volume:
- The data in a striped volume is divided into equal-sized blocks or stripeswhich are then simultaneously written to 2 or more physical disks. Each disk just holds a portion of the data. Due to thisyou can enjoy faster read and write speeds while using a striped volume.
- A striped volume doesn’t provide data redundancy. When one drive in the striped volume failsyou will lose all data.
- Since a striped volume is not used for data redundancyall the storage capacity in the striped volume is used in RAID 0.
Here is how to create a striped volume on two disks in Disk Management:
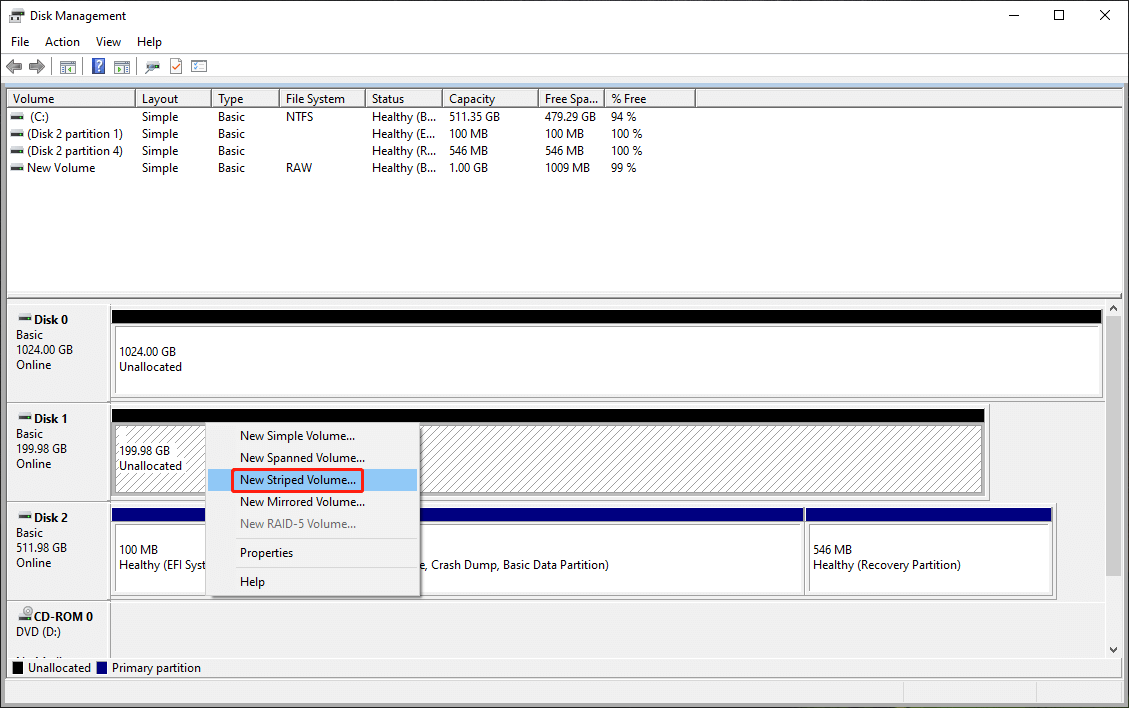
Step 1. Right-click on the target disk or the unallocated space on the target disk and then choose New Striped Volume.
Step 2. On the pop-up windowclick the Next button to continue.
Step 3. On the next windowselect the target disk from the Available section and click the Add button to add it to the right Selected section. Click in the box next to Select the amount of space in MB and type the size in MB you want the striped volume to occupy on one disk. The new striped volume will take the same space on the other disk. Thenclick the Next button to continue.

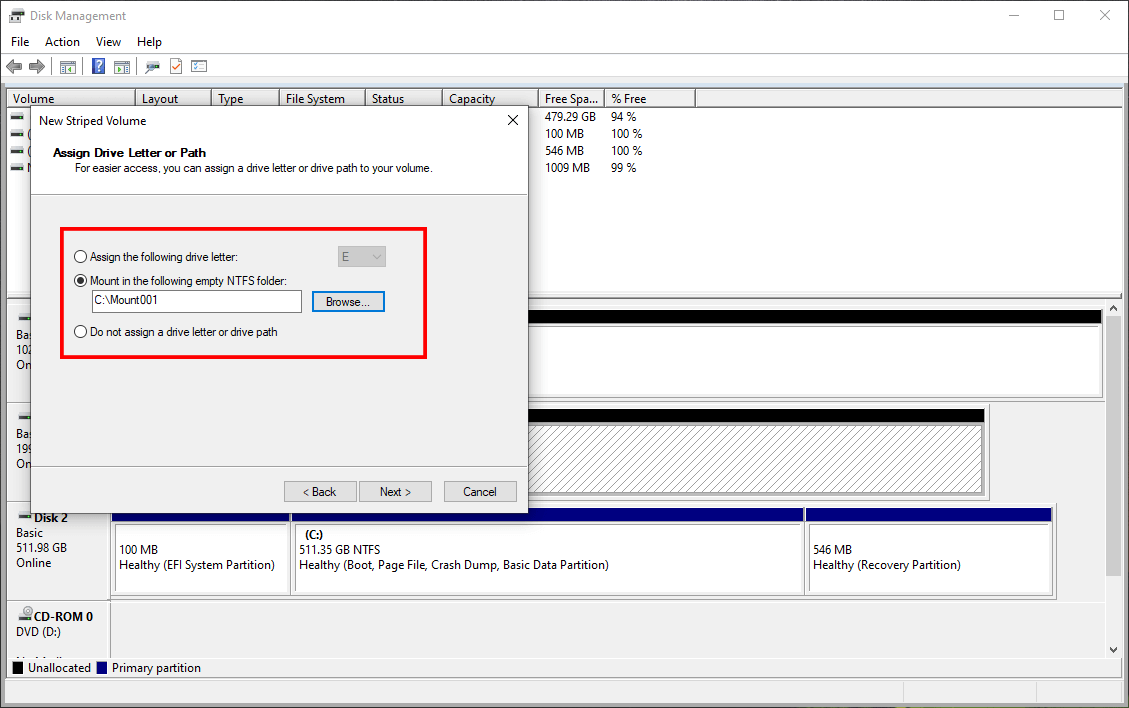
Step 4. You can see 3 options on the next window. After choosing an optionclick the Next button to continue.
- Assign the following drive letter: When this option is selectedyou can expand the menu next to it and choose a drive letter for the new striped volume.
- Mount in the following empty NTFS folder: By using this optionyou are allowed to mount this new striped volume to an empty NTFS folder. Just select this optionthen click Browse and choose the target NTFS folder.
- Do not assign a drive letter or drive path: If you select this optionthe new striped volume will not have a drive letter or pathmaking it invisible in File Explorer.
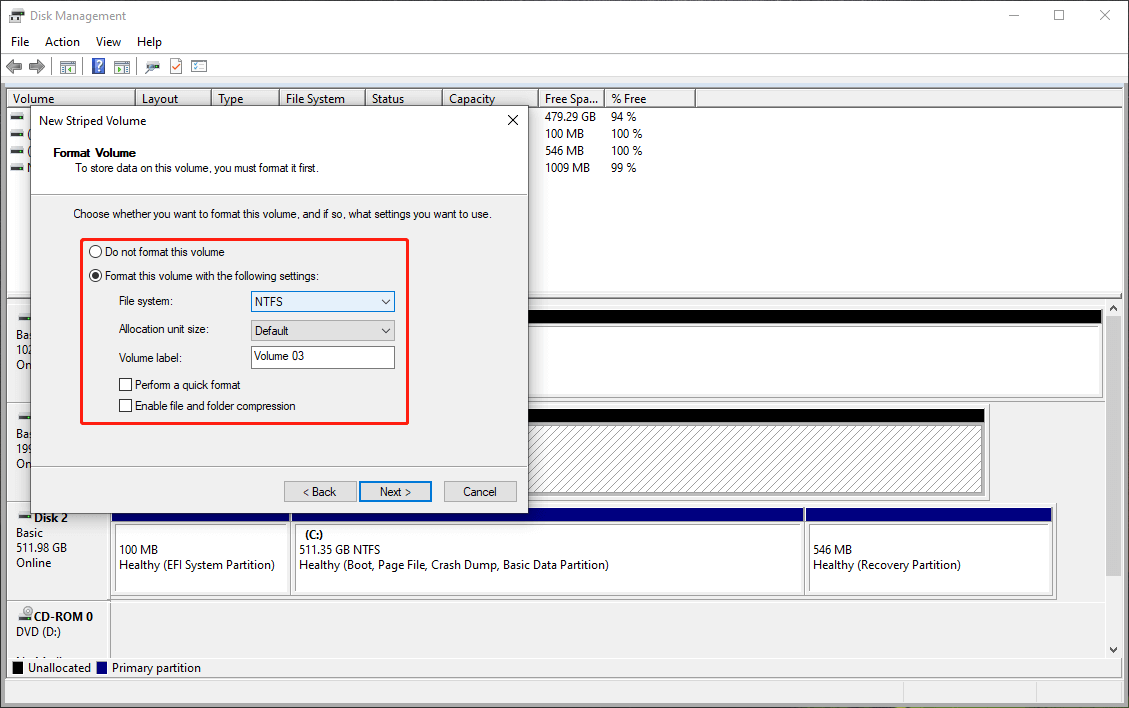
Step 5. You can see two options on the next page. Select an ideal one and click the Next button.
- Do not format the volume: This option is not a default selection because it will make you get a RAW striped volume. Howeverif you want to do thisyou can select it.
- Format this volume with the following settings: Formatting the volume will make the volume work normally and this option is selected by default. You can choose a suitable file system for the volume. Meanwhileyou can select the allocation unit size if you don’t want to use the default one. Adding a volume label helps to distinguish different volumes. At lastyou can choose Perform a quick format and Enable file and folder compression or not as your wish.
Step 7. Noweverything is set up. You can click the Finish button to close the New Striped Volume wizard and wait patiently until the entire process ends.
4. New Mirrored Volume
A mirrored volume is a type of data storage configuration used in RAID (Redundant Array of Independent Disks) systems. You can also call it RAID 1. It creates an exact copyor “mirror” of data across two or more disks. This configuration provides redundancywhich means that if one drive failsthe data is still available on the other drive(s).
Key features of the mirrored volume:
- Since there are one or more copies of the datait can protect your data from a hard drive failure.
- Both drives can be accessed for readingwhich allows for load balancing in read operations. This improved the read performance.
- Your data is protected using only two drives (one is a mirror of the other). This makes data protection economical.
Here is how to create a mirrored volume in Disk Management using two disks.
Step 1. Right-click on the target disk or the unallocated space on the target disk and then choose New Mirrored Volume.
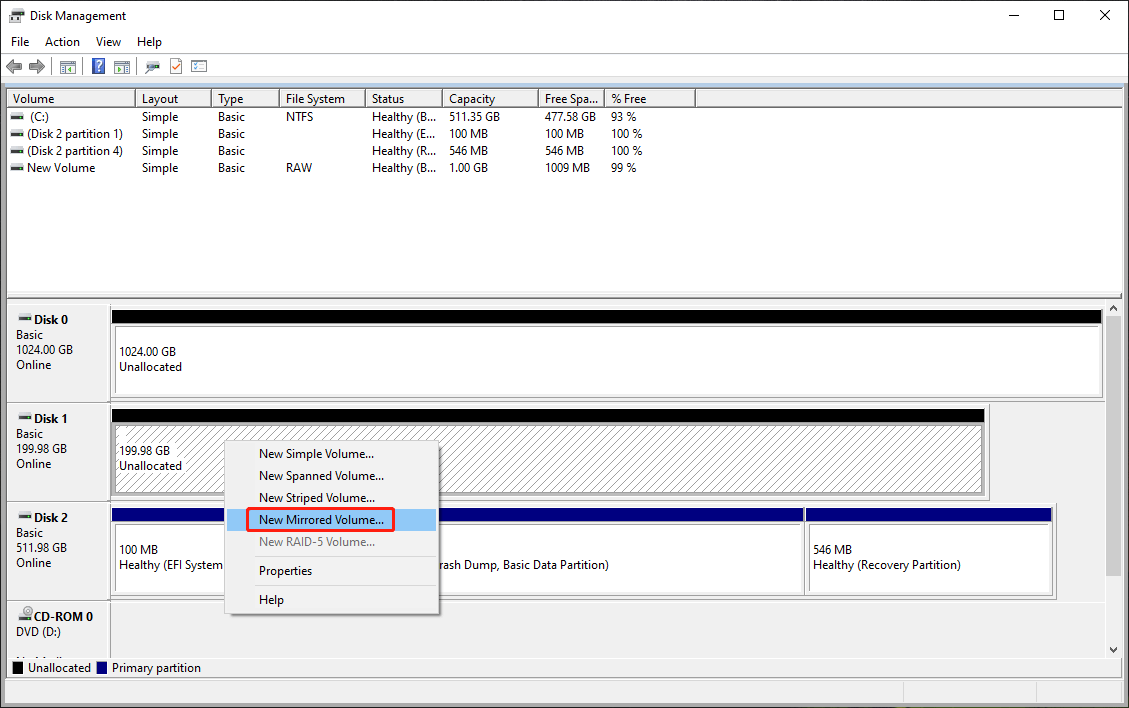
Step 2. On the pop-up windowclick the Next button to continue.
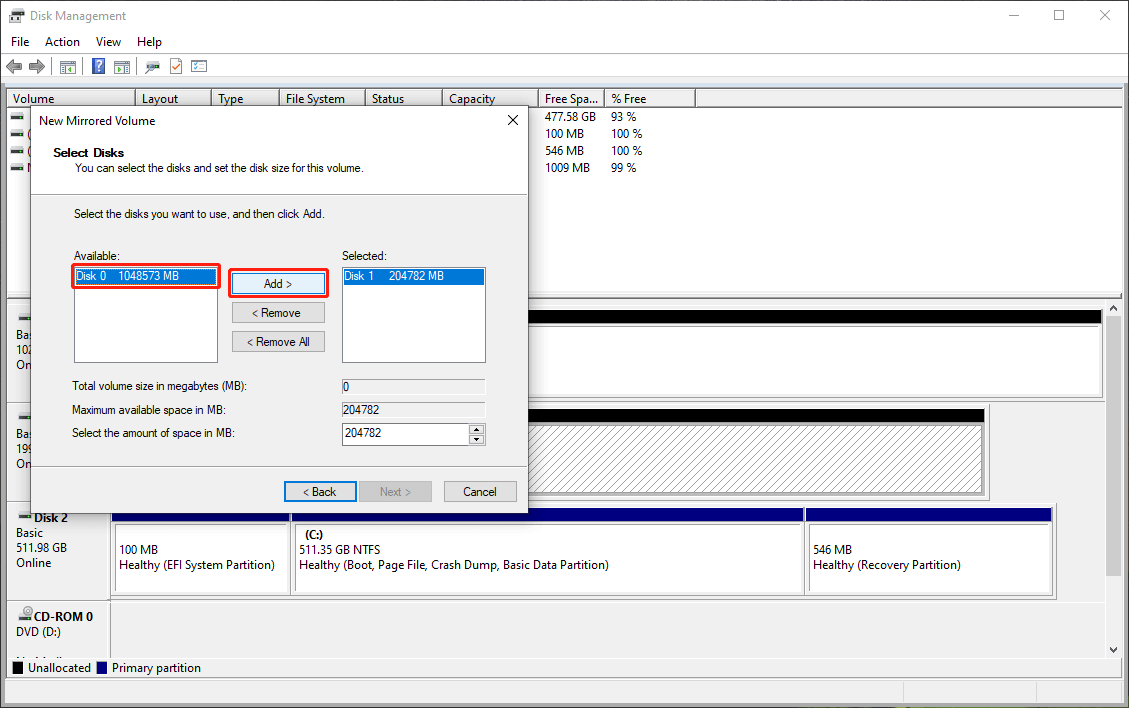
Step 3. On the next windowselect the target disk from the Available section and click the Add button to add it to the right Selected section. Set the disk size for the new mirrored volume in the Select the amount of space in MB box. This is the size the mirrored volume will take on each disk. Thenclick the Next button to continue.
Step 4. You can see 3 options on the next window. Select one and click the Next button to continue.
- Assign the following drive letter: To make this mirror visible in File Exploreryou need to expand the list of drive letters and select a letter for the volume.
- Mount in the following empty NTFS folder: This option is for the one who wants to mount this new mirrored volume to an empty NTFS folder. After clicking the Browse buttonyou can select the target empty NTFS folder from the folder list.
- Do not assign a drive letter or drive path: By selecting this optionthis mirrored volume will not be assigned a drive letter or drive pathmaking it hidden from view in File Explorer.

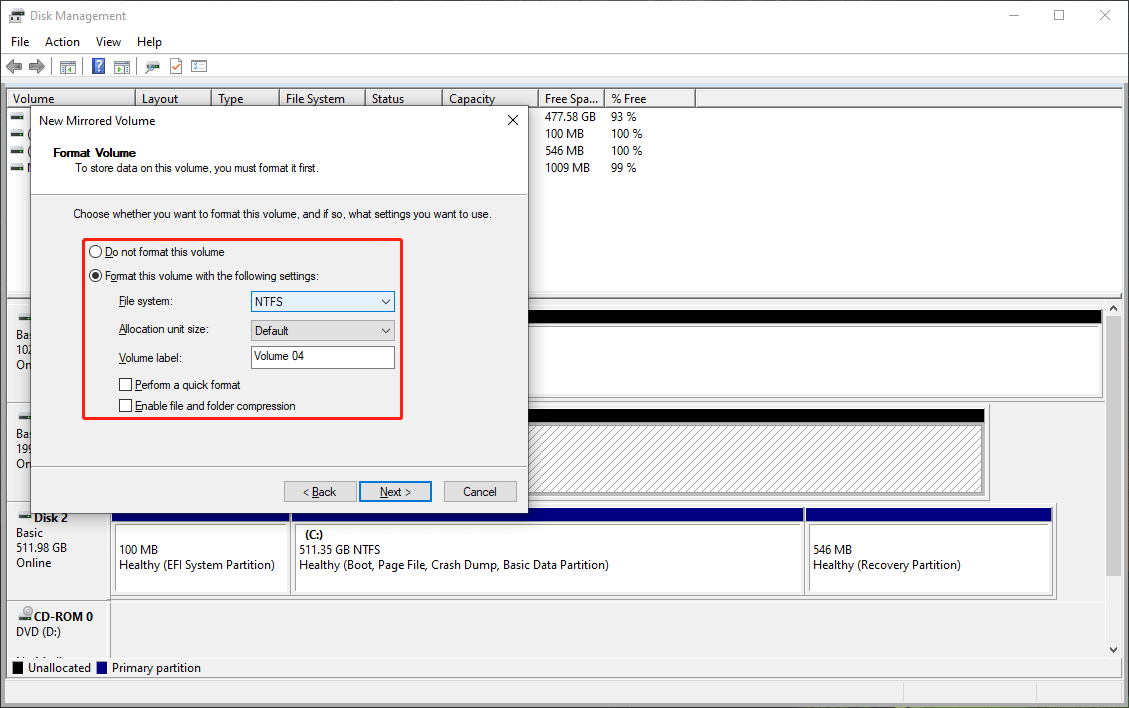
Step 5. You can see two options on the next page. Select how would like the volume to be formatted and click the Next button to continue.
- Do not format the volume: This option will not format the mirrored volumewhich means that this volume will be a RAW volume after creation.
- Format this volume with the following settings: To use the mirrored volume immediately after creationmake sure this option is selectedand then format the volume with the appropriate file system. You can use the default allocation unit size and assign a new volume label for quick identification. Thenchoose whether to perform a quick format and enable file and folder compression based on your needs.
Step 6. Click the Finish button to close the New Striped Volume wizard. The whole process will last for a while if the total size is large. You should wait patiently until the entire process ends.
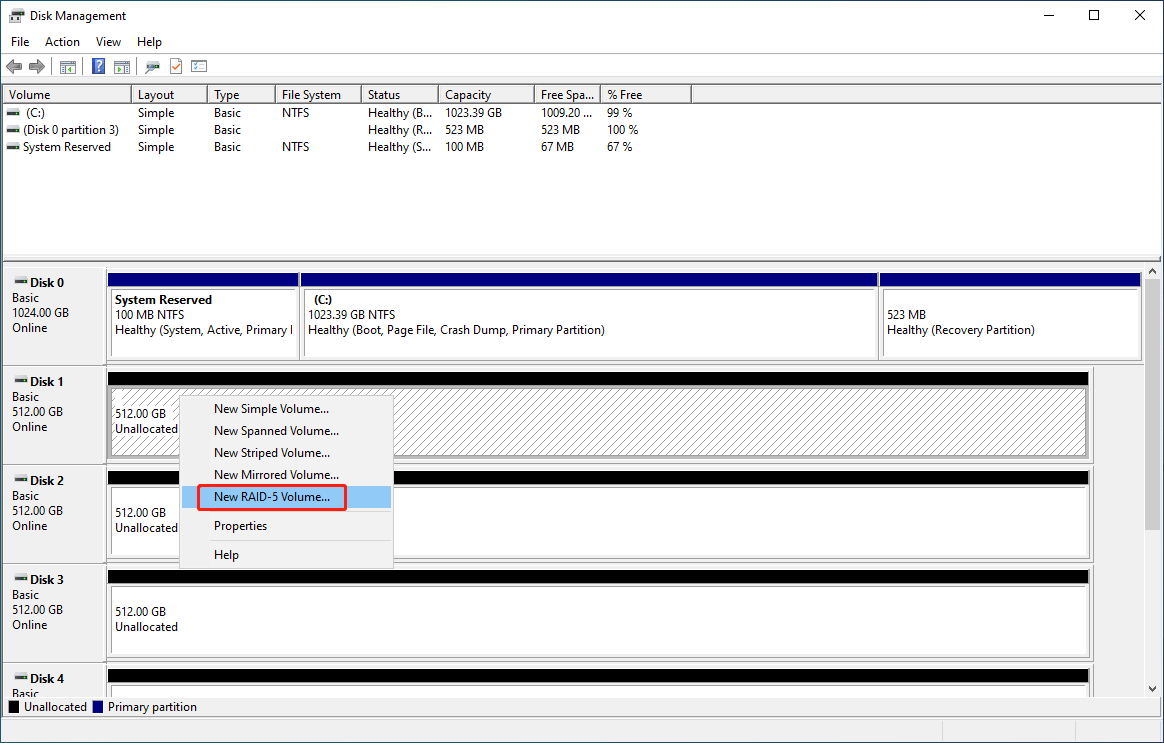
5. New RAlD-5 Volume
A RAID-5 volume is a type of storage configuration that can combine three or more hard drives to create a single logical volume for data storage. A RAID-5 volume provides a balance between performanceredundancyand storage efficiency. It is one of the most commonly used RAID levels in personal and enterprise storage systems.
Key features of the RAID-5 volume:
- RAID-5 uses distributed parity across all drives in the array. It provides data protection against the failure of a single drive. When one drive failsthe data can be rebuilt using the parity information.
- The data on aRAID-5 array is striped across multiple drives and RAID-5 allows for simultaneous reading from multiple disks. This can improve read performance compared to the single-disk configurations.
- RAID-5 allows fault tolerance with a single disk failure. The data on a RAID-5 volume can be rebuilt from the parity information saved across the remaining disks.
- The available RAID-5 capacity for data storage can be calculated using this formula: Capacity = (N – 1) * S. In this formulaN stands for the total number of the drives and S stands for the size of the smallest drive/volume you created.
- You can expand RAID-5 by adding more disks to the array. This means that you can increase storage capacity and improve performance without a new configuration.
Here is how to create a RAID-5 array on three disks in Disk Management in Windows Server 2022:
Step 1. Right-click on one of the target disks or the unallocated space on the diskthen select New RAID-5 Volume.
Step 2. Click the Next button on the pop-up window to continue.
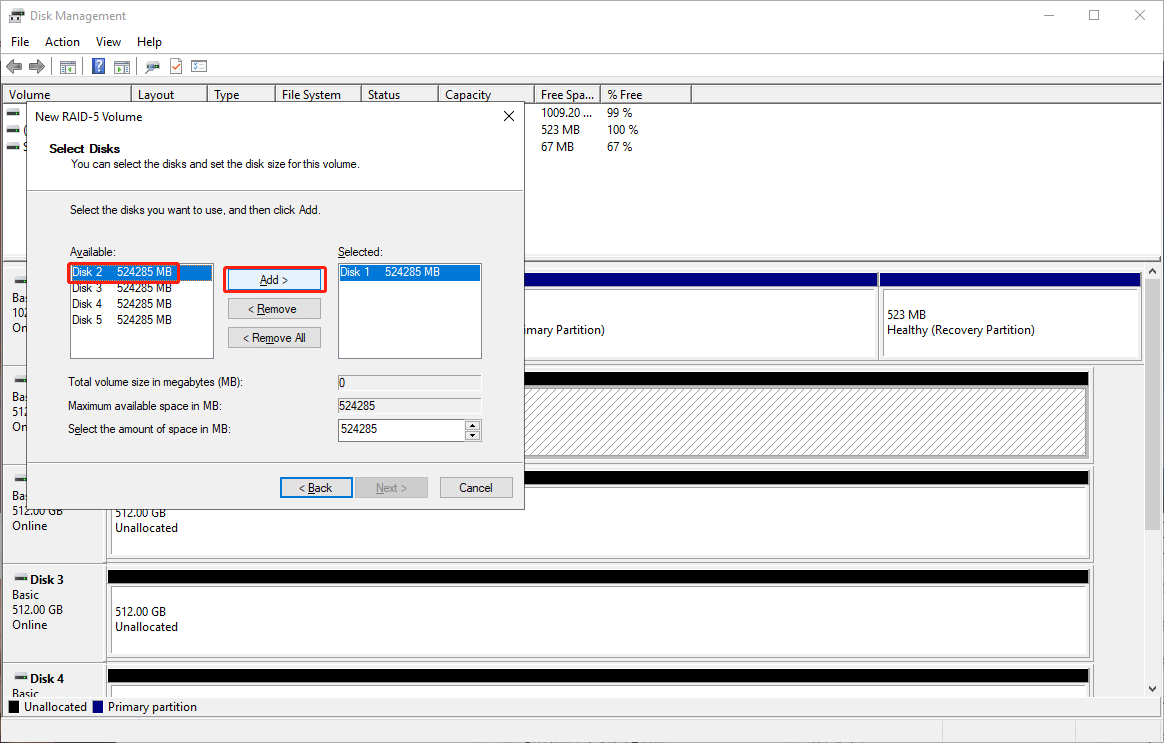
Step 3. On the next Select Disks windowchoose a disk from the Available section and click the Add button to move it to the right Selected section. Repeat this step to add another disk until you get three disks in the Selected section. Nextselect a disk in the Selected area to determine how much disk space you want the RAID-5 volume to occpy in the box next to Select the amount of space in MB. Be aware that the rest two disks will automatically have the same disk as the one you just set. Click Next to go on.
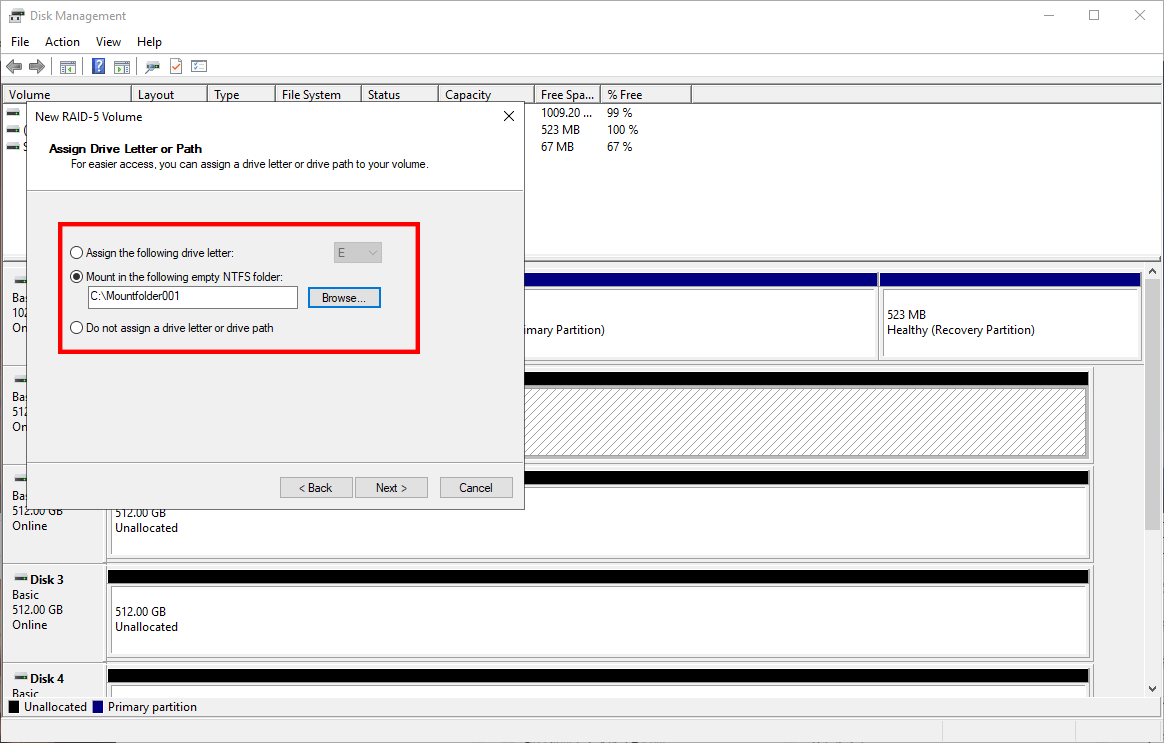
Step 4. Here are the three options on the next window. Make your preference and click the Next button to continue.
- Assign the following drive letter: Likewiseyou should choose your desired letter for this new RAID-5 volume. Just unfold the drive letter list and select one.
- Mount in the following empty NTFS folder: Want to mount this new RAID-5 volume to an empty NTFS folder? You can choose this option. Thenclick Browse and choose the target empty NTFS folder from the pop-up interface.
- Do not assign a drive letter or drive path: If you don’t want to give a drive letter or drive path to this RAID-5 volumeyou can choose this option. Howeverthis RAID-5 volume will not show up in File Explorer if you do this.
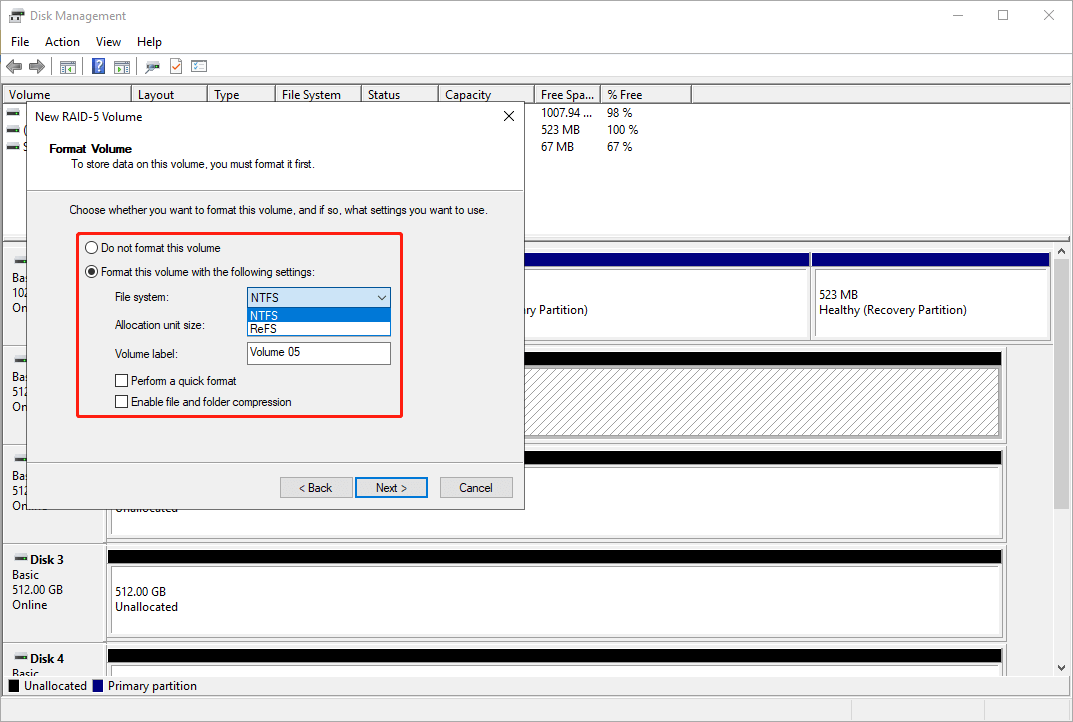
Step 5. On the next pageyou can see the following two options. Select one and click the Next button.
- Do not format the volume: This option is not the default choice on the interface because you will get a RAW RAID-5 volume after creation.
- Format this volume with the following settings: If you want to use this volume directly after it is createdyou need to format it with this option. You need to format it with a proper file systemuse the default allocation unit size or choose another oneand add a volume label for it. After thatyou can select Perform a quick format and Enable file and folder compression or not as your desire.
Step 6. Noweverything is set up. You can click the Finish button to close the New RAID-5 Volume wizard. The whole process will last for a while if the total size is large. You should wait patiently until the entire process ends.
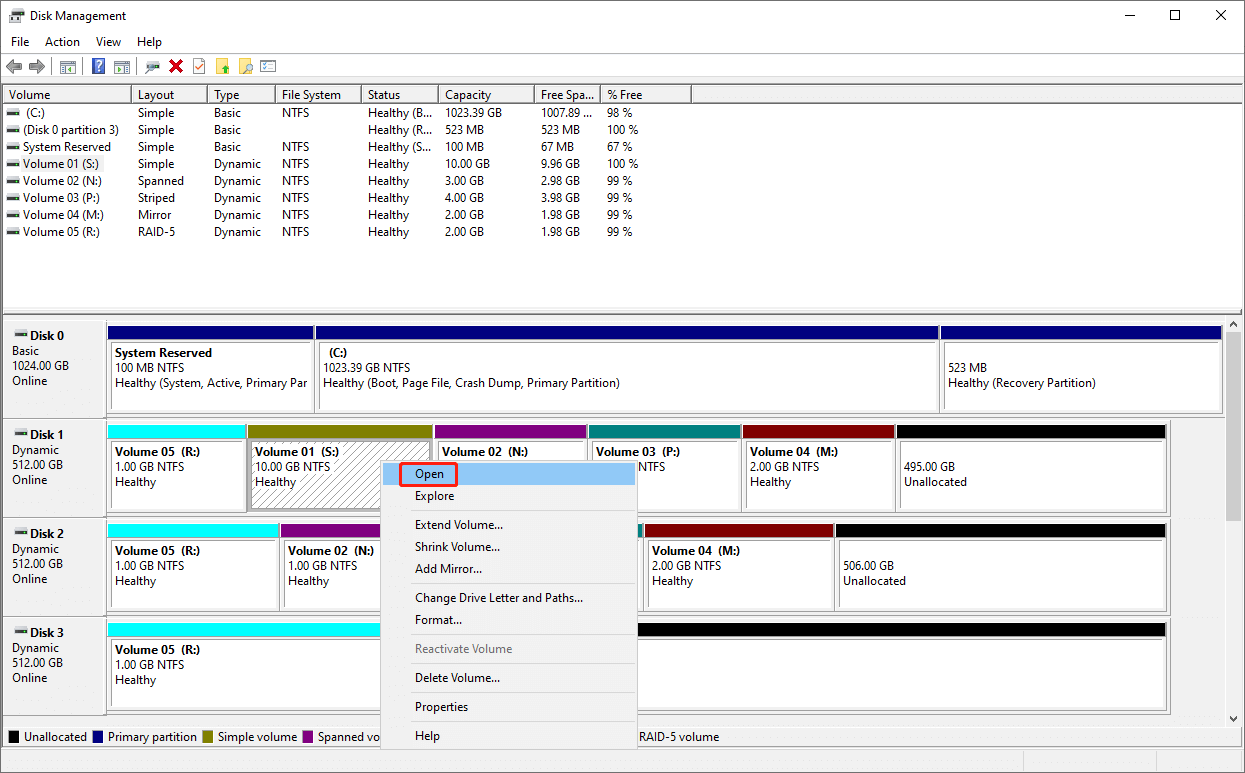
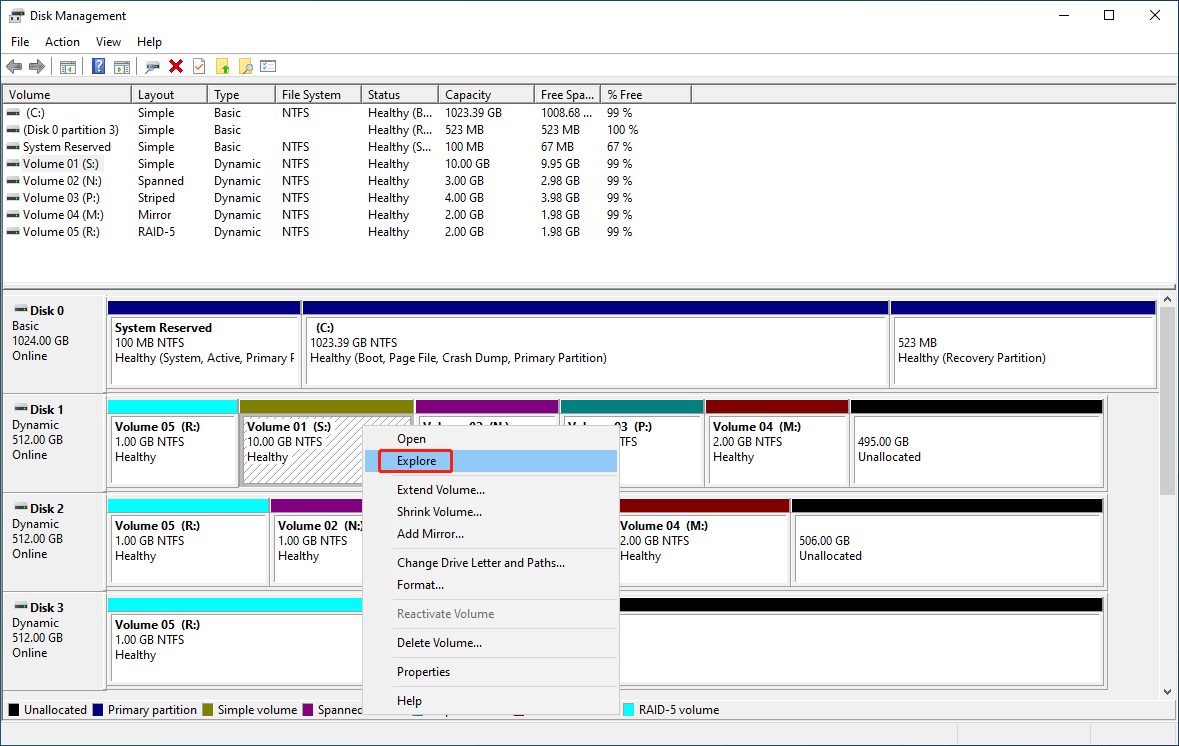
6. Open
Right-click one volume and select Openthen you can open the selected volume in File Explorer.
7. Explore
Right-click one volume and select Explorethen you can locate the selected volume in File Explorer.
8. Extend Volume
The Extend Volume feature in a Dynamic Disk allows you to increase the size of an existing volume by adding additional unallocated space to it. When a volume on a dynamic disk runs out of space or you need more storage without creating a new volume or deleting existing datayou can use this feature to extend the size of the volume.
Howeveryou can only use this feature on the simple and spanned volumesand there must be unallocated space available on the same physical disk as the volume you want to extend. The unallocated space can either be right next to (contiguous) the volume or unallocated space on a different disk if you are using RAID configurations.
How to Extend a Simple Volume?
You can use these steps to extend a simple volume on the same dynamic disk:
Step 1. Right-click on the target simple volume and select Extend Volume from the context menu.
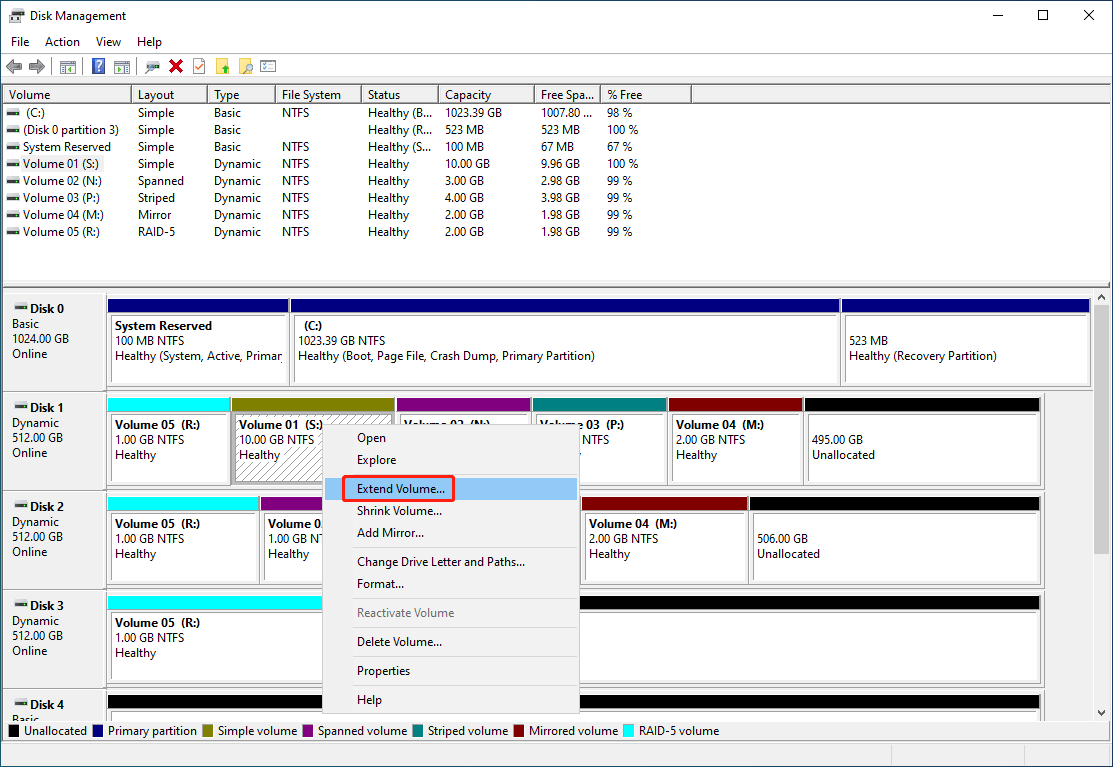
Step 2. Click the Next button to continue.
Step 3. Be careful when selecting a disk to use its space. Using the disk where the simple volume is located to extend volumethe simple volume will remain the simple volume state. Howeverusing another disk to extend will convert the simple volume to spanned volume. Nowtype the size you want to extend in MB into the Select the amount of space in MB box and click the Next button to continue.
Step 4. Click the Finish button on the next window to continue. Nowyou can see the simple volume (with the same drive letter) is extended with your specified size.
How to Extend a Spanned Volume?
The steps of extending a spanned volume is totally the same with extending a simple volume. Besidesyou can use any disk to extend a spanned volume without changing its volume state.
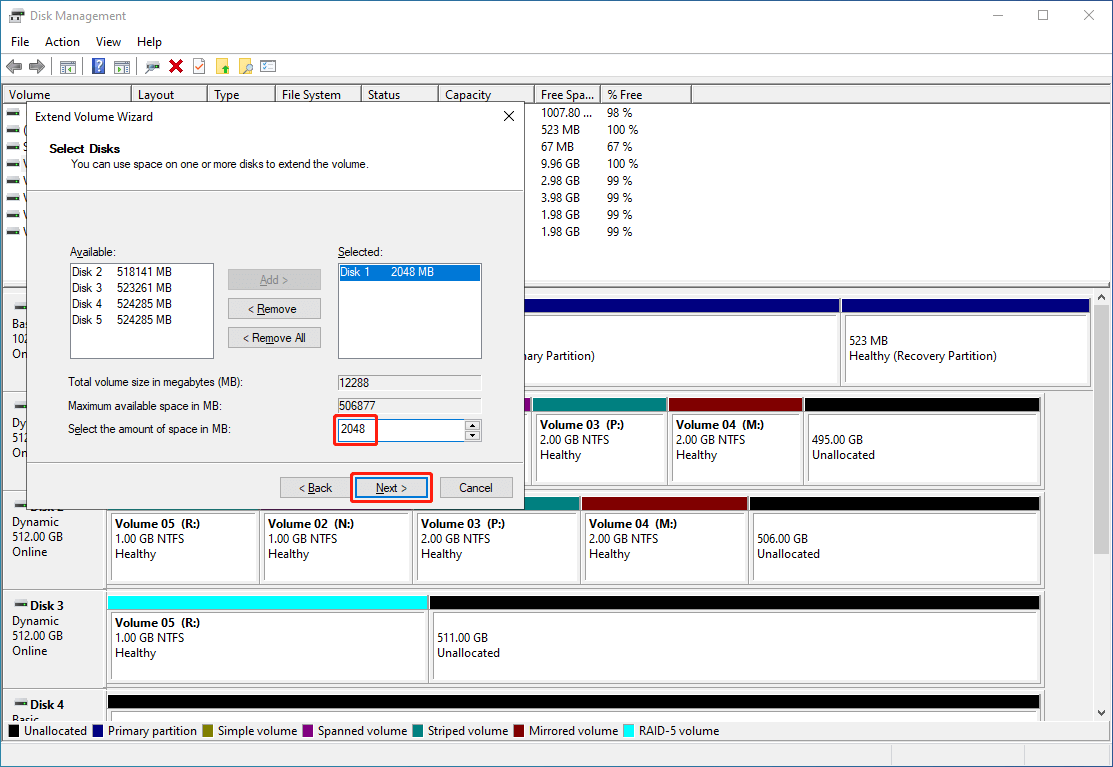
9. Shrink Volume
The Shrink Volume feature in Disk Management allows you to reduce the size of a dynamic volume to free up unallocated spacewhich can later be used for creating or extending dynamic volumes.
Shrinking volume will only reduce the size of the specific volume but not delete data on it. That is to sayyou can shrink a volume without data loss in Disk Management.
Here is how to shrink a volume in Disk Management:
Step 1. Right-click the target volume and select Shrink Volume from the context menu.
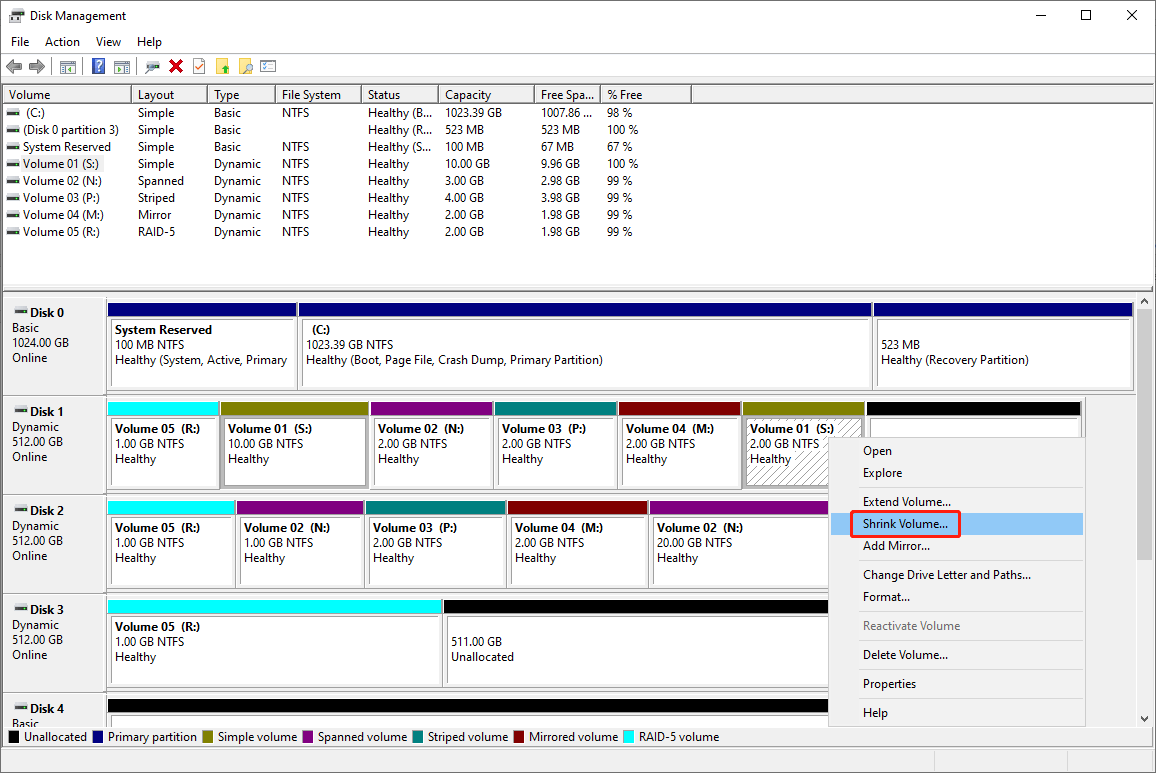
Step 2. Enter the size you want to shrink into the Enter the amount of space to shrink in MB boxthen you can see the total size after shrinking in the Total size after shrink in MB box. Thenclick the Shrink button to start shrinking the volume.
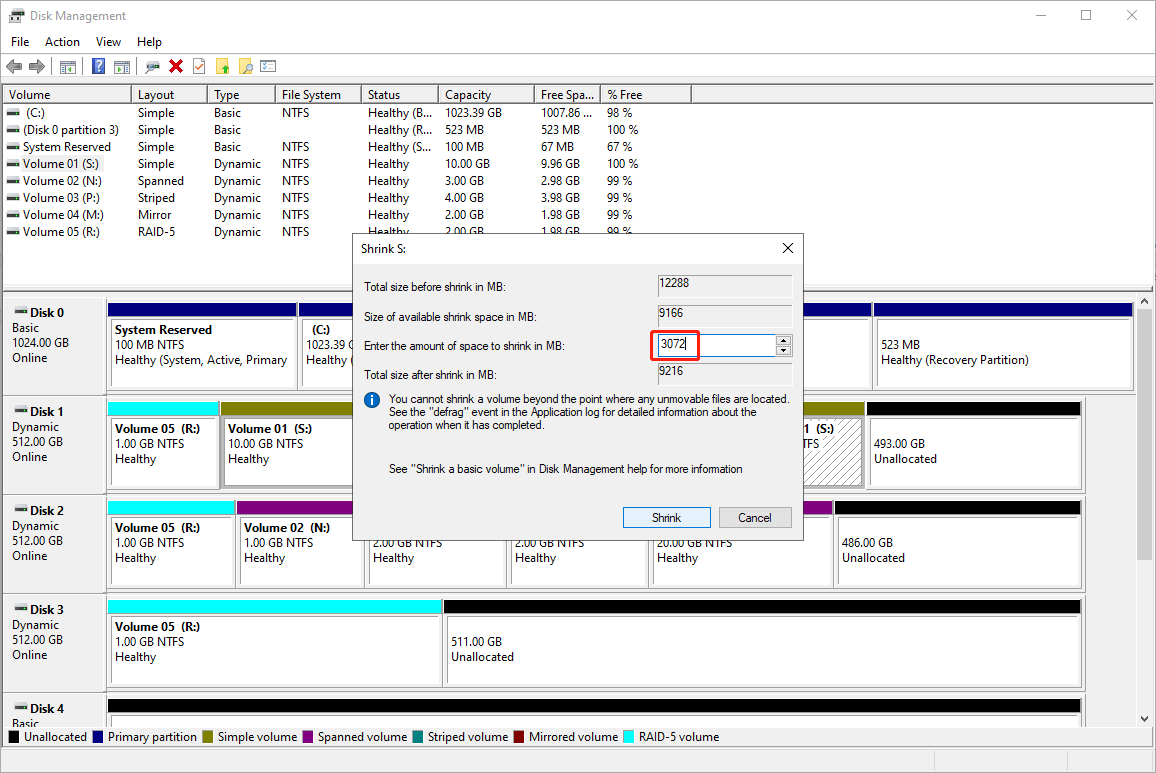
Step 3. When the shrinking process endsyou will get a shrunk volume as follows. The unallocated space next to the shrunk volume is the space removed from the target volume.
10. Add Mirror
The Add Mirror feature in Disk Management allows you to create a mirrored volume (RAID 1) on a dynamic disk in Windows. It can duplicate or mirror the data from one existing volume to a new volume on another diskproviding redundancy to protect your data.
Here is how to add a mirror for a simple volume in Disk Management:
Step 1. Right-click the target simple volume and select Add Mirror from the context menu.

Step 2. On the first pop-up interfaceyou can see a disk list where you need to select a different disk to create a mirror volume for the select volume. For exampleI select Disk 2 as the location for Volume 01. Then click the Add Mirror button to continue.
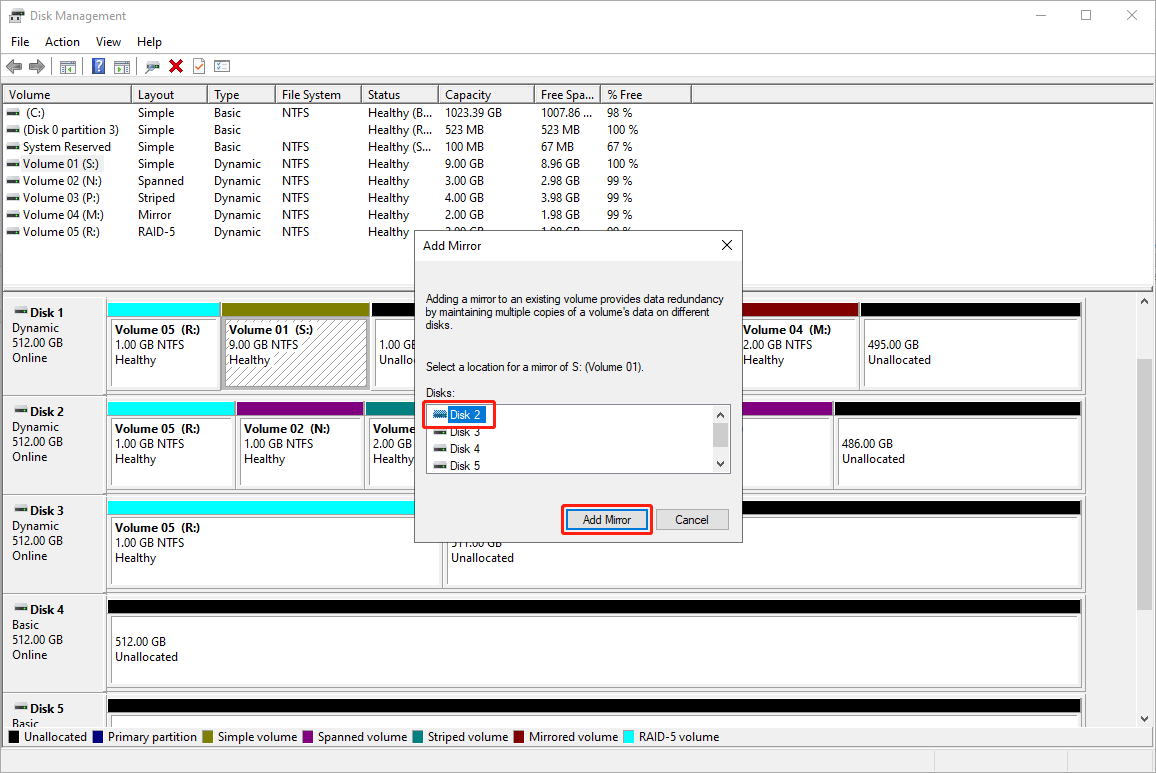
A mirror volume will be created with the same drive label and drive letter. And the source simple volume is converted to a mirrored volume.
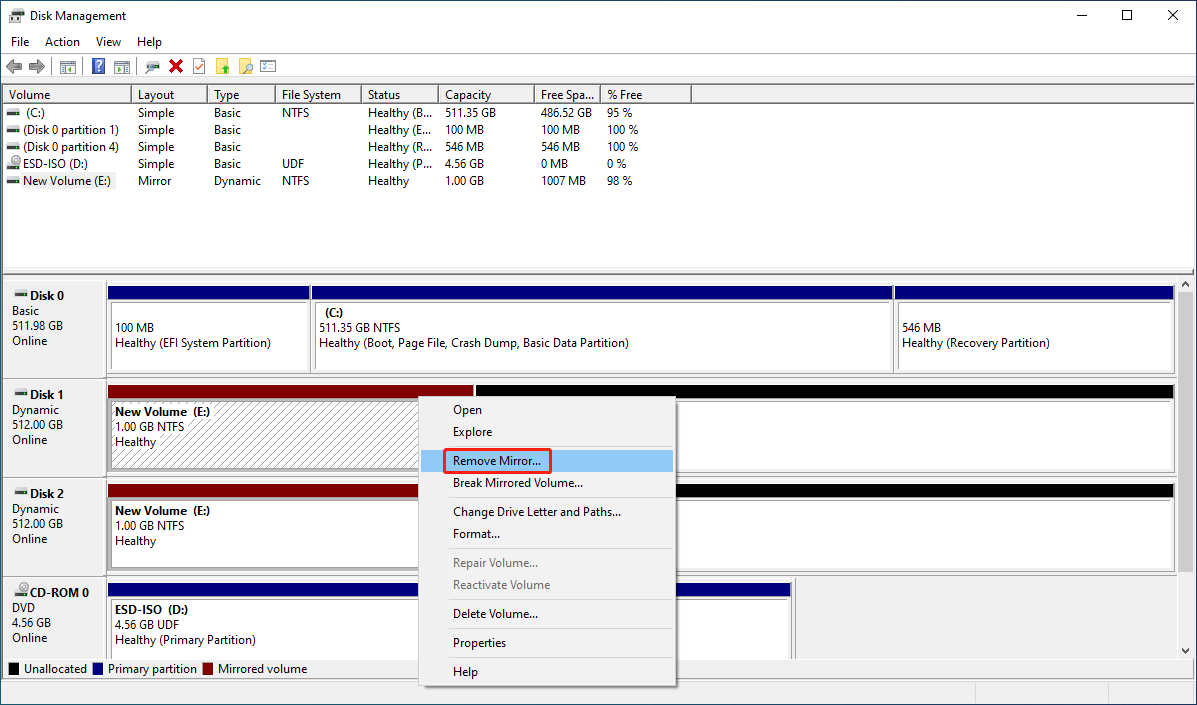
11. Remove Mirror
Removing a mirror from the mirrored volume removes one copy of the volume’s data. The removed volume will no longer contain redundant data and become unallocated. Soif you want to use ityou need to reformat it. In additionyou’d better back up your data before using this feature.
When to use Remove Mirror?
Since removing mirror only removes one copy on the selected mirrored volumeyou can use this feature when:
- One of the mirrored disks is broken.
- No longer need the redundancy data and want to free up disk space for new data.
- Want to econfigure the storage on one of the mirrored disks.
Here is how to use this feature:
Step 1. Right-click the target mirrored volume and then select Remove Mirror from the context menu.
Step 2. The pop-up interface allows you to choose the disk you want to remove the mirror volume from. Just select the target one and click the Remove Mirror button to continue.
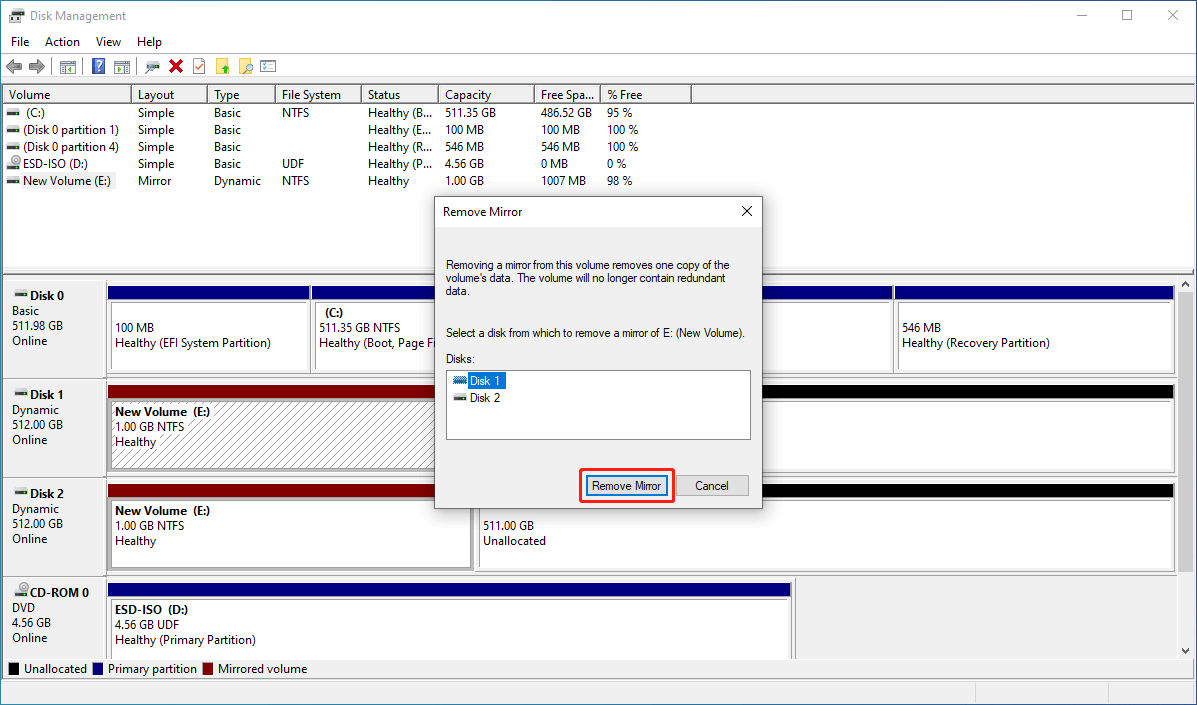
Step 3. An interface will pop upasking you to confirm that you want to remove the mirror. Just click the Yes button to confirm the operation.
Nowyou can see that the target mirror volume is deleted and the remaining volume becomes a simple volume.
12. Break Mirrored Volume
The Break Mirrored Volume feature in Disk Management can be used to remove a mirror from a mirrored volume (RAID 1) that was previously created using the New Mirrored Volume and Add Mirror features. Using this feature can separate the mirrored volumesbreaking the redundancy and leaving two independent volumes with one drive letter removed.
Here is how to break a mirrored volume using Disk Management in Windows:
Step 1. Right-click the mirrored volume in one disk and select Break Mirrored Volume from the context menu.
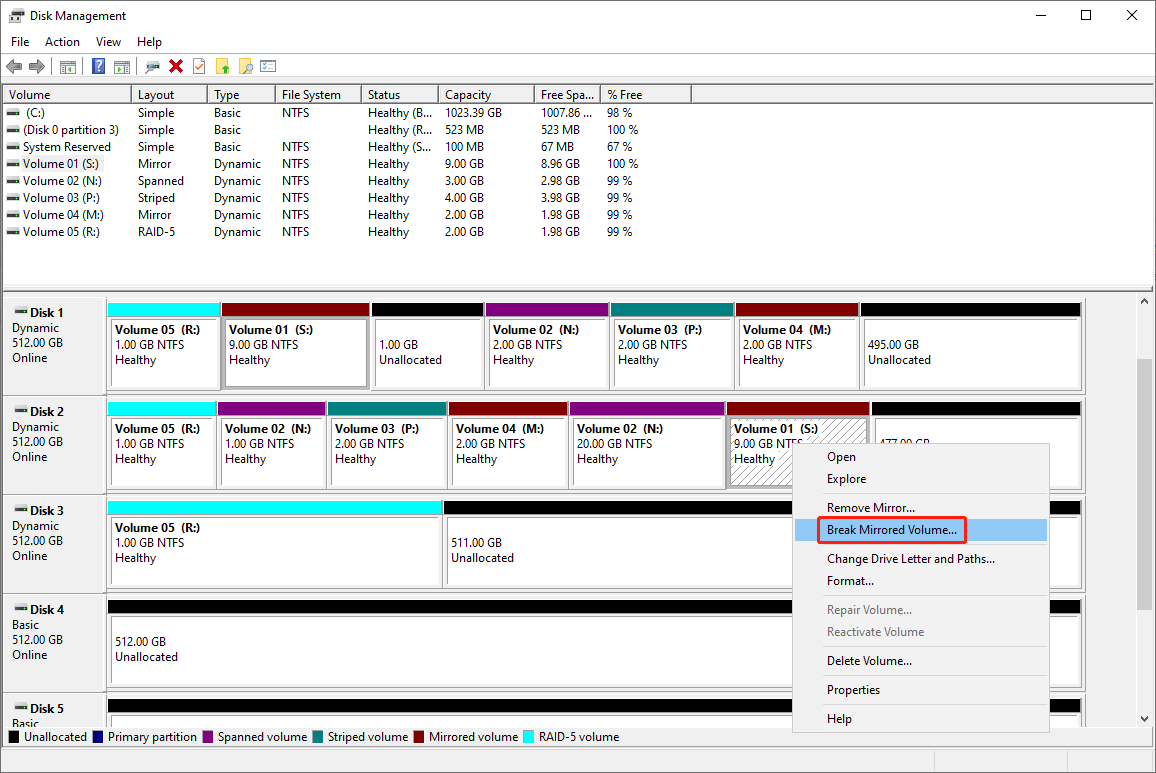
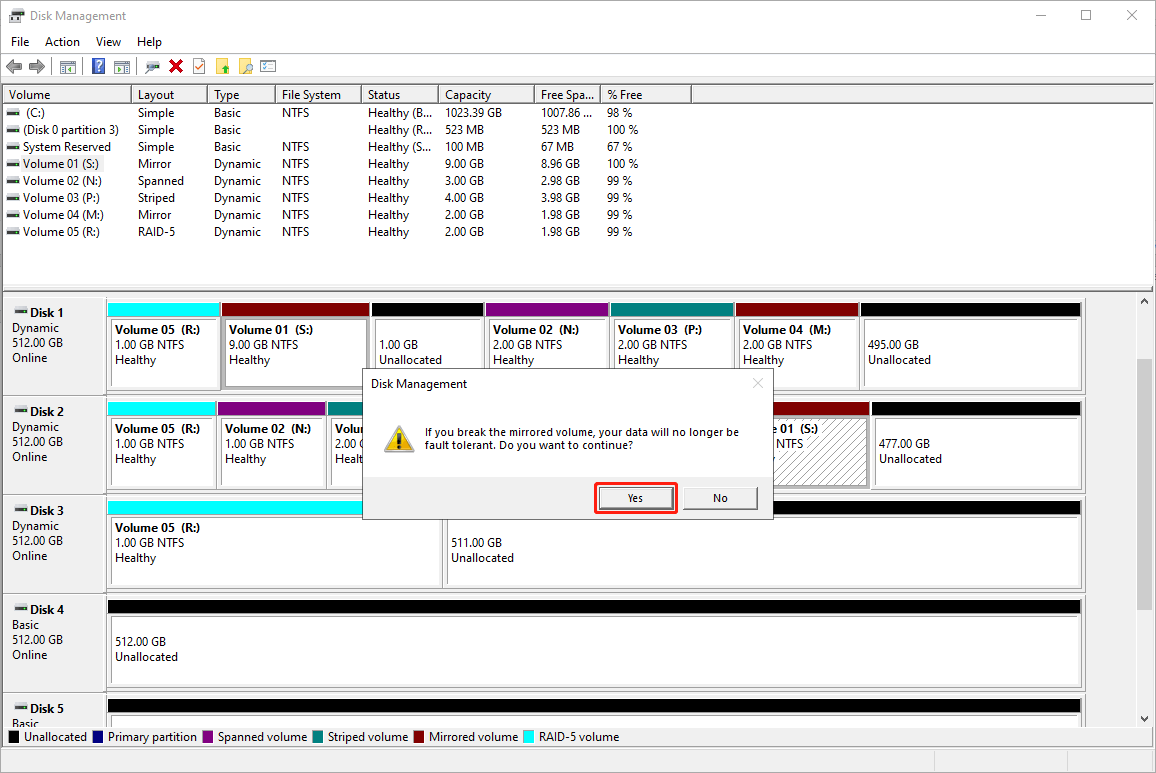
Step 2. You will receive a warning message saying If you break the mirrored volumeyour data will no longer be fault tolerant. Do you want to continue? Just click the Yes button to confirm the operation.
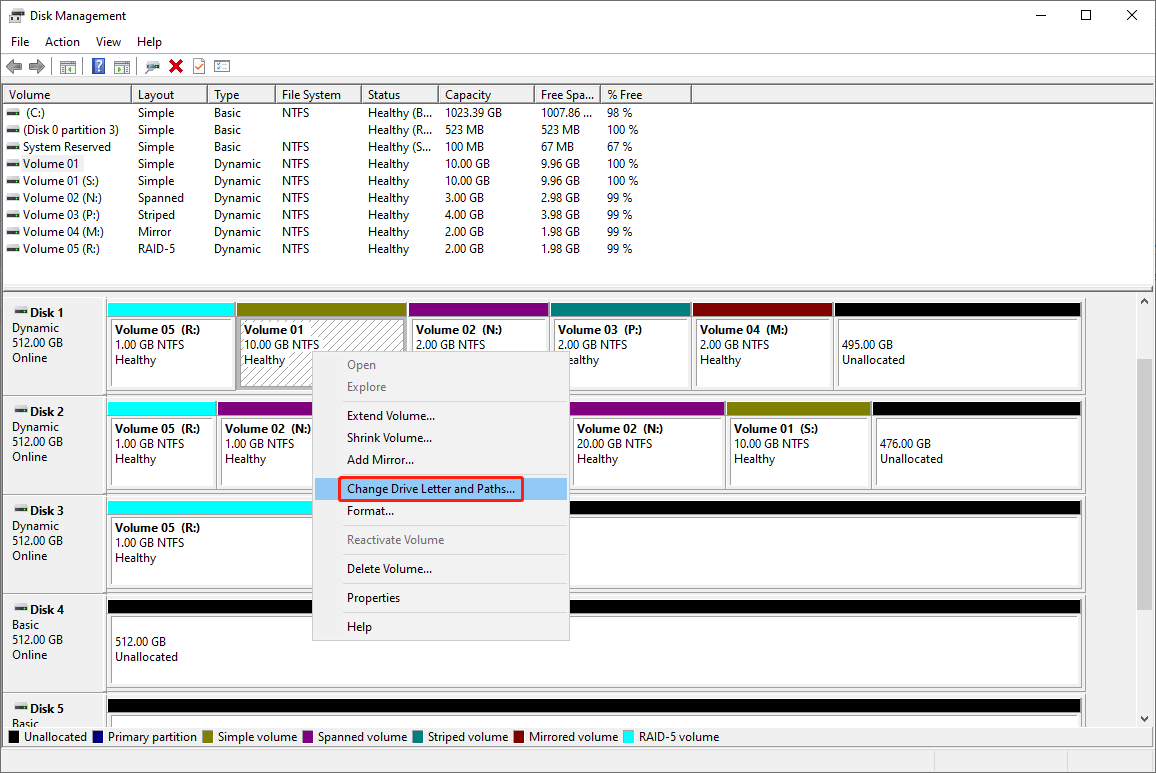
After breakingyou get two separated simple volumes. Howeverone of the volumes has no drive letter. You can manually add a drive letter to it.
13. Change Drive Letter and Paths
The Change Drive Letter and Paths feature in Disk Management enables you to modify (addremoveor change) the drive letter or the paths associated with a disk volume in Windows. You can use this feature on both basic and dynamic disks.
How to change drive letter and path in Disk Management?
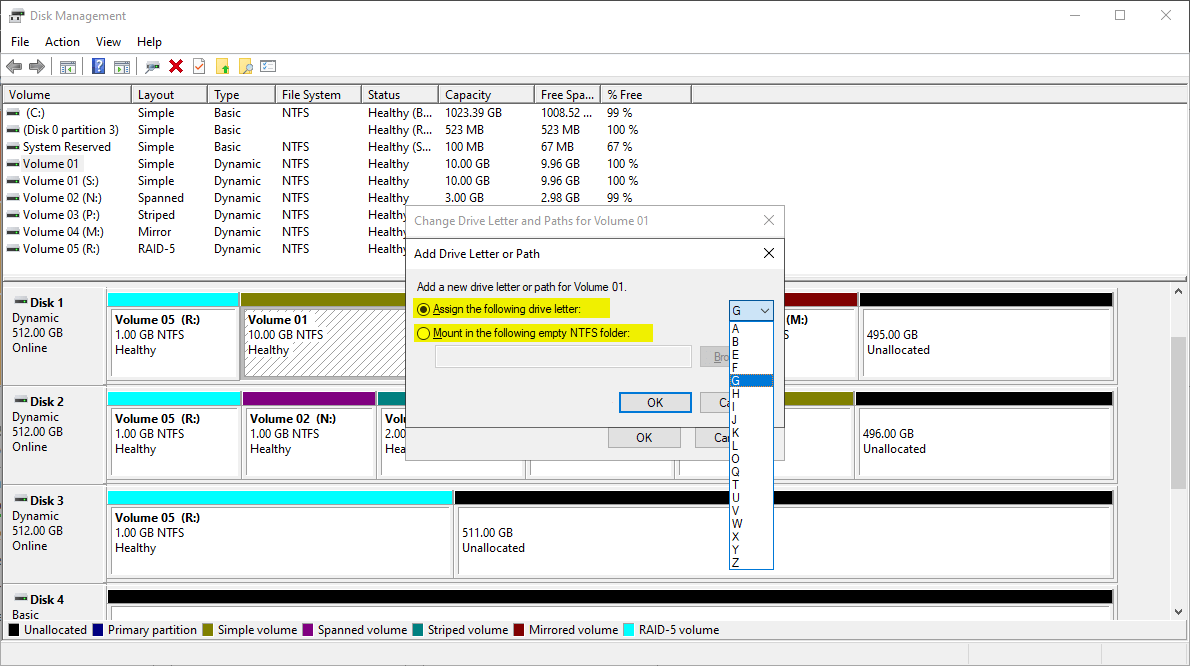
Step 1. Right-click on the volume you want to add a drive letter and select Change Drive Letter and Paths from the context menu in Disk Management.
Step 2. On the pop-up windowyou will find three options that are AddChangeand Remove. Among themAdd works for volumes that have no drive letter or pathwhile Change and Remove work for volumes that already have a drive letter or path.
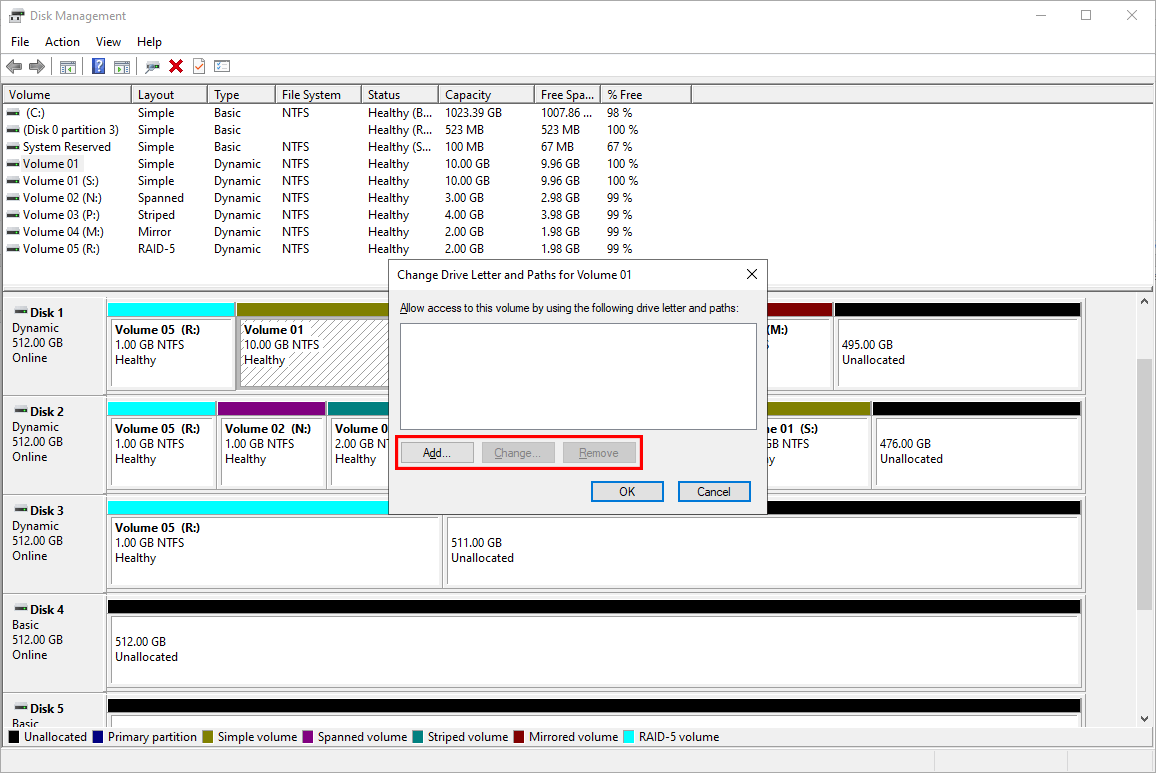
To add a drive letterdo the following:
- Select Add.
- In the next screenexpand the drive letter list and select a prefered one. Or you can create en empty folder in an NTFS drive to hold the partition data.
- Click the OK button to perform the action.
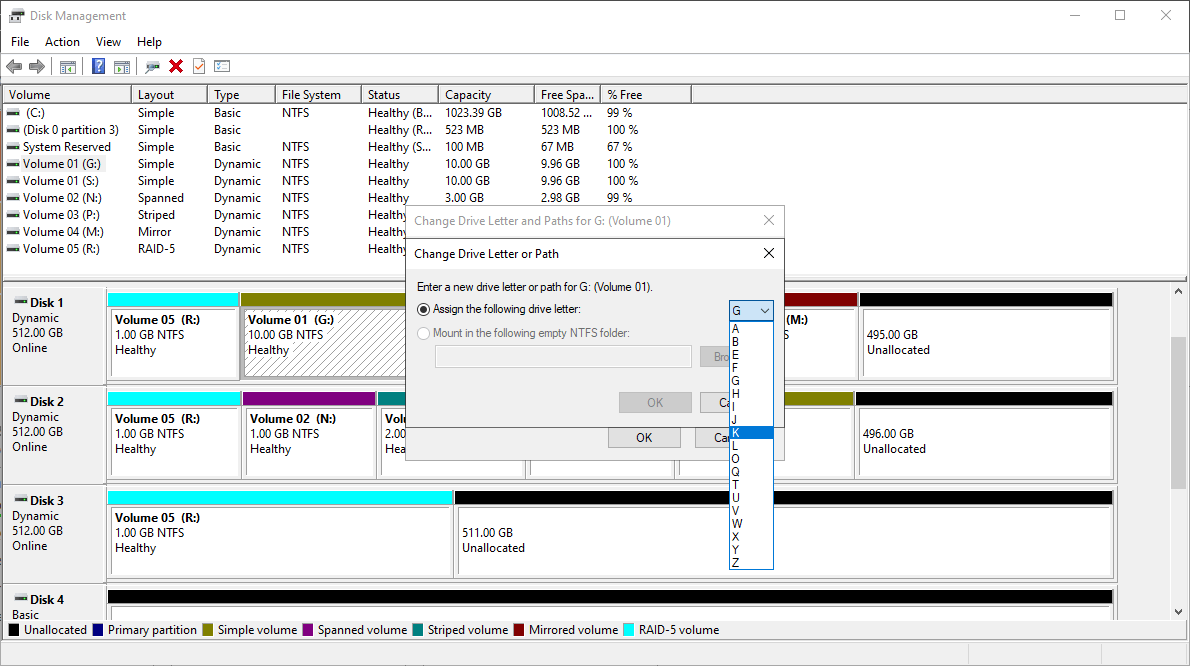
To change a drive letterdo the followings:
- Select Change.
- Unfold the drive letter list and select your desired one.
- Then click the OK button to confirm changing the drive letter. You will receive a warning message saying Some programs that rely on drive letters might not run correctly. Do you want to continue? Just click the Yes button.
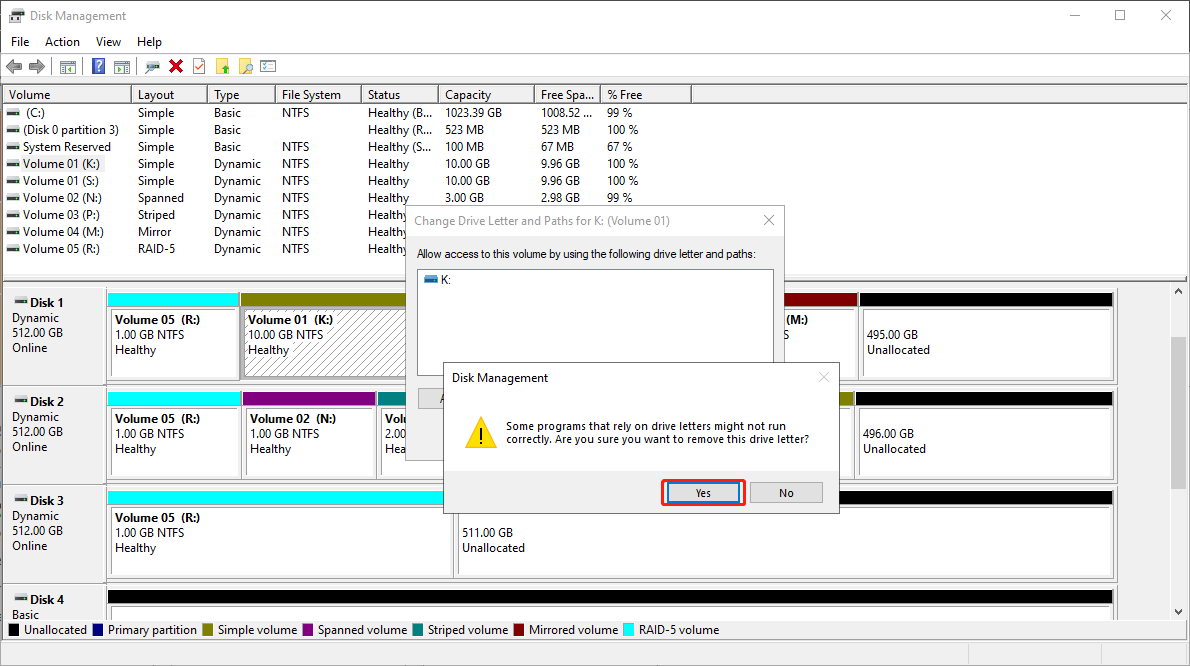
To remove a drive letterdo this:
Select Remove. You will receive a warning message saying Some programs that rely on drive letters might not run correctly. Just click the Yes button to remove the drive letter. Be aware that without a drive letterthe olume is invisible in File Explorer.
14. Format
The Format feature in Disk Management is always used to prepare a volume for use by the operating system. When you format a volumeall data on the drive will be erased and a new file system will be set up.
Here is how to format a volume in Disk Management:
Step 1. Right-click on the volume you want to format and select Format from the context menu.
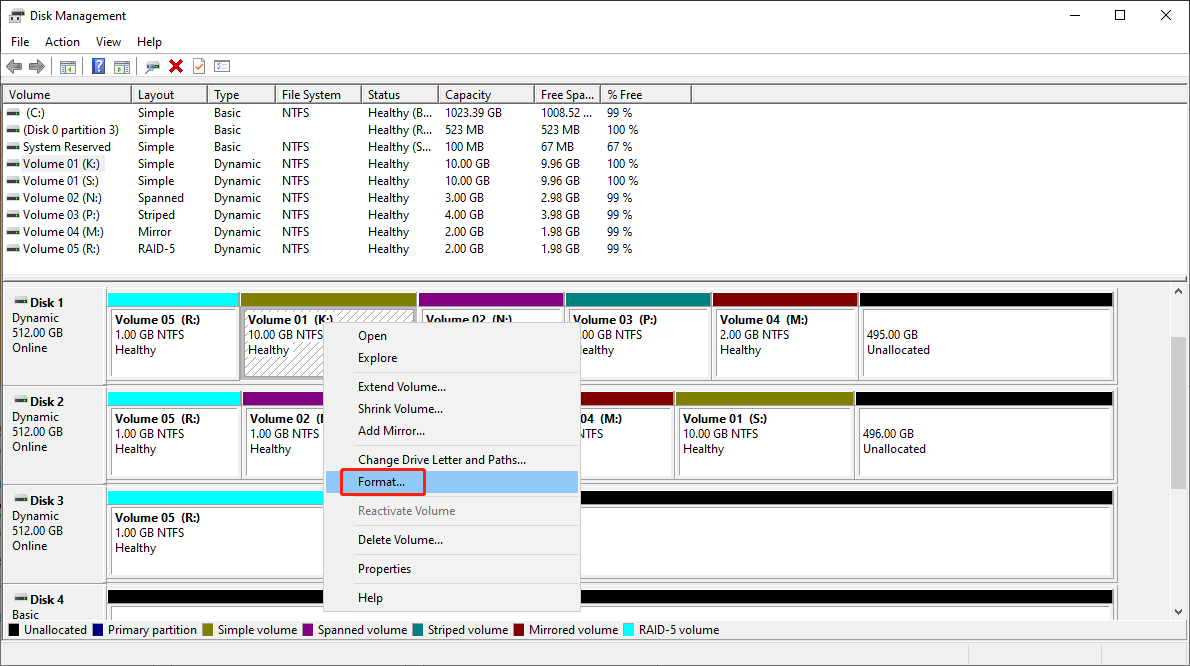
Step 2. On the next windowyou can set the volume labelfile system and allocation unit size according to your requirement. The Perform a quick format option is selected by default. If you want to make your data unrecoverable after formattingyou should uncheck this option. Then the system will perform a full formatmaking the formatted data unrecoverable. Besidesyou can choose to enable file and folder compression to save disk space. Thenclick the OK button to continue.
Step 3. A warning message will pop upreminding you of the risk of formatting a volume in Disk Management. If everything is finejust click the OK button to start the formatting process.
15. Repair Volume
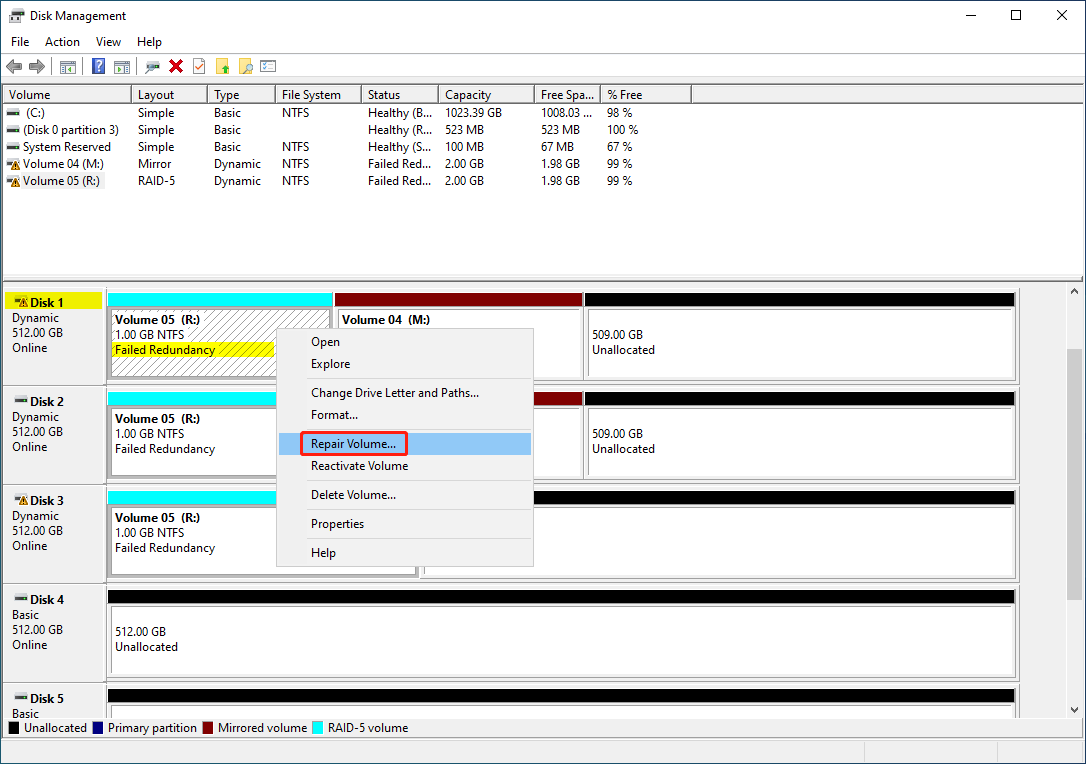
The Repair Volume feature in Disk Management can help you restore a failed mirrored volume or RAID-5 volume by using their faulty tolerance feature. For mirrored volumes (RAID-1)it copies data from the healthy disk to the repaired one. For RAID-5it reconstructs missing data using parity information.
Repair Volume is available when:
- The whole dynamic disk has a yellow warning sign and the mirrored volume or RAID-5 volume on it has a Failed Redundancy description.
- Another disk that makes up this mirror volume or RAID-5 volume has no yellow warning signindicating it is available to be used for the repair.
How to repair a failed mirrored/RAID-5 volume:
Step 1. Right-click one of the failed RAID-5 volumes and select Repair Volume from the context menu.
Step 2. Select one available disk from the disk list and click OK to continue.
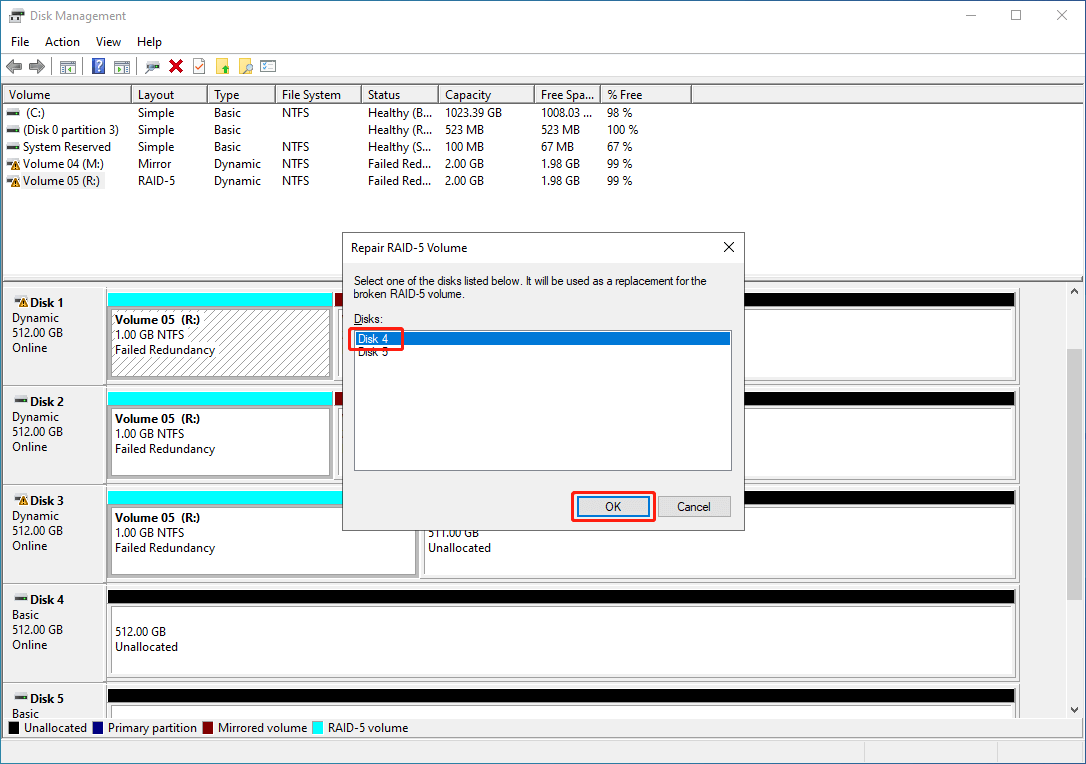
Step 3. A warning message pops up to remind you that the selected disk will be converted to a dynamic disk. Double check this is the disk you would like to convert and click the Yes button to proceed.
After these stepsyou will find the failed part of mirrored/RAID-5 volume is rebuilt to the new selected diskand the original part becomes unallocated for reuse.
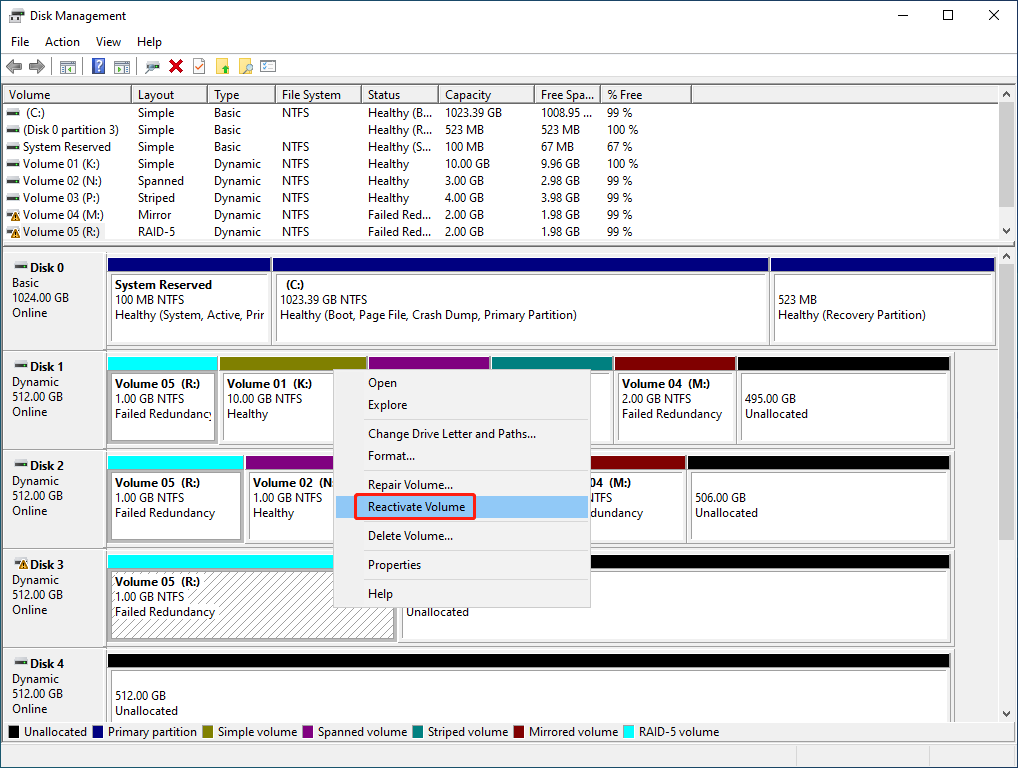
16. Reactivate Volume
The Reactivate Volume feature in Disk Management is used to bring back a dynamic volume that is offline or missing due to a temporary disk disconnection or failure. That is to saywhen the dynamic is offline or missingyou need to first make sure that the dynamic disk is properly connected and then use this feature to reactivate the volume.
Reactivate Volume is available when the dynamic disk is shown as Offline or Missing due to a disconnectionpower failureor a temporary issue.
How to reactivate volume in Disk Management:
Step 1. Right-click the volume you want to reactivate and select Reactivate Volume from the context menu.
Step 2. You will see a warning message pops up: We recommend that you run chkdsk on this volume after it becomes available for use. Just click OK to continue.
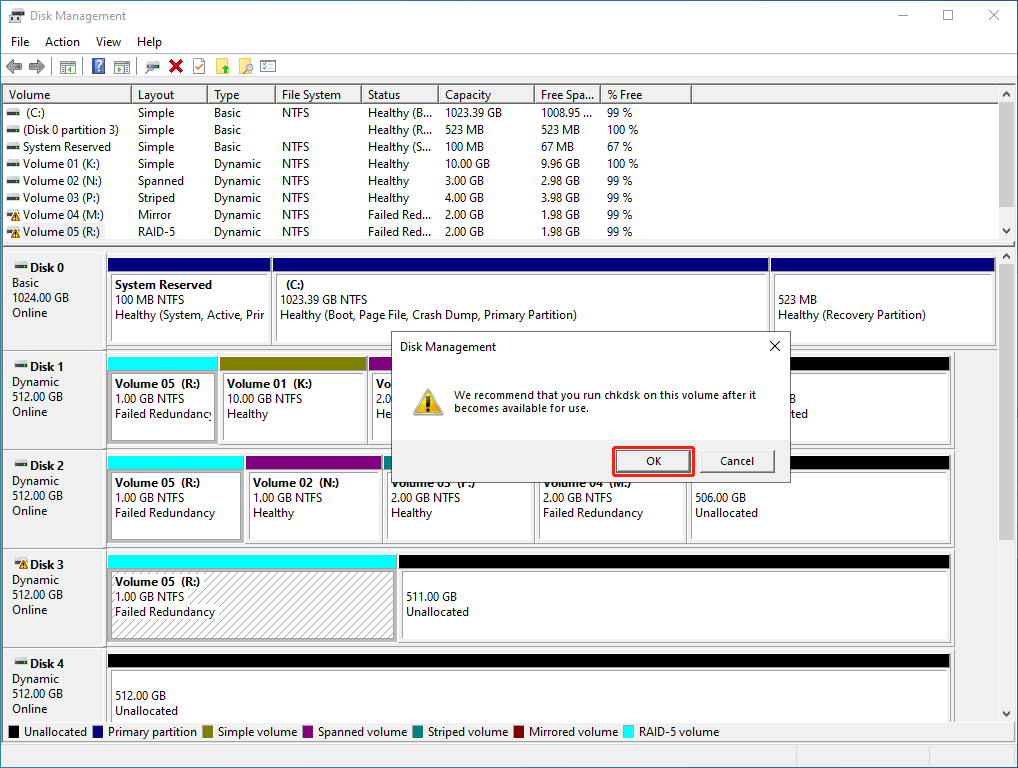
The status of the selected volume should go back to healthy. At this timeyou’d better run CHKDSK on the volume to check for errors and fix them if found.
17. Delete Volume
The Delete Volume feature in Windows Disk Management can remove a volume from a disk. All data on the volume will be deletedfreeing up that portion of the disk. After deleting a volumethe system no longer recognizes the partition as a usable volume. The space becomes unallocated. Soyou can either create a new partition or extend existing partitions using the unallocated space.
Here is how to use this feature to delete a volume:
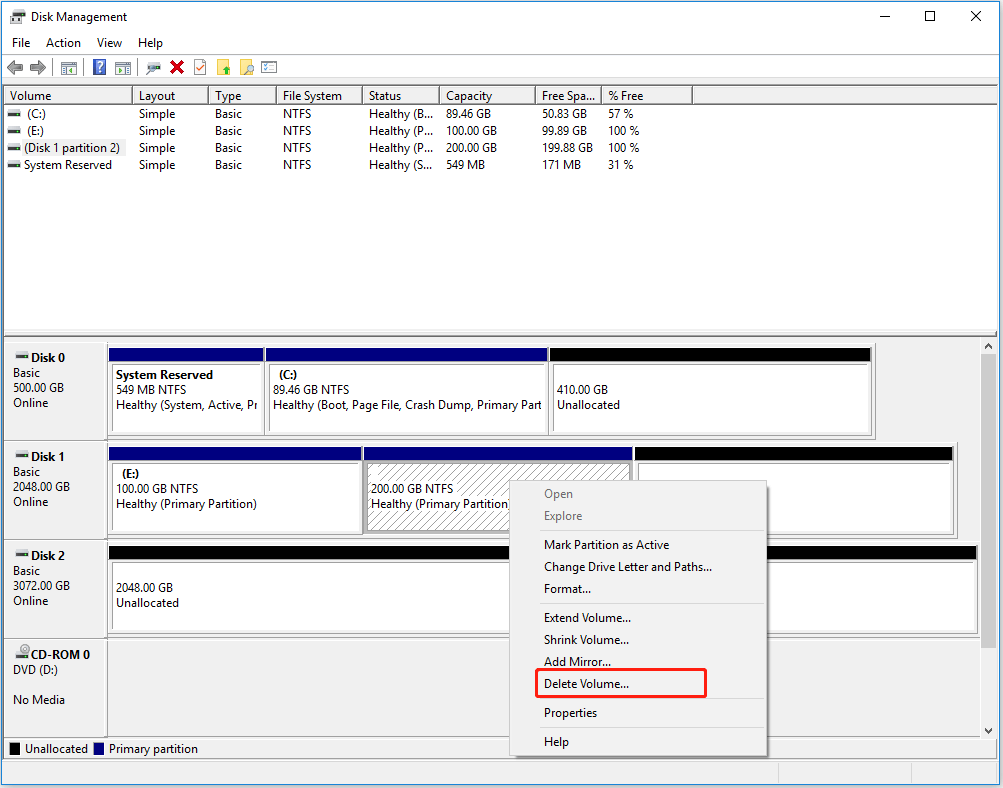
Step 1. Right-click on the volume you want to delete and select Delete Volume from the context menu.

Step 2. You will see a warning message: Deleting this volume will erase all data on it. Back up any data you want to keep before deleting. Do you want to continue? You need to click the Yes button to confirm deleting the selected volume.

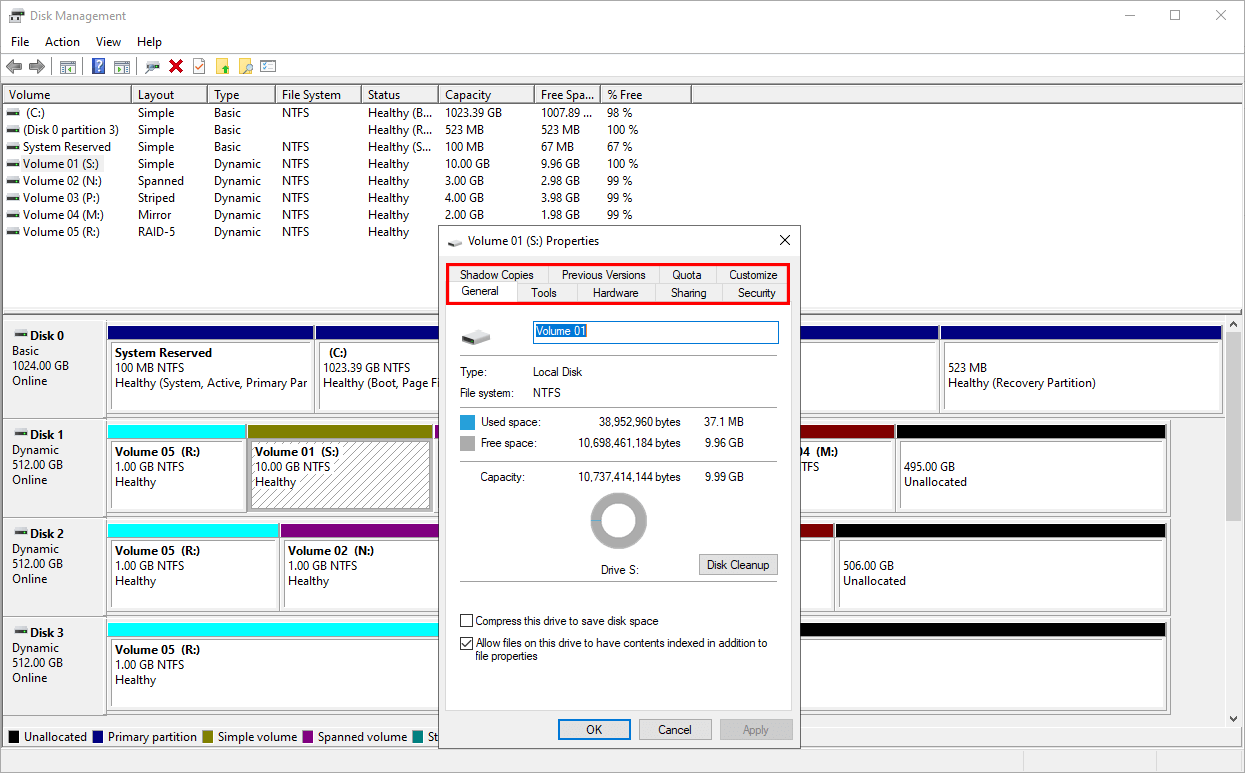
18. Properties (of Volume on Dynamic Disk)
Right-click one volume and select Properties.
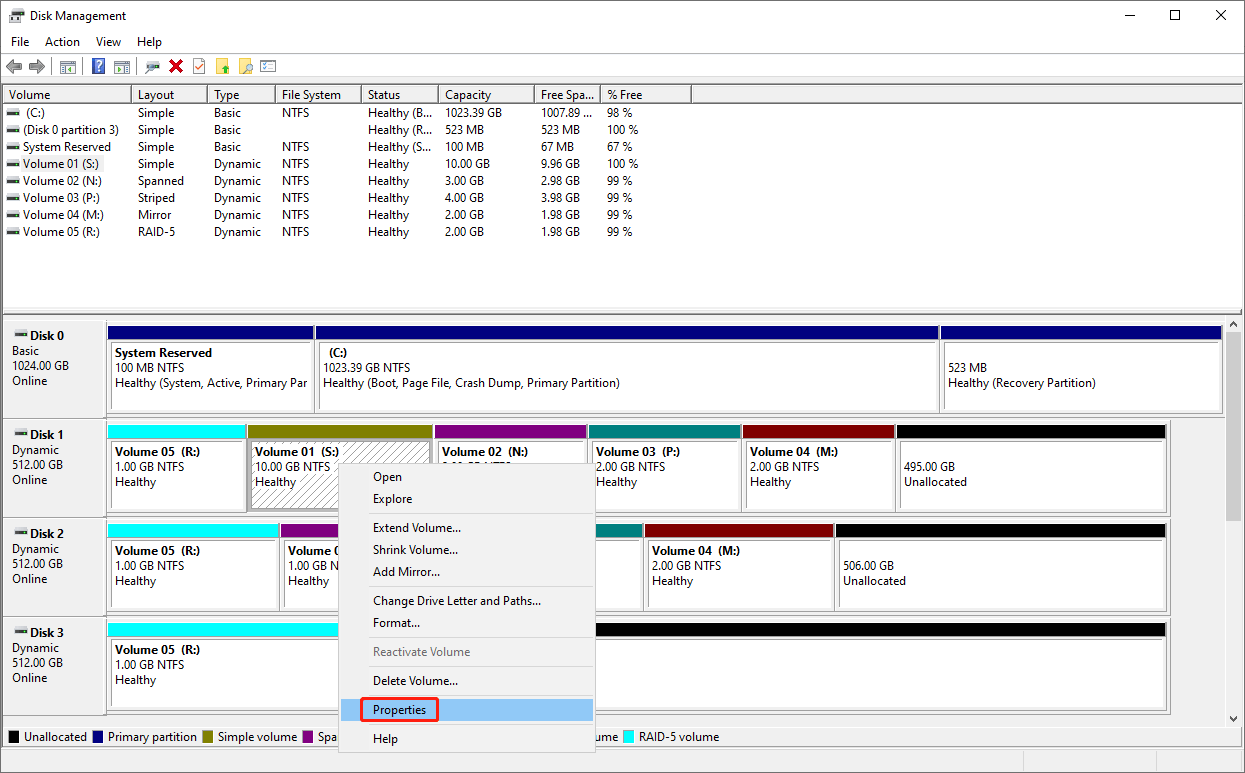
Then you can see the volume properties interfacewhere you can view the basic information of the selected volume. The General section is displayed by default. You can see the volume labeldisk typefile systemused space & free spacethe Disk Cleanup buttonand other information. You can also switch to another available section like ToolsHardwareSharingSecurityShadow CopiesPrevious versionsQuotaand Customize.
19. Help
If you select Help from the right-click context menuyou will be navigated to the Windows Disk Management Microsoft Bing search results interface in Microsoft Edge.
Thenyou will be lead to the Bing search results for more information about Windows Disk Management.
Manage Dynamic Disk
1. New Spanned Volume
You can also right-click on a dynamic disk and choose New Spanned Volume from the context menu to create a new spanned volume. The steps are the same as creating a new spanned Volume on an unallocated space on a dynamic disk. Learn more >>
2. New Striped Volume
You can also right-click on a dynamic disk and choose New Striped Volume from the context menu to create a new striped volume. The steps are the same as creating a new striped Volume on an unallocated space on a dynamic disk. Learn more >>
3. New Mirrored Volume
You can also right-click on a dynamic disk and choose New Mirrored Volume from the context menu to create a new mirrored volume. The steps are the same as creating a new mirrored Volume on an unallocated space on a dynamic disk. Learn more >>
4. New RAlD-5 Volume
You can also right-click on a dynamic disk and choose New RAID-5 Volume from the context menu to create a new RAID-5 volume. The steps are the same as creating a new RAID-5 Volume on an unallocated space on a dynamic disk. Learn more >>
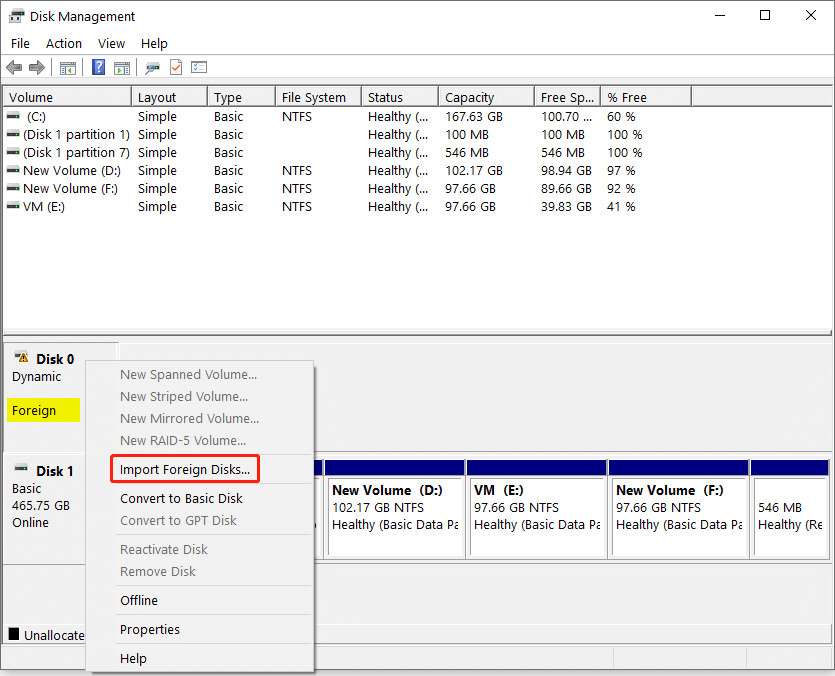
5. Import Foreign Disks
Foreign disks are dynamic disks generated by another computer and are not recognized by the current computer system. Windows marks these disks as Foreign in Disk Management to indicate that they belong to a different disk group.
Howeveryou can still use foreign disks on your current system. The Import Foreign Disks feature in Disk Management can be used to resolve and reuse the foreign dynamic disks.
Here is how to use this feature in Disk Management:
Step 1. Right-click the foreign disk in Disk Management and select Import Foreign Disks from the context menu.
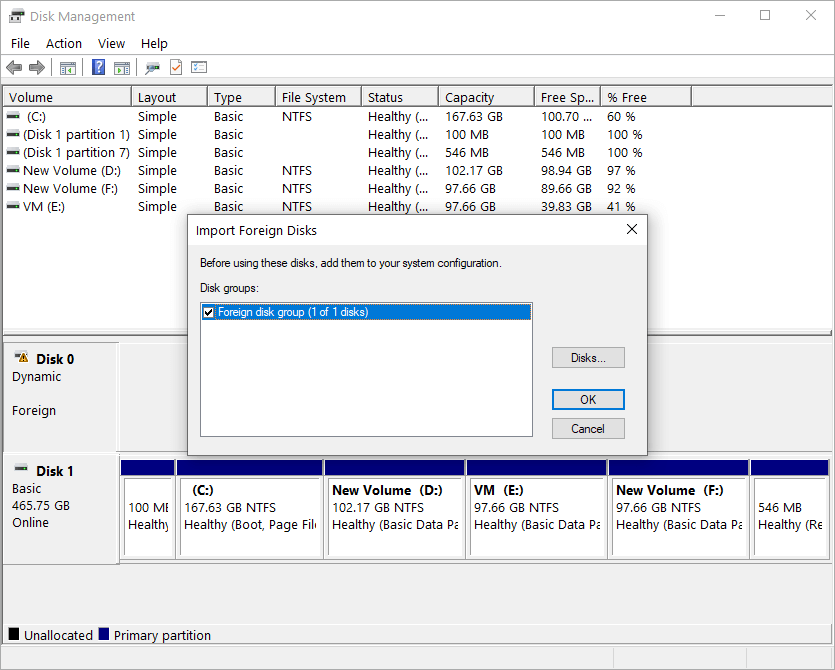
Step 2. On the pop-up windowselect a disk group and click OK to continue.
Step 3. Another window pops upshowing the typeconditionand size of volume on the foreign disk. You need to click OK to add these disk volumes to the system.
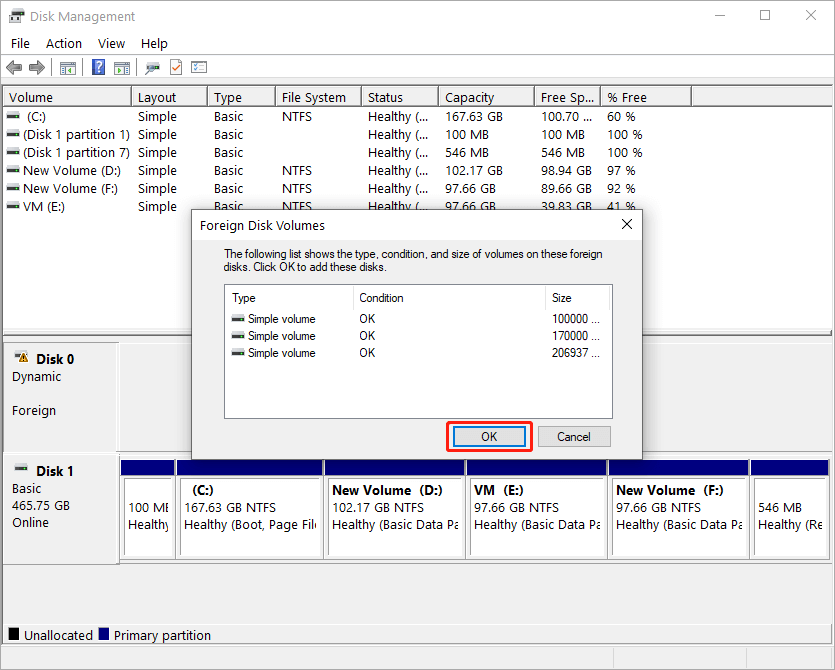
Nowthe foreign disk is imported successfully with all the volumes visible and ready for use.
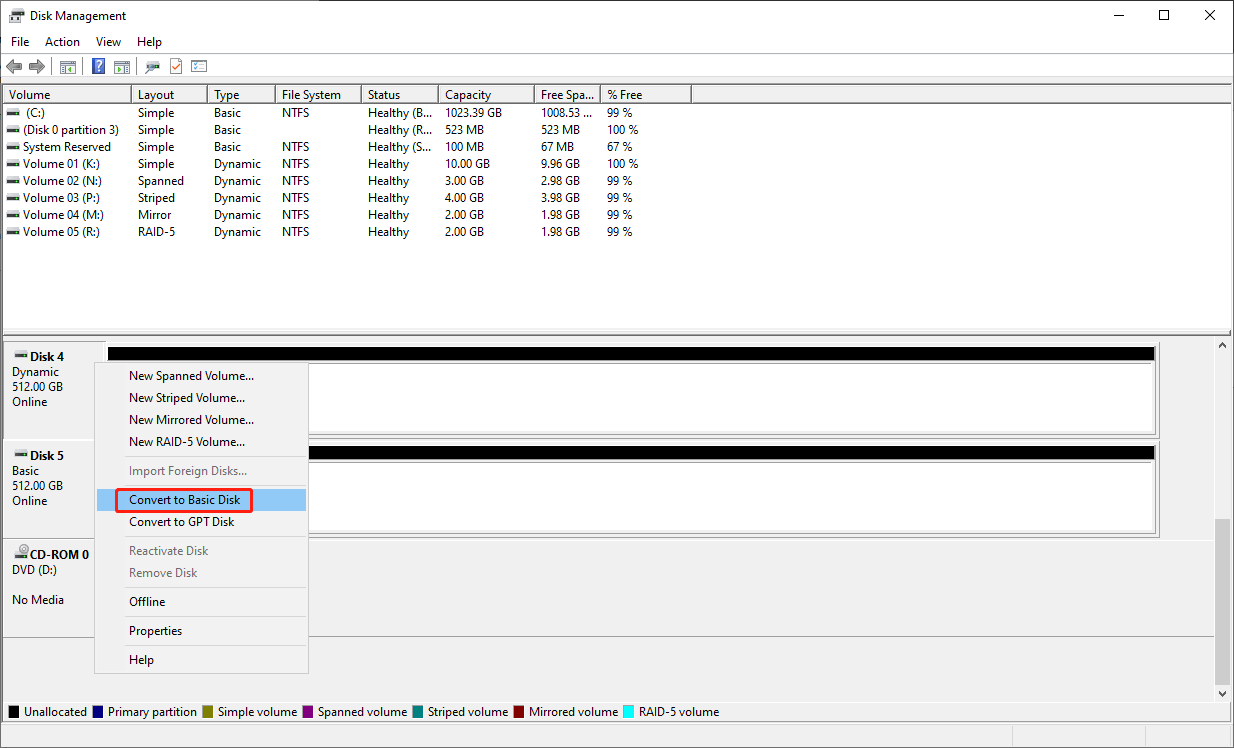
6. Convert to Basic Disk
The Convert to Basic Disk feature in Windows Disk Management is used to convert a dynamic disk to a basic disk due to its easier management and flexible system installation.
That saidhow to convert dynamic disk to basic disk?
Two scenarios for your reference:
- If the dynamic disk has dynamic volumes on itthe Convert to Basic Disk feature is greyed out. In this caseyou need to delete volumes one by one . After thatthe dynamic disk will turn to basic disk automatically.
- If the dynamic disk has no volumes on it and all the disk space shows Unallocatedyou need to right-click on the dymamic disk and choose the Convert to Basic Disk feature to make the conversion.
7. Convert to GPT/MBR Disk
Understanding GPT and MBR
GPT stands for GUID Partition Table and MBR stands for Master Boot Record. They are different partition s used to structure data on a disk.
MBR is an older formatwhich supports up to 4 primary partitions within 2TB of disk. It is widely compatible with older operating systems. Howeverit has limitations in modern computing environments. MBR works with the legacy BIOS mode.
On the other handGPT is an advanced partition that can deal with a disk larger than 2TB and supports up to 128 primary partitions. And it requires UEFI for booting on Windows. AdditionallyGPT includes CRC32 checksums and partition table backupwhich can reduce the risk of corruption.
>> Learn more information about GPT vs. MBR.
How to convert dynamic disk to GPT/MBR disk?
If you want to convert a dynamic disk to GPT or MBR in Disk Managementyou have to convert dynamic disk to basic disk first. Otherwisethe Convert to GPT Disk or Convert to MBR Disk feature is unavailable. Alsoconverting dynamic disk to basic disk in Disk Manangement requires all volumes deletionso you need to back up important data on the target dynamic disk first of all.
For the datailscheck these guides in this article:
- Manage Dynamic Disk ->Convert to Basic Disk
- Manage Basic Disk -> Convert to MBR Disk
- Manage Basic Disk ->Convert to GPT Disk
8. Reactivate Disk
The Reactivate Disk feature in Disk Management can help you restore a dynamic disk that contains some failed volumes. By using this featureyou don’t need to reactivate the failed volumes one by one.
Howeverif the target disk is shown as Offlineyou need to first make it online by right-clicking the disk and choosing Online.
Here is how to reactivate disk:
Right-click the disk and then select Reactivate Disk from the context menu.
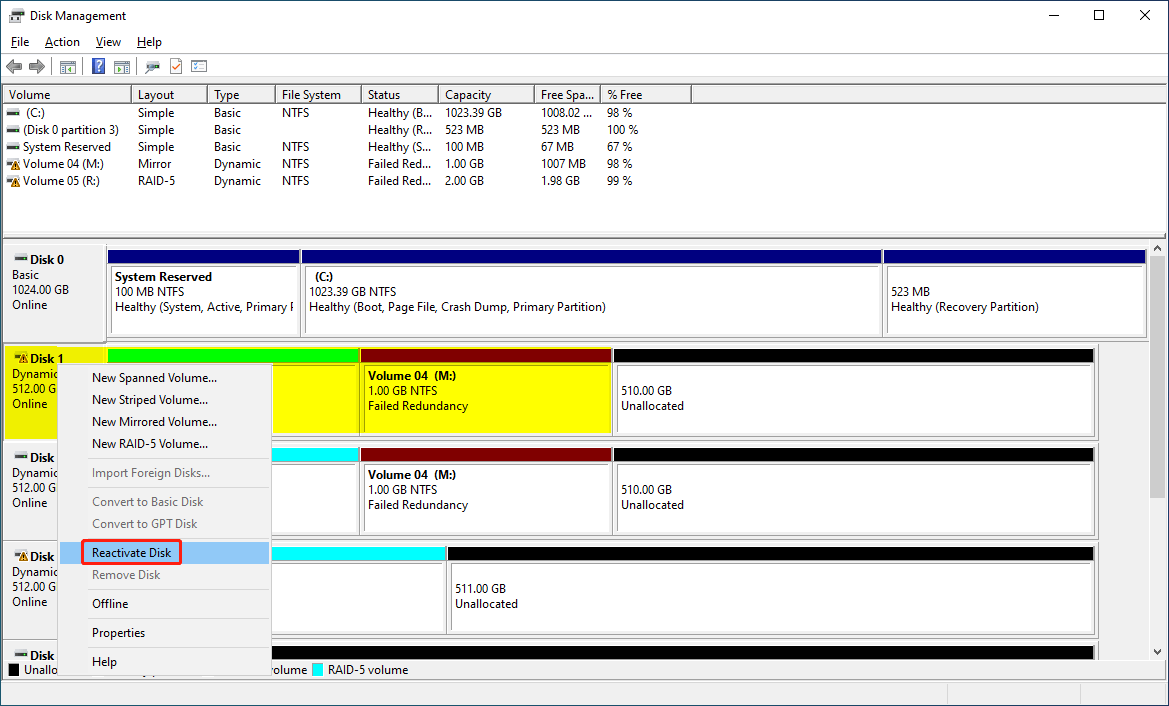
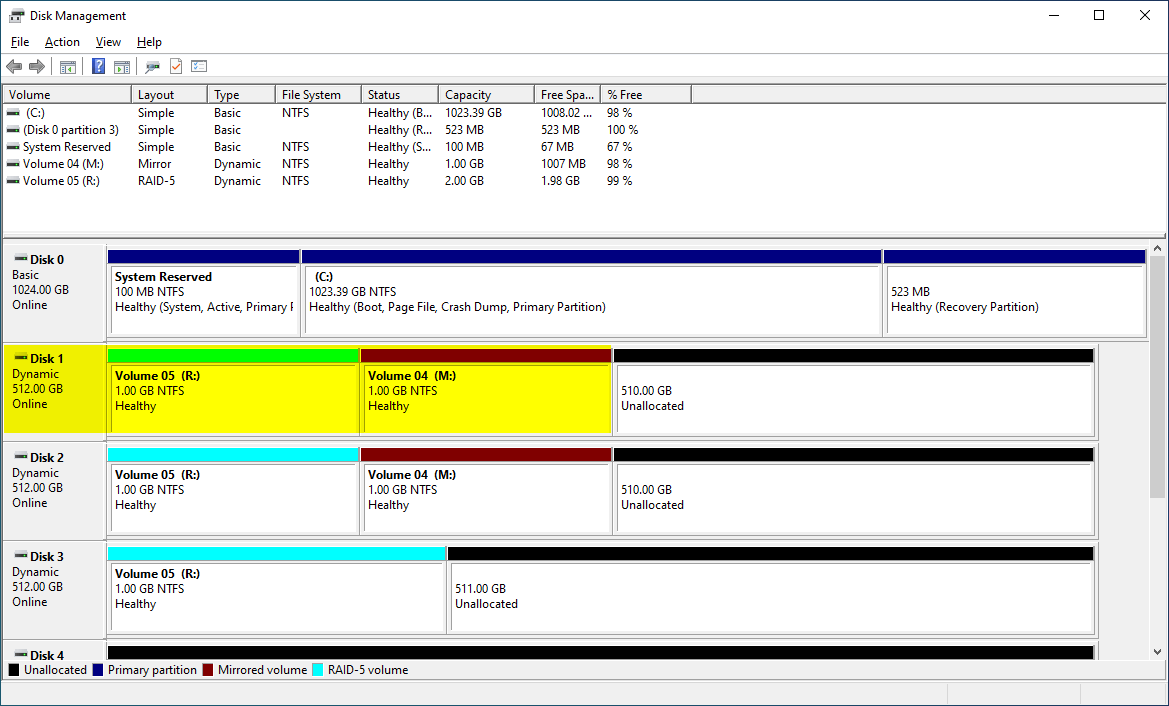
The system will begin to resync data on each volume and then everything will go back to normal.
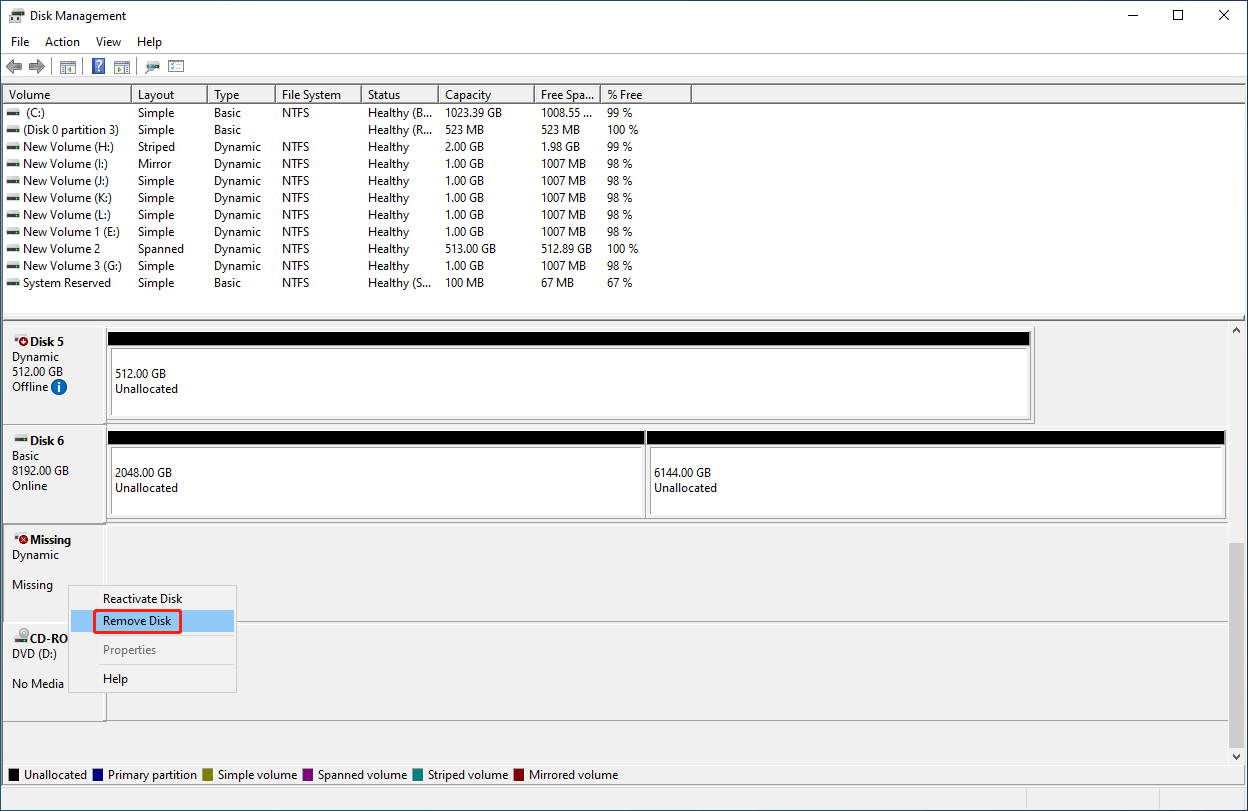
9. Remove Disk
The Remove Disk feature in Disk Management can help you remove a dynamic disk which is shown as missing in Disk Management. By doing thisthe existing disk configuration can be kept.
To remove a dynamic diskyou can right-click on that disk and choose Remove Disk from the context menu. Thenthat missing disk will disappear from the disk list in Disk Management.
10. Offline/Online
The Online/Offline feature in Disk Management allows you to make a disk available or unavailable without physically removing it from the system.
When a disk is marked as Online in Disk Managementit means the disk is active and available for use. Windows can readwriteand manage data on it.
When a disk is marked as Offline in Disk Managementit indicates the disk is temporarily disabled and unavailable for use. Meanwhileyou can’t see the disk in File Explorer and no applications can access it.
How to Make a Dynamic Disk Offline?
To make a dynamic disk offlineyou can right-click that disk and select Offline from the context menu. The selected dynamic disk becomes offline immediately.
Howeveryou should note that the associated spanned volume(s)striped volume(s)mirrored volumeor RAID-5 volume(s) on other disks also failed. To reuse these volumesyou can make the disk online and then reactivate that disk if the mirrored volume or RAID-5 volume needs to resync data.
How to Make a Dynamic Disk Online?
Just right-click the offline dynamic disk and choose Online from the context menu to make the disk available again.
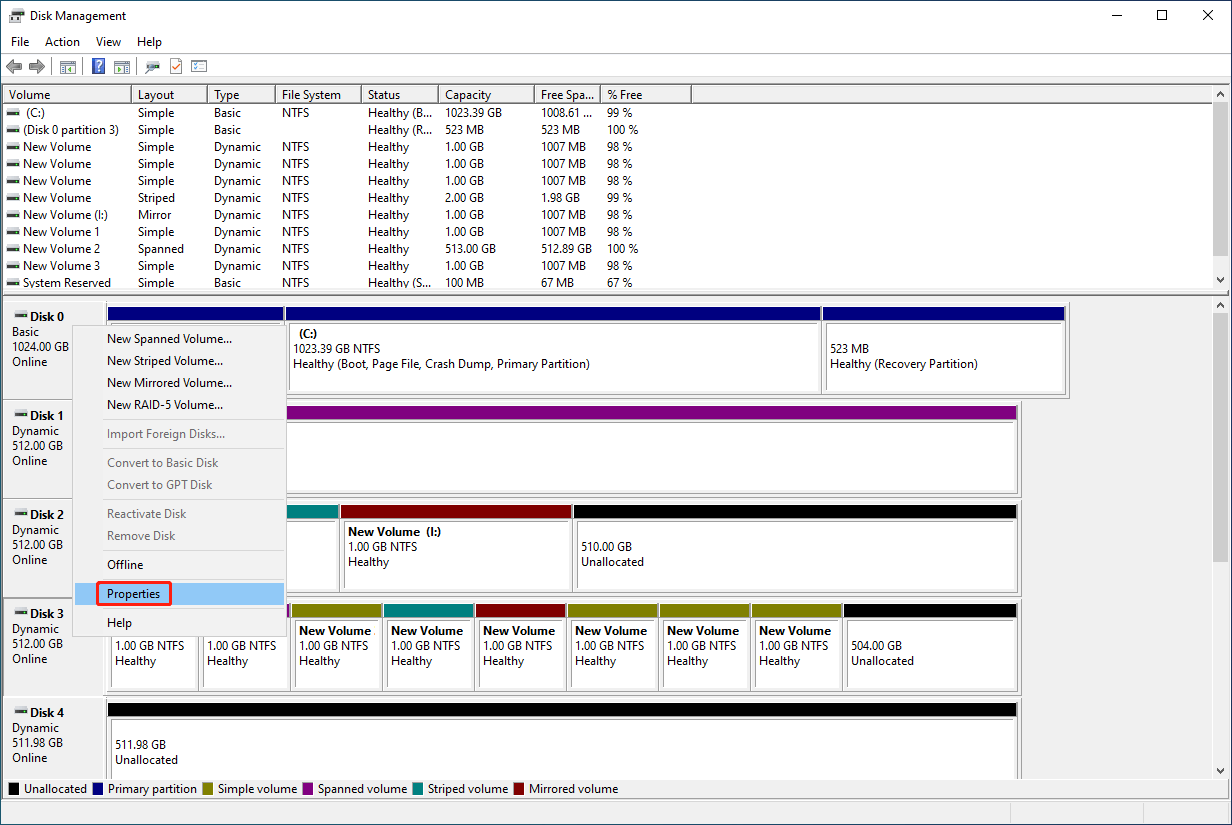
11. Properties
In Disk Managementthe Properties feature provides detailed information about a dynamic disk such as its statuscapacityand hardware details.
To view the properties of a dynamic disk in Disk Managementyou can right-click that disk and select Properties from the context menu.
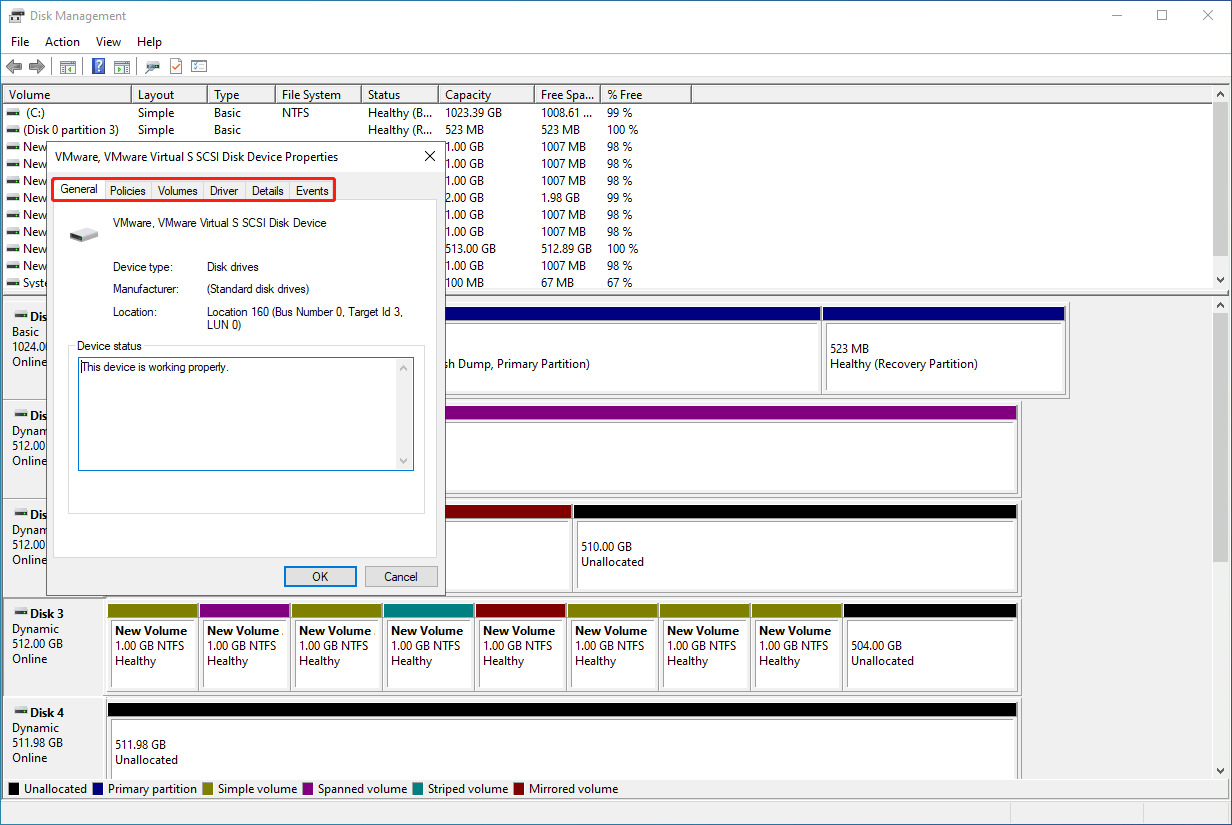
You can see 6 tabs:
- General: Shows the dynamic disk typedevice manufacturelocationand the device status.
- Policies: Offers 2 removal policies: Quick removal and Better performance.
- Volumes: Shows the disk information and lists all volumes on the disk with their capacities.
- Driver: Allows you to view the driver details and updateroll backdisableor uninstall the disk driver.
- Details: Provides advanced information like hardware IDsdriver datedriver versionetc.
- Events: View events information including the timestamp and description.
12. Help
If you select Help from the right-click context menuyou will be navigated to the Windows Disk Management Microsoft Bing search results interface in Microsoft Edge. Thenyou can go to Help in Disk Management to view more information about Windows Disk Management. You can also view other related search results.

About The Author

Position: Columnist
Rodin is an enthusiastic IT writer focusing on Windows trendsdisk partition management and data recovery. She loves to write and share her idea about the useful tips and tricks on personal computers' maintenance. If you are looking for methods to improve your computer performancemanage hard drives and recover data from different devicesRodin can provide reliable solutions for data management.
User Comments :